About Emergency Update process
This article will show you how to recover your Mitras LX7 in case the device becomes unresponsive due to an interruption during a firmware update.
What you will need…
In order to do this kind of update, you will need the following:
| Item | Purpose |
| Windows computer w/ newest version of GCC installed | Allows you to access and use the tool for the emergency update |
| USB cable | For transmitting the firmware via USB |
| Paperclip or similar tool | For inserting into the side opening of the LX7 |
If you are going to use a metal object, please use caution to not touch any of the surrounding hardware.
In order to access the newest firmware version for your device, you will need to download the newest version of GHL Control Center (GCC). You can find the latest version in our downloads page.
Prepare the LX7 for Emergency Update
- Power ON the LX7.
- Connect the USB cable to an available port on your PC and to the USB port on the LX7.
Activate the USBVCOM driver for the Emergency Update
- On the LX7, press and hold the reset button (located next to the USB port) for approximately 5 seconds, then release. This will put the device in programming mode.
- On your Windows computer, click the Windows search bar and type-in Device Manager, then open it.
Right-click on the Windows logo (lower-left corner of screen) and select Device Manager.
3. With Device Manager opened, you will see an arrow pointing towards Ports (COM & LPT). Click on the arrow and proceed to the next step.
![]()
4. You will see the USBVCOM driver displayed in your Device Manager window. Take note of the COM port number which is shown on your screen.

You will need to know the COM port number for the next step.
If you do not see the USBVCOM driver listed on your computer, the driver must be manually installed. Steps for manually installing this driver can be found here.
Perform the Emergency Update
1. Open the flasher tool.
This tool can be found in the GHL Control Center program directory. Go to “This PC” on your computer, then C:\ProgramFiles(x86)\GHLControlCenter_V1xxx\Tools\Cypress USB DIRECT Programmer\FlashUSB
![]()

2. Change the settings on the flasher tool to the following:
Target MCU: MB9BF506N/R
Hex File: Click OPEN and navigate to the Mitras LX7 firmware file you want to use
COM (1 – 256): Type-in the COM number that was listed beside “USBVCOM” in your Device Manager
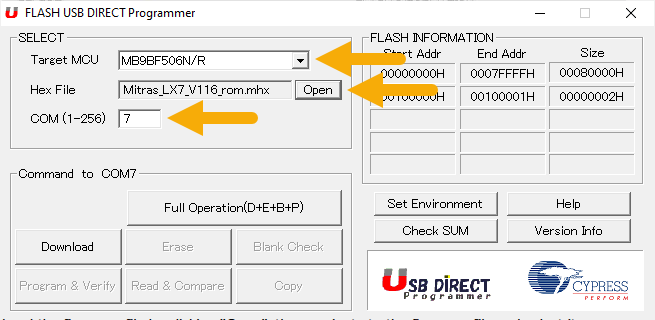
The firmware file for the LX7 can be found in the program directory of GHL Control Center. When you click OPEN, select “This PC”, then C:\ProgramFiles\GHLControlCenter_V1xxx\Firmware\Mitras LX7
3. Click Full Operation to start the update.
4. When the message below pops up, press and hold the reset button for at least 5 seconds, then release and click “OK” to proceed.
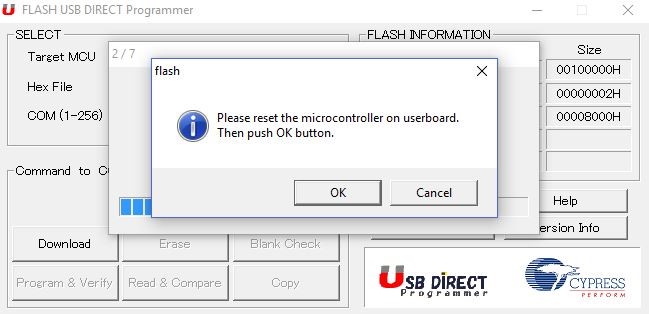
If you get an error after clicking Full Operation, that means either the wrong COM port number was selected or the LX7 did not go into download mode. In this case, check your settings and click on “Full Operation” again, then press the reset button on the LX7 for at least 5 seconds, then click “OK”.
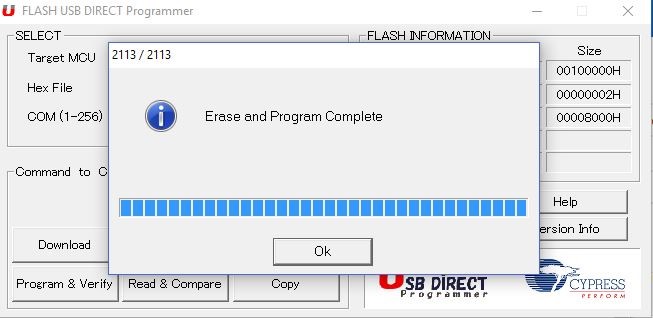
5. If the download was successful, click “OK” and exit the flasher tool (close the program).
6. Briefly press the reset button on the LX7 and the device will restart with the new firmware.