About 1-10V pump control
ProfiLux controllers have the ability to control any 1-10V compatible flow or return pump. With the correct cables and accessories, any 1-10V pump can be set to react according to the flow control settings you create.
Since the applications for each pump will vary, this article will provide a general overview of what you need to do to get your pump up and running.
Before you begin
- If you are not familiar yet with the operating concept of the ProfiLux Controller, we highly recommend to first read the Knowledgebase Article “How the ProfiLux Controller works“. It gives you an understanding of the basics and the operational concept of the controller
- Make sure you have all the correct parts on-hand. (See also list below)
Choose one specific to your needs…
In order for the ProfiLux to control a 1-10V pump, a GHL compatible control cable is required. In most cases, this cable can be sourced from the pump manufacturer. For example, Abyzz, Tunze, and Royal Exclusiv offer GHL compatible cables.
If a GHL-specific control cable is not available from the manufacturer or there is only an RJ-45 control cable available, you can still connect it to the ProfiLux by cutting the end of the cable and connecting it to our breakout box accessory.
| (Accessory) | (Purpose) |
| S-Port & L-Port breakout box (PL-1680) | For connecting a 1-10V pump when a GHL-specific control cable is not available from the pump manufacturer |
| Tunze 1 cable (PL-0087) | For controlling compatible Tunze stream pumps on odd-numbered 1-10V channels (1, 3, 5, etc.) |
| Tunze 2 cable (PL-0088) | For controlling compatible Tunze stream pumps on even-numbered 1-10V channels (2, 4, 6, etc.) |
| Optional: YL-2 splitter cable (PL-0096 1m, PL-0097 2.5m, PL-0490 5m) | Allows you to connect 2x 1-10V control cables to a single 1-10V (YELLOW) port on the ProfiLux; available in 1m, 2.5m and 5m lengths |
A single 1-10v port can control 2 independent 1-10V channels
Each 1-10V (Yellow) L-channel port on the ProfiLux, expansion cards and expansion box are capable of controlling 2 separate 1-10V channels. You can access both channels by using our YL2 splitter cable accessory; available in 1m, 2.5m and 5m lengths.

Even though both cable options can be used to control Tunze stream pumps, T1 and T2 cables each control specifically numbered 1-10v channels.
This means…
Tunze 1 cables control pumps on odd-numbered 1-10v channels 1, 3, 5, etc.
Tunze 2 cables control pumps on even-numbered 1-10v channels 2, 4, 6, etc.
For example, if you had 2x Tunze pumps and wanted to connect both to a single 1-10V port on the ProfiLux, you can do this with a T1, T2 and YL2 splitter cable. The splitter can connect to the L1 / L2 (Yellow) port on the ProfiLux and the T1 and T2 cables would connect to the splitter. The T1 cable would communicate on the L1 channel and T2 cable on the L2 channel.
If the pump you want to control requires a breakout box, make sure you’ve read the accompanying manual before proceeding. You will have to connect the wires from the pump control cable to this BO box. To which terminals they connect to, depend on the pump.
Reef Octopus Varios wiring how-to: Click here


Connect your 1-10V control cable to the ProfiLux
- Take the 1-10V control cable and connect one-end to the pump driver or GHL breakout box. Take the other-end of the cable and connect it to an available YELLOW 1-10V port on the ProfiLux
If you are using a YL2 splitter accessory, one port on the splitter will be the 1st L-channel and the other port will be the 2nd L-channel. For example, connecting a YL2 splitter to the ProfiLux L1 / L2 port will make one port on the splitter L1 and other port L2.

1-10V ports (Yellow) on ProfiLux 4 / 4e
If you are connecting the cable to an Expansion Card or Expansion Box 2, the L-channel (1-10V) numbering will continue beyond L5 / L6.
For example, if you have a PLM-4L expansion card on a ProfiLux 4 or 4e, the L-channel numbering would be L7 / L8 for the first port and L9 / L10 for the second port.
If you do not have any L-channel Expansion Cards on your P4 or P4 and instead have an Expansion Box, the L1 / L2 port on the EXB2 would actually be L7 / L8.
Assign pump(s) to a 1-10V interface
In this step, you will assign your 1-10V pump to a 1-10V interface channel in the ProfiLux. This allows the ProfiLux to communicate with your pump(s).
1. Press the Menu icon and select 1-10V interfaces
2. Select the L-channel interface where you have the pump connected
If you have a pump connected to the L1 channel, select L1. If on L2, select L2.
3. Set the function to Pump and select an unused pump number
If this is your first pump, you can select Pump 1. If this is a second pump, select Pump 2.
4. Set the output signal, then press SAVE
The minimum and maximum V signal will depend on the device being used. Most can be set to 1 – 10V. Tunze Stream pumps should be set to 3 – 8V.


Assign pump(s) to a Stream Group
Now that your pump(s) are assigned to their respective 1-10V channels, the next step will be to assign those pumps to a pump group. This allows your pump or pumps to behave as a collective.
1. Press the back-arrow, press the Menu icon, select Extras, select Pump groups
2. Select a Pump group
First time setup: Select Pump group 1. Otherwise, select another group.
3. Press ASSIGN PUMPS, select the pump(s) to assign to this group, then press SAVE
If you assigned Pump 1 in the 1-10V interfaces page, select Pump 1


4. Press the blue-gear icon to the right of the assigned pump

If you are going to control a skimmer pump, make sure to set the Min and Max flow speeds to the same % values so the pump can run at a constant speed.
5. Name this pump and set the pump-specific settings; Min flow %, Max flow %, at night % and thunderstorm %
6. Choose how this pump will react when a feed pause is activated, then choose which FP it will react to.
Uninvolved: Does not react to Feed Pause
At minimum: Runs pump(s) at minimum flow %
OFF: Turns pump(s) OFF
Repeat steps 4 – 6 for each pump you add to this group.
7. Give this pump group a name, then press SAVE.

Setup Pump group behavior and control
Now that your pump(s) is/are assigned to a group, it is time to setup the behavior of the group as a whole. When you are done with this step, your pump(s) will react according to the pump control settings you entered.
Pump group settings offer a wide range of control options. For the purpose of this general article, we will use the Standard program for this setup. It is of course possible to create more complex pump control schedules. If you wish to learn more about the available options, we highly recommend reading this article.
1. Press the blue gear icon to edit the Standard program
2. Give this pump program a name
3. Select the desired MODE
If you are running a skimmer pump or return pump, we recommend you use Permanent mode. This will allow the pump to run at a constant speed. If you are running a closed loop pump, Tunze Stream or another flow pump, choose from the available options.
4. Select the Wave form behavior for the pump(s) in this group
If you are running a skimmer or return pump, select No waves.
5. Select the Waves pattern for this group and press APPLY
If you are running a skimmer or return pump, select Uniform.
6. Save settings


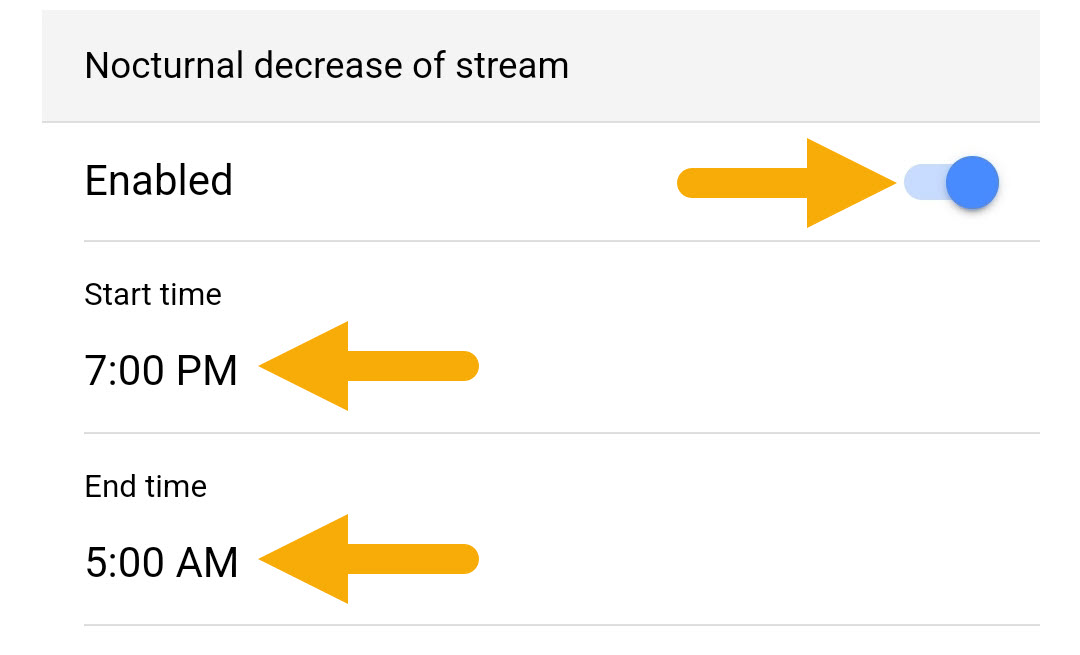
Optional: Nocturnal mode for pump(s)
If you wish to run the pump(s) at a different % at night, use our nocturnal mode feature by enabling it and specifying the start and end times for this mode.
Optional: React to a maintenance mode, Feed pause, etc.
If you would like to have this pump group react to an “activity”, do the following:
- Press ADD
- Give this program a name
- In the “Activation” section, select by activites, then specify which activities shall trigger this Pump group
- In the “Pump activation / tides” section, specify what the pump(s) in this group shall do when the above activities are activated
- Save settings
")
")