

About conditional dosing via pH value
Aside from being able to set up standard dosing schedules, ProfiLux (3 / 4 / 4e) owners have the option to control their dose schedules based on the live pH reading of their aquarium. With this level of control, you can create a dosing schedule that will run ONLY when pH is below a certain value.
This article will show you how to set this up using a Programmable Logic function.
Create your dosing schedule
The first step in the setup process will be to create your dosing schedule using an unused Dosing Pump channel.
1. Press the Menu icon, select Dosing pumps
2. Select an unused Dosing pump channel
(Such as a non-smart single dosing pump)
Select the dosing pump channel you would like to use to create your dosing schedule.
If you are dosing with a GHL Doser pump head…
Select an unused dosing pump channel such as Dosing pump 32 as shown in the example below. This will be your virtual dosing pump which you will use to create your dosing schedule. Later on, we will show you how to tie-in your physical dosing pump so it reacts to this dosing schedule and pH value.
3. Type-in a description for this pump
4. Press the Dosing schedule tab


5. Select a dosing mode and create your dosing schedule

The dosing mode you select will depend on how you want to set your dosing schedule
Automatically: Allows you to specify the number of doses per day, amount per dose and time of the first dose.
For example, if you want to dose 50ml you can set the pump to 5 doses per day and 10ml per dose; 5 x 10ml = 50ml total dose per day. Each dose will be evenly split throughout a 24hr window.
Individually: Allows you to specify the exact time to dose and amount to dose at that time
6. Select a day mode, then press SAVE

The day mode you select will depend on how often you want to dose
Special weekdays: Allows you to choose specific days of the week to run the dose schedule
Day-intervals: Allows you to specify how often to dose and set a dosing delay
For example, Repeat every 3 days = Dose schedule will run every 3 days
Starting in is a delay. If you want to delay the dose, specify by how many days
7. Press the Dosing settings tab. In the Pump settings section, enter the Max flow rate of the physical dosing pump head which will be dispensing your supplement, then press SAVE.
Since this dosing pump channel contains your actual dosing schedule, you will need to enter the correct flow rate here because this is what will trigger the PHYSICAL pump. The flow rate here determines how long the physical motor needs to run so it provides the correct dose amount you are requesting.
Create pH control function
Now that your dosing schedule is made, the next step will be to go to the settings page for the pH probe which will determine when the dosing schedule can or cannot run.
- Press the Menu icon, select Control, select Sensors
- Select the pH probe which you want to use with your dosing schedule
- In the Probe/sensor controls section, type-in your desired pH value (Nominal value) and hysteresis
- Press SAVE
The number you enter here will determine how much of a swing you are willing to allow in-between the nominal value. This determines when the pH control function is triggered.
By default, this value is set to +/- 0.3 pH. This value works for most individuals. If you want a tighter or wider range of control, type in a smaller or larger value.


Create PL function (Combine Dose sch. / pH control)
With your dosing schedule and pH control settings now setup, it’s time to combine these two functions using Programmable Logic.
1. Press the back-arrow, press the Menu icon, press the back-arrow, select Programmable Logic
2. Select an unused PL gate
You are free to choose which ever gate you want. Just make sure you remember which gate number you chose because you will need to know this later in the setup process.
3. Set the function to AND
4. Set Input 1 to Dosing pump, then select the dosing pump channel number where you created your dosing schedule.
Example: Since we created our dosing schedule on Dosing Pump #32, we would choose “Dosing pump 32”
4. Set Input 2 to pH value (select your pH probe), then set the Functional parameter to Control upwards (increase)
5. Press SAVE


Assign PL function to Powerbar socket
Now that you have created a PL function which combines your dosing schedule and pH control settings, the next step will be to assign this PL function to an available Powerbar socket.
This will be the final step for you.
1. Press the Menu icon and select Switch channels
2. Select an available Switch channel…
If your dosing pump is connected directly to a Powerbar socket, select the switch channel where the dosing pump is connected.
If your dosing pump is a GHL Dosing pump head, select an unused switch channel. For example, in the example below we chose Switch channel #10 which is a non-physical powerbar socket in our setup.
3. Type-in a description
4. Set the function to Programmable Logic and select the Gate number you used when you created the PL function (Dosing sch. / pH control combination).
For example, we created this function on PL gate #10 so we would choose Programmable Logic #10
5. Press SAVE


Set physical dosing pump to react to dosing schedule and pH
For those who are using a GHL Doser pump head to run their dosing schedule, the final step will be to go to the settings page belonging to the physical dosing pump so you can have it react to the PL function which has been assigned to the switch channel.
1. Press the Menu icon, select Dosing pumps
2. Choose your physical dosing pump
Example: Our physical pump is on dosing pump #18, so we will choose this pump.
3. Type-in a description for this physical dosing pump
4. Select Container is EMPTIED
5. If you would like to have your dosages recorded, Enable the feature as shown below


6. Type-in the Capacity of your dosing container, then press REFILL CONTAINER and type-in how many ml are now in your container, then press SAVE
If you would like the ProfiLux to notify you when the container is at or below the minimum threshold, enable the option “Alarm if below minimum” and specify the min.point.

7. Type-in the flow rate of your dosing pump (ml / min).
If you are using a GHL Doser, you have the option to change the speed of the pump. The speed you choose depends on the amount you want to dose each time. We recommend GHL Doser users to calibrate their pump head by following the steps shown here.

The speed you choose to run your GHL pump at will depend on the amount you wish to dose in a single cycle and the accuracy required. Here are some recommendations on choosing the correct speed:
Speed (0): Choose this if you want to do single doses smaller than 0.5ml
Speed (0) or (1): Choose this if you require 0.1ml dosing increments; 4.7ml or 15.3ml
Speed (2) or (3): Choose this if your single dose amounts will be 1ml or greater
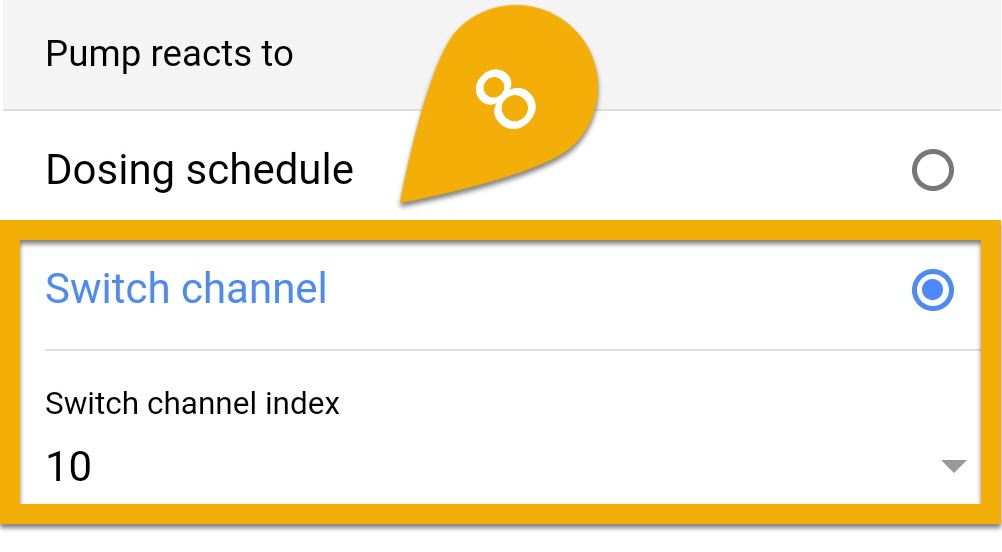
8. Set the pump to react to a Switch channel, then select the switch channel number where you assigned the PL function to.
For example, since we assigned our PL function on Switch channel #10 we will choose Switch channel Index #10
9. Press SAVE
With all the steps completed, the ProfiLux will now run the set dosing schedule ONLY when your pH value is below your desired value.
If pH rises above the desired (nominal) value, the ProfiLux will PAUSE the dosing schedule UNTIL pH has fallen below the nominal value.