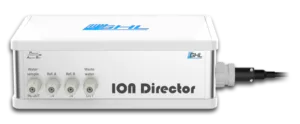
About this article
This article will provide you with tips and troubleshooting guides for your ION Director. If you still require assistance, please use the ticket system so we can provide further support.
ION Director manual
This article is a supplement to the existing ION Director manual. We highly recommend you download and follow the latest instructions provided there.
The manual can be found in our download area.
General IOND measurement info
In this section we will explain how to check and fine-tune the measurement accuracy of the ION Director and how to have the IOND react to “false readings”.
— Achieving maximum accuracy
In order for the IOND to give you the most accurate results possible, these conditions must be met…
- Use the flex-PVC tubing that is included with the IOND
- Dosing pump heads are accurately calibrated using a graduated cylinder or digital scale (recommended)
- Keep the IOND tubes as short as possible. The length of the Reference fluids should be kept under 100 cm or 40 inches.
- Reference fluid tubes must be fully primed; no air bubbles should be in these tubes
- The amount you enter into the Sample volume field MUST be 100% correct. An incorrectly entered amount will result in skewed test results!
— IOND results vs. traditional test kits
Due to the significant differences in testing technology and measurement processes, the IOND is in a class of its own. For this reason, we do not recommend using these conventional kits as a baseline for confirming the accuracy of your ION Director.
WHY?
Our research and observations show that traditional testing methods do not offer a degree of repeatability when compared to the IOND. For example, many of these kinds of kits provide a repeatability of 5% under real conditions. Seeing an actual tolerance of 10% or more with these kits are also not uncommon.
When one considers the measurement processes of the IOND, it becomes easier to see and understand that the IOND is much more consistent in the way it measures your water. Compared to the IOND, regular test kits are prone to variables such as:
- Fingerprints on the measurement vial
- Dust and solids in sample and/or measurement vial
- Varying perception of ending-color result
- Varying perception of mL amount in syringe
- Age of reagent liquid or powder
- And more…
Factors like these are product and user dependent. These are also factors which DO NOT affect the ION Director’s ability to accurately measure your water; provided pump heads are accurately calibrated, instructions are followed, and device is properly maintained.
As mentioned above, due to the different measurement processes and technologies used between the IOND and traditional kits, using these kind of kits as a point of reference is not ideal. The best way to verify and fine-tune the accuracy of the IOND is to use a reference point that has fixed values which have been lab verified.
You will find exactly this when you use the GHL Multi-Reference Solution (PL-1899).
With this reference solution, you can use the IOND to measure a sample of this solution. Based on the results of this measurement, you can use the “offset” feature to fine-tune the end results of each measurement.
— IOND results vs. ICP test results
Although ICP testing provides hobbyists with a high-tech method for testing water, that is not to say that these numbers are absolute and without error. As with all measuring instruments, even ICP instruments have tolerances and margins of error. ICP labs also have maintenance intervals that must be followed otherwise the machine’s accuracy will suffer.
Unfortunately, the hobbyist has no way of confirming the maintenance practices of ICP labs and are therefore left with the hopes that their results come from a well-maintained machine. For example, if a user sends their water sample (taken the same day) to multiple ICP testing services, each lab may provide very different results…but which one is right?
For this reason, comparing ICP results to IOND results is not the best method for verifying IOND numbers.
The best way to verify and fine-tune the accuracy of the IOND is to use a reference point that has fixed values which have been lab verified.
You will find exactly this when you use the GHL Multi-Reference Solution (PL-1899).
With this reference solution, you can use the IOND to measure a sample of this solution. Based on the results of this measurement, you can use the “offset” feature to fine-tune the end results of each measurement.
— Using the IOND “Offset” feature
The IOND Offset feature allows you to adjust the end-result of each measured parameter. This feature modifies the IOND’s lab grade precision and should only be used if you would rather see the IOND results match the outcome of another testing instrument.
To use this feature:
- Go to the IOND settings page and press the Control and alarms tab
- For each parameter, type-in the value you wish to adjust the end result by (+ / -)
— Using the “Double-check” feature
The Double-check feature allows the IOND to run an additional test if one or more parameter result shows an abnormal value. What qualifies as an “abnormal” value is determined by the value you enter into the double-check field. If the result for one parameter deviates by more than the specified amount, the IOND will run an additional test.
To use this feature:
- Type-in the value which will trigger the double-check feature.
For example, if the double-check value for CALCIUM is set to 50 mg/L and last IOND measured calcium value was 400…when the IOND does another test, if the new result is 350 (and lower) or 450 (and higher), the IOND will run another test. If this new result is within the 50 mg/L boundary, the previous result will be discarded.
— How to use GHL Multi-Reference Solution
The Multi-Reference solution is the perfect tool for fine-tuning and verifying the results you are getting from the ION Director. In order to properly use this bottle, follow the instructions provided below.
- Remove water sample tube from aquarium
- Manually run the water sample pump until the tube is empty up to the IOND inlet
- Wipe the end of the tube and INSERT IGNORE INTO Multi-ref bottle
- Manually run the water sample pump until the tube is filled up to the IOND inlet
- In IOND settings page, press Prepare measurement cell
- Press Start measurement now
- View measurement results and use “offset” feature to adjust final numbers according to the fixed parameters on the Multi-ref bottle

After using the solution…
- Remove water sample tube from bottle
- Manually run the water sample pump until the tube is empty up to the IOND inlet
- Wipe the end of the tube and insert back into the aquarium
- Manually run the water sample pump until the tube is filled up to the IOND inlet
- Press Prepare measurement cell
- IOND can now resume normal operation according to the set measurement schedule
— How to add IOND results to email notifications (ProfiLux 3 / 4E / 4 only)
If you would like to see your IOND’s last measurement results in your email notification, add the following token to your new or existing email body:
Calcium:$$SENV[i0]$$
Magnésium:$$SENV[i1]$$
Potassium:$$SENV[i2]$$
Sodium:$$SENV[i3]$$
Nitrate:$$SENV[i4]$$
Maintaining your IOND
Even though the ION Director is mostly maintenance free, there are however some parts which do require some attention. This section will show you how to service and maintain your device.
— Replacing the MUI sensor
The MUI sensor is a wear part which is regularly monitored by the sensor performance check feature. When the time comes to replace the sensor, follow these steps to ensure proper removal and replacement of the sensor.
1. Set the IOND measurements per day to (0)
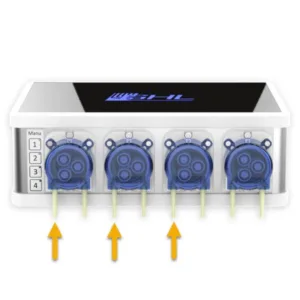
2. Disconnect dosing pump feed tubes as shown
3. Press Empty measurement cell completely
4. Turn the probe locking nut counter-clockwise to loosen the fitting…DO NOT unscrew completely!
5. Disconnect MUI sensor and remove from IOND body
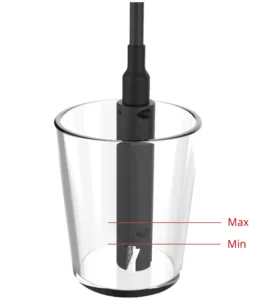
Prepare NEW MUI sensor
6. Unpack the new sensor and let it soak in a cup of tap water or DI water for at least 30 minutes
7. Connect and install new sensor to IOND
8. In IOND settings page, press Prepare measurement cell, then wait 12 hours before doing a measurement with the new sensor
— Servicing Doser pump heads
Depending on how often you are testing with the IOND, there will come a time when the dosing pump’s cap and rollers need servicing. If you are noticing increased noise coming from one or more dosing pump head, we recommend doing the following:
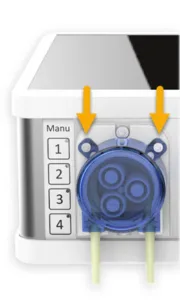
- Using a T8 Torx screwdriver, remove the two screws on the side of the pump head (as shown) and gently pull off the blue cap.
- Remove the 3 white rollers and 3-pronged piece which holds the rollers in-place
- Remove the tube from the head
- Soak all parts (cap, rollers, roller holder and tube) in a bowl of lukewarm water for 10-15 minutes, then reassemble.
For more info on Doser 2.1 / 2.2 maintenance tips and care, click here.
Troubleshooting the IOND
If you’re having some trouble with your IOND, use this section as a starting point for resolving any issues you are having. If you still require assistance, please use the ticket system so we can provide further support.
— MUI sensor is showing 0%
If your MUI sensor is reporting 0% health, do the following checks:
Possible cause: MUI sensor cable connection to IOND is loose
Solution: Check cable connection and run a new IOND test
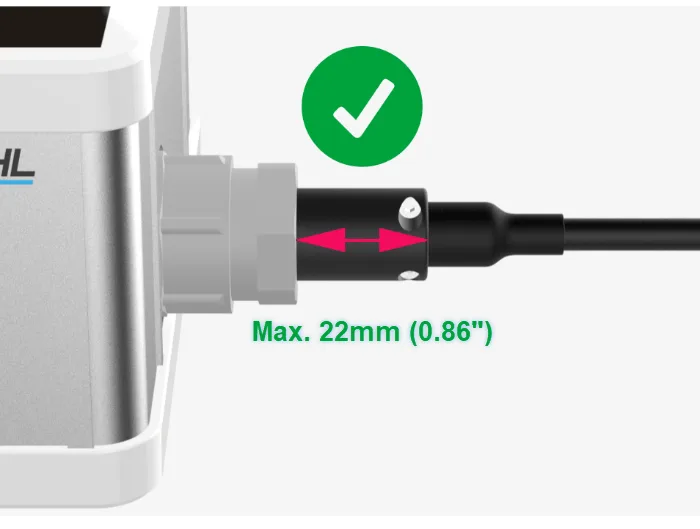
Possible cause: MUI sensor is not fully inserted
Solution: Confirm sensor is correctly inserted; see illustration below

Possible cause: Air bubble injected into water sample, reference or waste water line
Solution: Go to the IOND settings page and select Prepare measurement cell, wait at least 6 hours, then perform a new measurement
Possible cause: MUI sensor fitting is not tight enough and allowing for air to slowly creep inside
Solution: Check MUI sensor fitting and tighten it some more, but be careful not to overtighten and damage the sensor
Problem: Sensor is under 3 months old
Solution: Open a support ticket for further assistance
— MUI sensor health percentages are fluctuating
Possible cause: MUI sensor is not fully inserted
Solution: Confirm sensor is correctly inserted


Possible cause: MUI sensor fitting is not tight enough and allowing for air to slowly creep inside
Solution: Check MUI sensor fitting and tighten it some more, but be careful not to overtighten and damage the sensor
Possible cause: Air bubble injected into water sample, reference or waste water line
Solution: Go to the IOND settings page and select Prepare measurement cell, wait at least 6 hours, then perform a new measurement
Problem: Sensor is under 3 months old
Solution: Open a support ticket for further assistance
— IOND results widely different from IOND reference solution or other reference point
Possible cause: MUI sensor is not fully inserted
Solution: Confirm sensor is correctly inserted


Possible cause: IOND water sample filter is clogged or dirty
Solution: Replace water sample filter
Possible cause: Dosing pump heads used by IOND are incorrectly calibrated
Solution: Recalibrate pump heads using a digital scale
Possible cause: The water sample tube volume that was entered into the IOND settings is DIFFERENT than the actual sample tube volume
Solution #1: Remeasure the length of your water sample tube (from tank to pump head, inside pump head (4.7″), from pump head to IOND) and enter length into IOND water sample tube volume calculator.
Solution #2: Manually fill the water sample tube with tank water, then manually measure how many mL is held inside this tube. Take this amount and enter it into the IOND water sample tube volume field.
Possible cause: Air bubble injected into water sample, reference or waste water line
Solution: Go to the IOND settings page and select Prepare measurement cell, wait at least 2 hours, then perform a new measurement
Possible cause: MUI sensor fitting is not tight enough and allowing for air to slowly creep inside
Solution: Check MUI sensor fitting and tighten it some more, but be careful not to overtighten and damage the sensor
ION Director Sensor Troubleshooting
If you encounter any IOND measurement issues and the above tips did not resolve the problem for you, please refer to this KB article for additional IOND Sensor troubleshooting steps.

