
About this article
This article (part 1 of 3) will show you how to properly setup and configure the KH Director for automatic KH testing. In order for the KHD to provide accurate test results, these steps must be followed exactly as shown.
In order to get the best understanding of how the KH Director is setup and how it works, we highly recommend you read the KH Director manual.
Click here to download the manual.
PART 1: The basics
In this section we will cover the basics:
- Overview of each connector on the KHD
- How to power ON the device
- How to connect PAB cable to device
- How to assign KHD to your primary device
Unpack the contents of your KH Director set box
Inside the box you will find the following:
| KH Director | KHD pH probe | Silicone tubing | KHD water sample filter | PAB cable |
| KHD reagent (500ml) | pH 4 and 7 calibration fluids | Flex PVC tubing | GHL Doser 2.1 SA or EXT | PSU splitter cable |
For the initial setup (part 1) you will need:
| Item | Purpose |
| Contents of KHD set box | For connecting KHD device and doser |
| KHD EXT set owners: Additional PAB cable | For connecting the KHD/Doser set to a ProfiLux or SA Doser |
If you purchased a KH Director EXT set, you will need an additional PAB cable. This cable will be used to connect this set to your master device. PAB cables are offered in various lengths and can be purchased from your preferred GHL dealer or at the GHL store.

— KHD ports overview
A: 24V power port
B: BNC connector for KHD probe
C: Vent / Emergency drain
D: AUX port for future expansion options
E: PAB ports for connecting KHD and Doser together. Also used for expanding GHL system with other PAB devices.

KHD and GHL Doser 2.1 shared PSU
As you were going through the contents of your KHD box, you will see that your KHD did not include its own power supply. Instead it came with a PSU splitter cable. This cable is used to connect the KHD and Doser to the 24V PSU that belongs to the doser itself. In other words, both devices share the same 24V power supply.

A: Water sample inlet is used for feeding the KHD a sample of your aquarium water
B: Reagent inlet is used to feed reagent into the KHD during a KH test
C: Waste water outlet is were water is pulled OUT of the KHD after a test is completed

KHD probe port
On the right-side of the KH Director, you’ll find the probe port for the KHD probe. Here is where you will be installing the probe later-on in the setup process.

— Power ON devices and connect PAB cable
Power ON devices
- Take the power supply splitter cable and connect the Y-ends to the KH Director and Doser
- Connect the tail-end of the splitter cable to the 24V PSU.
NOTE: Make sure you connect ONLY the KHD and Doser to the 24V PSU!

Connect PAB cable to KHD / Doser
Standalone KHD set owners
- Take the 1 PAB cable that was included in the box and connect it to the KHD and Doser.
")
KHD EXT set (For ProfiLux or Doser SA owners)
- Take the 1 PAB cable that was in the box and connect it to the KHD and Doser.
- Take the 2nd PAB cable and connect one-end to either the KHD or Doser. Take the other end of the 2nd cable and connect it to your primary device.

— Download GHL Connect and connect to primary device
- Using your phone or tablet, open up the Google Play store or Apple app store and do a search for GHL Connect.
- Once you’ve found the app, download it and open it up.
- You will be greeted by the initial setup screen. Follow the on-screen prompts until you get to the My Devices page
KHD EXT set owners
- Connect to your primary device using the GHL Connect app
Standalone KHD set owners
1. Connect to your doser’s hotspot network by using your phone or tablet to search for nearby Wi-Fi networks. You will see the GHL-DOSER2 hotspot signal. Select it and wait for your phone or tablet to connect. Once connected, go back into the app.
![]()
2. Press ADD device, select the Doser 2, then press NEXT.
![]()

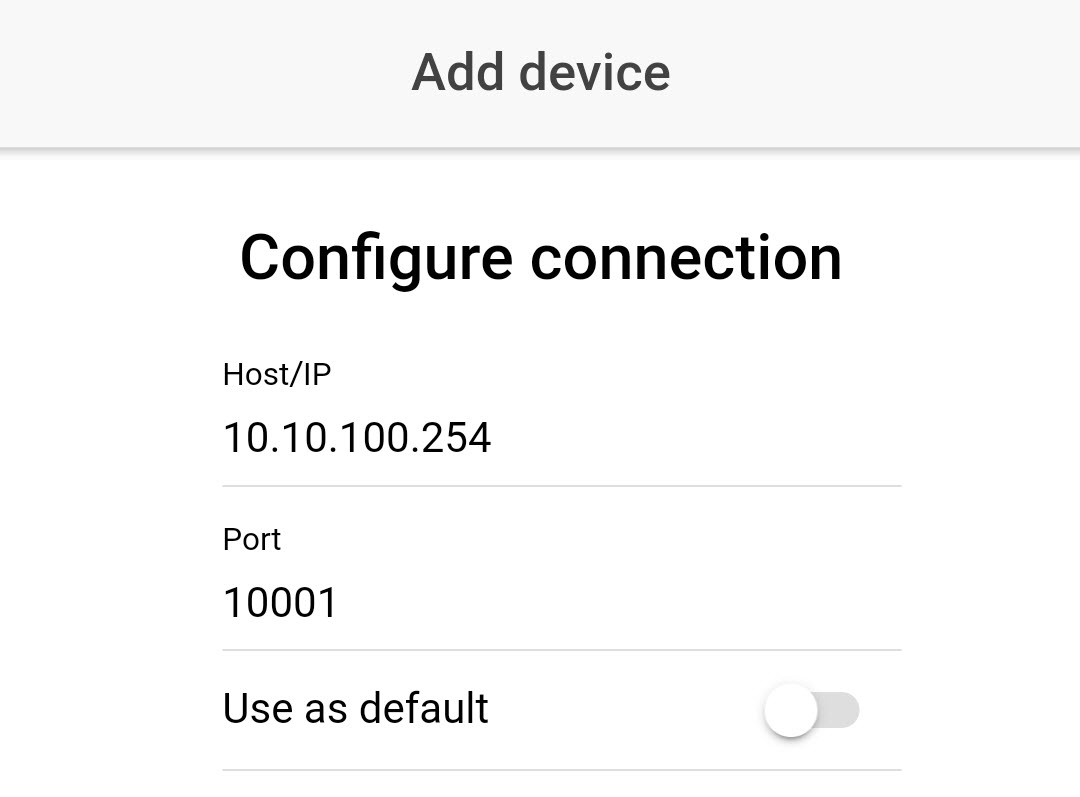
3. Leave the “Configure connection” page as-is and press NEXT.
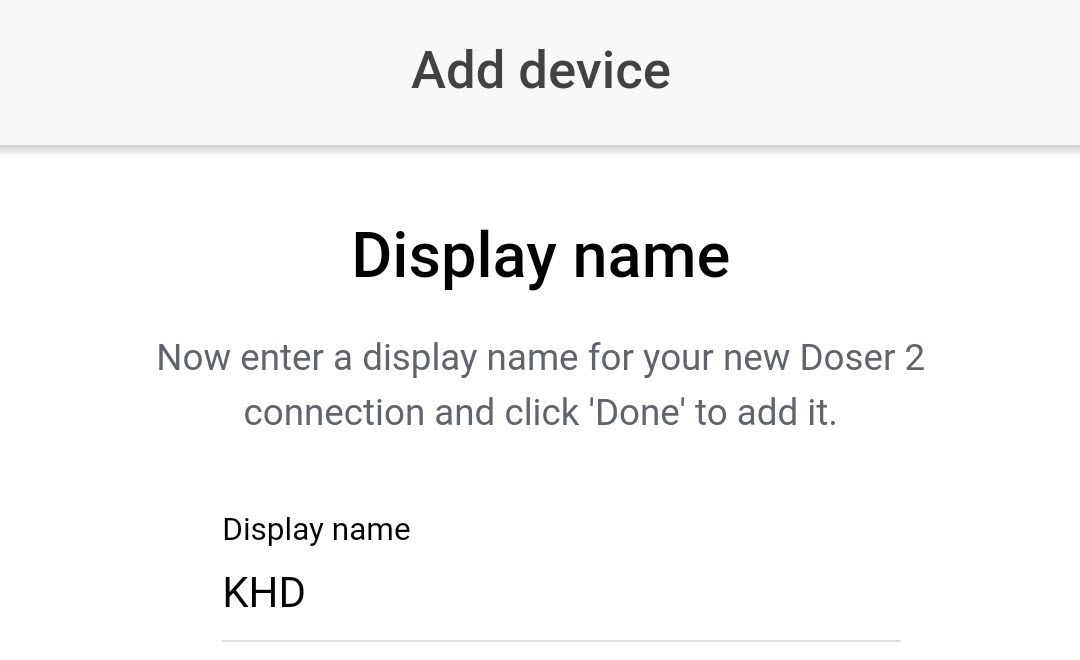
4. Type-in the name you want to give to this doser connection, then press DONE
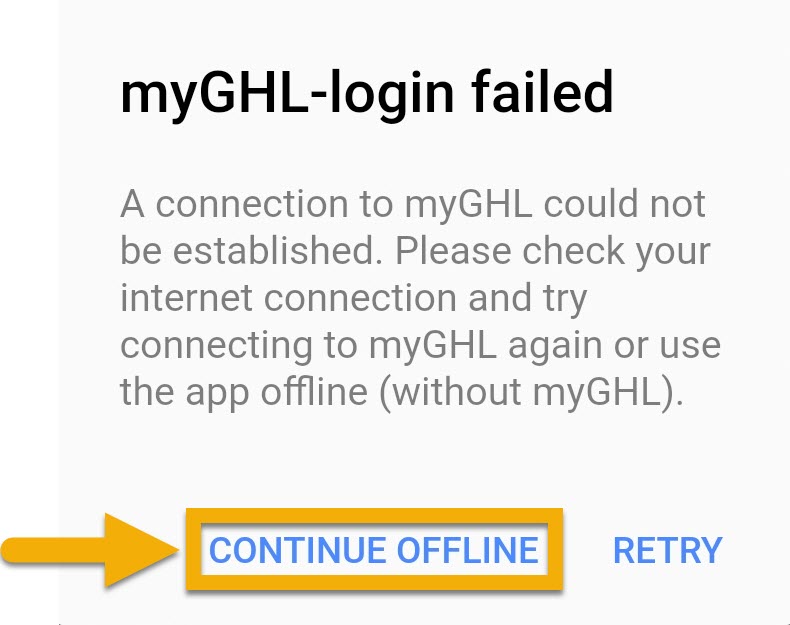
5. When this message appears, press Continue offline. Your new connection will now be listed. Select it to connect.
Once you see the Dashboard, you are officially connected to your primary device!
")
Standalone KHD set owners: CONTINUED
- Press the Menu icon and select General
- Set the time and date
- Set the timezone based on your location
NOTE: The timezone settings allow the KHD to show you the correct date and times of each test
Optional: If you’d like to set an audible alarm or PIN code, you can set that up on the same page
4. Press SAVE


— Assign PAB device
The next step will be to assign the KHD to your primary device. If you have a KHD EXT set, you will also be assigning the EXT doser that was included with the set.
If you purchased a SA KHD set and plan to connect the SA Doser and KHD to an existing SA Doser or ProfiLux (3 / 4) controller, you must first set this SA Doser to EXT MODE before proceeding any further with KHD setup.
This will allow your existing SA Doser or ProfiLux (3 / 4) to control the SA Doser (to be converted to EXT mode).
Click here to learn how to convert a Standalone Doser to EXT mode.
- Press the Menu icon and select System
- Press Assign and configure connected PAB-devices
- Press Assign devices
You will now see a list of devices which have been detected by your primary device.
4. Select the KHD and EXT doser (if you have one).
5. Press SAVE, then confirm by pressing YES
Your devices have now been assigned.


KHD EXT set owners: Set EXT pump numbering
If you have a KHD EXT set, reconnect to your primary device and go back to the PAB settings page. You must now assign the pump numbering of this newly added EXT doser. Press the blue-gear icon to the right of the doser and set the starting number of this dosing unit.
For example, if your primary device is a Standalone Doser 2.1, the numbering for those pumps are already assigned to dosing channels 1-4. By adding a second doser 2.1, the numbering of this doser should be set to begin at dosing pump channel #5. That way, your main doser controls dosing channels 1-4 and your second doser controls dosing channels 5-8.
HOW-TO VIDEO (Part 1)
KH Director Initial Setup (Part 2)
Now that you’ve completed part 1 of the step, you can move onto part 2 which shows you how to cut and install the including tubing, install the water sample filter and calibrate pump heads.