
Congratulations on your purchase!
Thank you for purchasing our product and allowing us to help support your path to successful fishkeeping!
With a Versia Flow, you now own a highly professional piece of equipment that is more than capable of assisting you in your daily monitoring and maintenance routines.
We are confident that our product will help make your hobby more efficient, safe, and ultimately help you spend more time enjoying your aquarium or terrarium.

Get the Most out of your GHL Product
GHL products are well-equipped with simple and intuitive features. In order to get the most out of our products, we recommend you read this instruction manual. Doing so will provide you with the most profound details for using our product.
Visit our Support Forum or meet us on Facebook to become a GHL-Product expert and fully utilize the full range of functions offered from your device!
Safety Instructions
GHL products are built with maximum security and safety in mind. However, product safety for this device can only be guaranteed if you follow these guidelines.
To avoid possible electric shock, special care must be taken since water is employed in the use of aquarium equipment. For each of the following situations, DO NOT attempt repairs by yourself. Please read these instructions carefully before operating a Versia Stream pump.
Anyone who uses this device must become familiar with the following safety instructions and the operation of the device.
Failure to follow these instructions will void any warranty claims.
Be sure to read over the safety instructions provided by this manual; including the respective manuals of other equipment manufacturers.
In this manual, the following symbols are used:
General note, tip or advice.
Important note for operation, to avoid damage to the equipment, and for your safety.
Warning that non-compliance can result in injury or damage to the device.
This equipment must not be used:
- By small children and vulnerable persons with limited physical, sensory or mental capabilities.
- By people who are unfamiliar with the functions of this product.
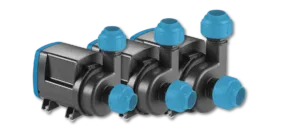
The Versia Flow pump is intended exclusively for use in the domestic area. Versia Flow may only be operated with GHL accessories.
- Make sure that the power cord is plugged into a grounded outlet; otherwise, you could get an electric shock or cause a fire.
- Protect the power cable from damage (For example, twisting, kinking, clamping). Please also pay attention to the joints and connections to the device.
- Disconnect the power plug by pulling the plug, not the cable.
- Never attempt to disassemble, repair or alter the equipment by yourself.
- Do not insert sharp objects into the electrical contacts and ports.
- Make sure the product is securely mounted and installed before operating it.
- Read and observe all the important notices for this product
- If an extension cord is necessary, a cord with a proper rating should be used. A cord rated for less amperes or watts than the product rating may overheat. Care should be taken to arrange the cord so that it will not be tripped over or pulled.
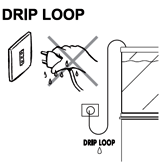
To avoid the possibility of the power plug or receptacle getting wet, use the power cable to create a “drip-loop” for each cord connecting an aquarium appliance to a receptacle. The “drip-loop” is the part of the cord below the level of the receptacle or the connector if an extension cord is used, which prevents water from traveling along the cord and coming in contact with the receptacle.
If the plug or socket does get wet, DO NOT unplug the cord. Instead, disconnect the fuse or circuit breaker that supplies power to the appliance, then unplug and examine for presence of water in the receptacle.
- NEVER operate the pump without water to avoid damage to the pump motor.
- DO NOT run the pump in liquids or in any environment with a temperature exceeding 35°C (95°F).
- Avoid pump use with corrosive or abrasive liquids.
- This pump can only be used in the above-mentioned applicated and is only for indoor use
- This pump has no user serviceable parts.
Technical Specifications
| Technical Data | Versia 6.0 (24 V) | Versia 7.0 (24 V) | Versia 9.0 (24 V) | |
| Flow rate | 220 - 240 V (50 Hz) | 2.000 - 5.500 L/H | 3.000 - 7.000 L/H | 4.000 - 9.000 L/H |
| 110 - 120 V (60 Hz) | 530 - 1,450 US GPH | 800 - 1,900 US GPH | 1,000 - 2,500 US GPH | |
| Head pressure | 220 - 240 V (50 Hz) | 1,0 - 3,5 m | 2,0 - 5,0 m | 2,6 - 7,0 m |
| 110 - 120 V (60 Hz | 3.5 - 11.5 ft | 6.5 - 16.5 ft | 8.5 - 23.0 ft | |
| Wattage | 220 - 240 V (50 Hz) | 10 - 40 W | 20 - 65 W | 30 - 95 W |
| Cable length | 3,0 m | |||
| 10.0 ft |


| Spare Parts | 6.0 | 7.0 | 9.0 | ||
| Rotor + ceramic shaft + O-ring | A | 24 V | |||
| Bottom bearing + hook | B | ||||
| O-ring for prechamber and rotor | C | ||||
| Prechamber with closing ring | D | ||||
| Anti-vibration silicon feet | E | ||||
| Hose fittings for rigid and flexible pipes | F | ||||
| Protective grid | G | ||||
| AC/DC power adapter (EU) | I | ||||
| AC/DC power adapter (USA) | J | ||||
| AC/DC power adapter (UK) | K | ||||
| AC/DC power adapter (AU) | L |
Scope of Delivery
Please check the contents of the product box. The following items should be included:
- Versia Flow pump
- 24V Power Supply
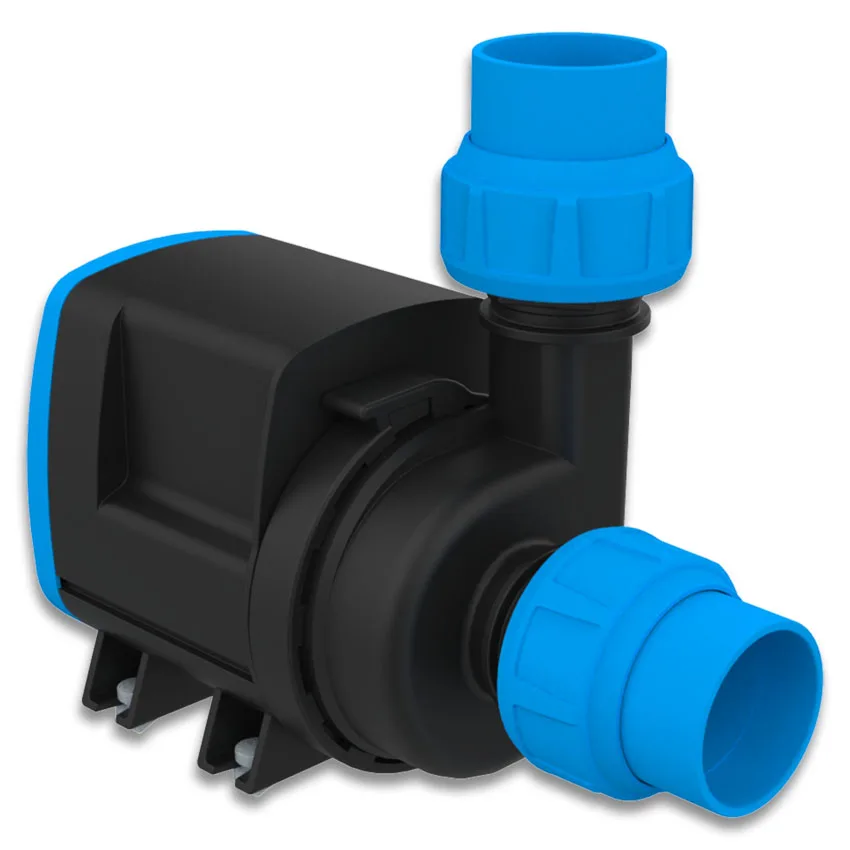
- Hose fittings for rigid and flexible pipes
- Protective grid
- Anti-vibration silicone feet
- Operating and Safety Instructions
Please check to make sure all items are in perfect condition. In case of damage, immediately contact the dealer from whom you purchased the Versia Flow.
A damaged Versia Flow or its components may not be put into operation under any circumstances.
Installing the Versia Flow
- Find a suitable location for the pump; preferably in an area that is easily accessible for maintenance routines.
- Connect all necessary plumbing to pump.
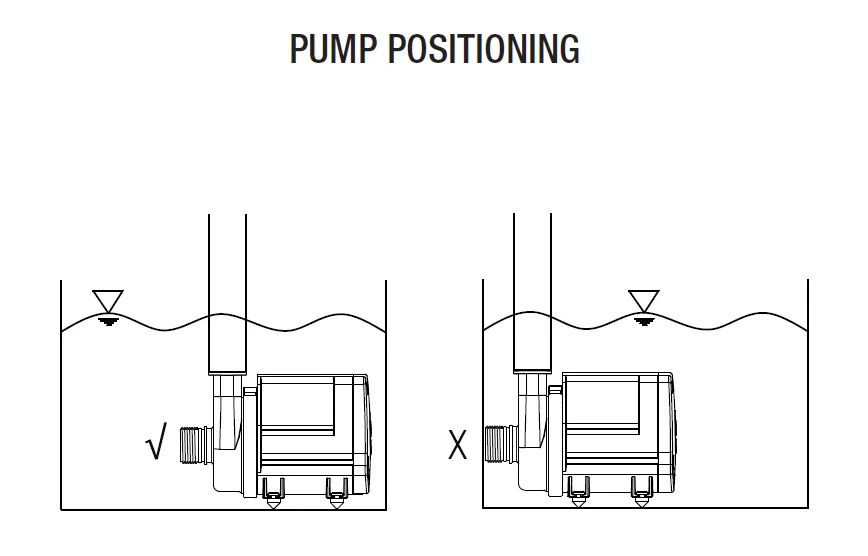
- Submerse pump in water (See Pic.1), then power ON.
When installing the pump, make sure to keep it the inlet away from sump walls!
- Find a suitable location for the pump; preferably in an area that is easily accessible for maintenance routines.
- Connect all necessary plumbing to pump, then power ON.
DO NOT position the pump above the water level; pump is not self-priming!
Failure to follow this guideline puts the pump at risk because it may run dry (See Pic.2).

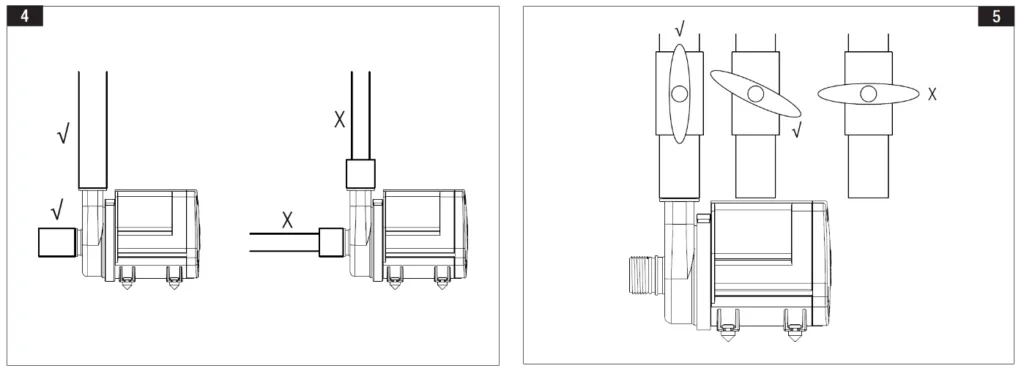
DO NOT use plumbing that is smaller than the diameter of the pump’s inlet and outlet size. (Pic.4).
If installing the pump with a valve, NEVER operate the pump while the valve is completely closed! Minimum water flow is required to keep the inner motor cool without running dry. (Pic.5).
For your convenience, we offer a 2,4 m (7.8 ft) extension cable for connecting the pump to the Versia Controller. If you need this accessory, you will find it in the GHL stores (PL-2089).
The barrel connectors on the extension cable and pump are not waterproof and should therefore NEVER be submerged in water or placed in a splash area.
Operating the Versia Flow
To operate one or more Versia Flow pump, the following GHL products are required:
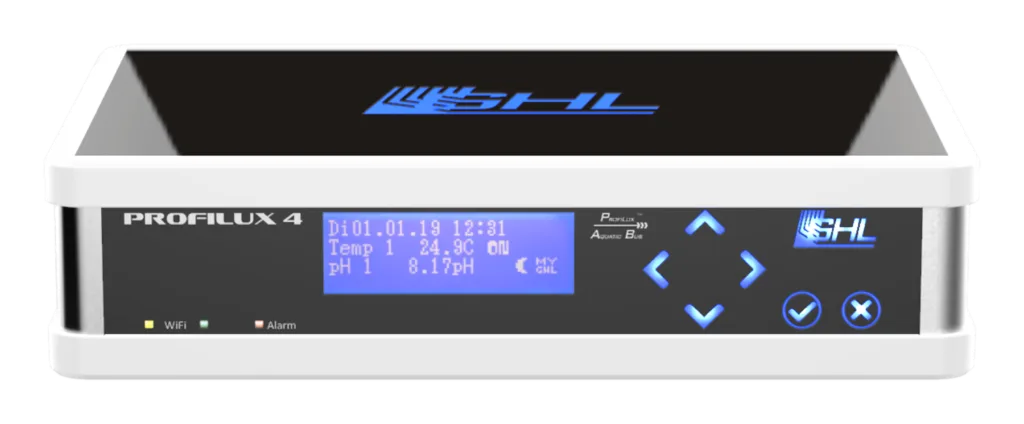
ProfiLux 4 aquarium computer
For setting and programming wave control functions. The Versia Flow connects to the Versia Controller and the Versia Controller connects to the ProfiLux 4 system via a PAB connection.
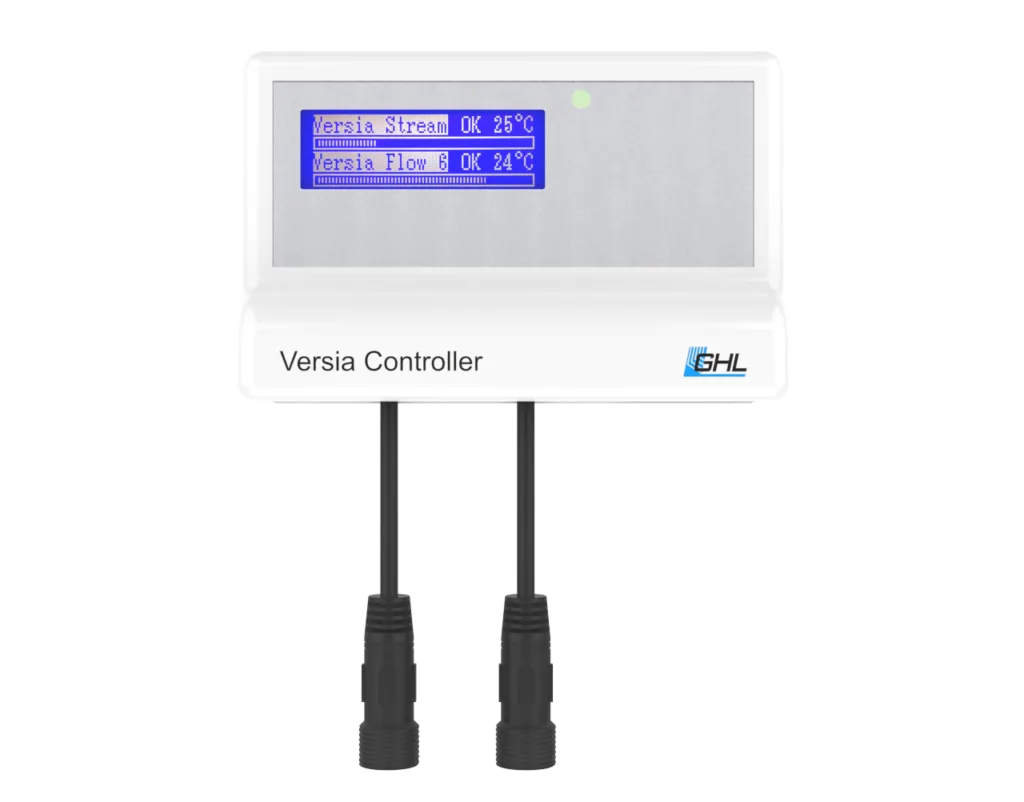
Versia Controller
For connecting Versia pump products to the ProfiLux 4 system. Versia Controller allows for the connection of up to 2 pumps (Versia Stream and/or Flow).
Follow these steps to properly connect your Versia Flow to the Versia Controller.
- Install pump in your aquarium.
- Connect pump cable to an available connector on the Versia Controller. Lock cables by tightening the ring nut.
- Connect pump’s power supply to the pump’s T-fitting.
- See next tab, “Assign Versia Controller to PAB”.

Once your pumps are positioned in the aquarium and cables are connected to the Versia Controller, follow these steps:
Learn how to create your own pump schedule by using this article:
For information on how to setup fallback modes, pump numbering and more, please refer to the article below.
Pump Care & Maintenance
IMPORTANT
The Versia Flow is programmed to provide 3 levels of protection:
- Protection against rotor blockage: In case of malfunction where the rotor becomes locked due to excessive dirt or other internal obstruction, the pump will attempt an infinite number of startup attempts in an effort to get the pump running correctly. In this scenario, the Versia Controller will detect the issue and report an error to the ProfiLux 4.
- Run-dry protection: If the pump is pulled out of the water, it will trigger this feature to protect the motor. In this scenario, the protection measure is the same as above.
- Thermal protection: The built-in monitoring system will automatically turn OFF the pump if the motor block temperature exceeds acceptable operating temperature.
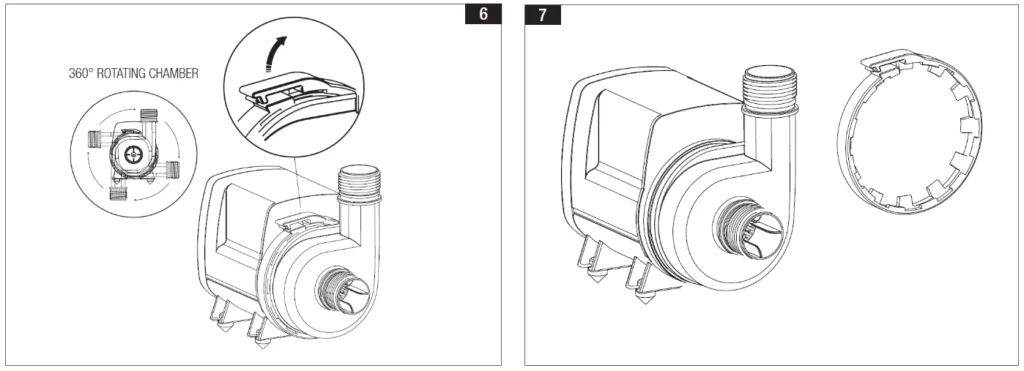
For general pump cleaning, follow these steps:
- Power OFF the pump and take it out of the aquarium.
- Lift the plastic ring of the pump’s volute pulling the tab outwards. (See Pic. 6).
- Remove the ring. (Pic. 7).
- Remove the volute of the pump by turning and simultaneously pulling forward.
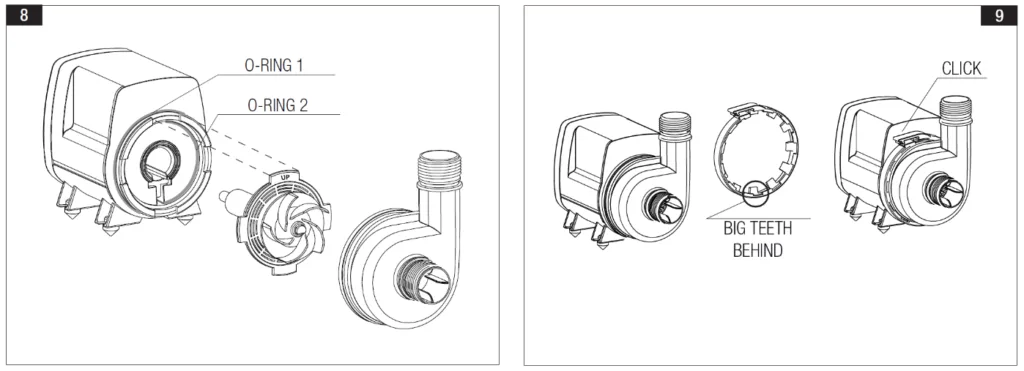
- Pull out the complete rotor set. (Pic. 8).
- Carefully clean each part with fresh water or using a soft brush with soap or vinegar.
- Reassemble everything in the inverse order.
- Put the ring in place with the biggest teeth facing the pump and close it by pressing on the tab until you hear a “click”. (Pic. 9).
Follow these steps if you would like to clean or replace your rotor kit:
- Open the pump by following steps 1 – 5 in the “General maintenance” tab.
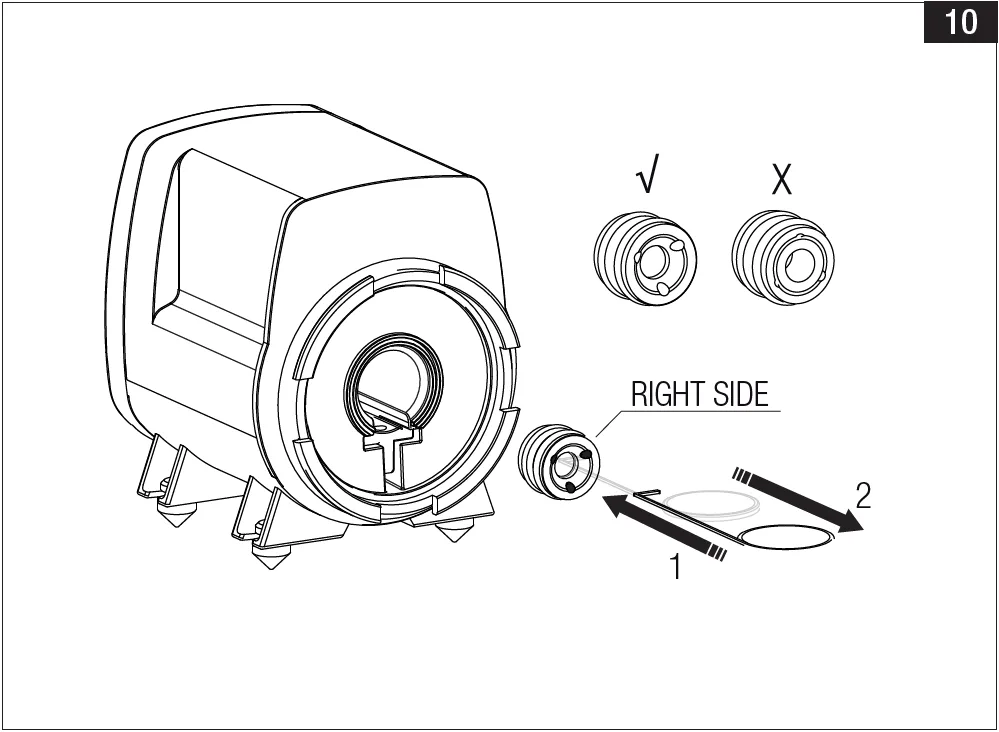
- Insert the hooks supplied inside the tube of the pump (See Pic.10).
- Hook the bearing and pull it out.
- Clean the bearing with a soft brush and water (For harder scale deposits, use a 50:50 mix of water and white vinegar).
- Re-insert the bearing sleeve in the pump (Pic.10) after wetting and pushing it in all the way.

If after the first use, you wish to store the pump for more than one week, we recommend you take the rotor assembly out of the pump. Clean it thoroughly, then store the pump and rotor separately.