Pump Groups minimum requirements:
- ProfiLux 3: At least firmware version 6.47
- ProfiLux 4: At least firmware version 7.32
Not ready to update, yet?
Click here to view the KB article which explains how to use the original Stream Group settings.
Introduction to Pump Groups
The Pump Group settings page is a powerful tool that allows you to create a wide range of wave and flow patterns using any ProfiLux compatible pump; Versia Stream, Versia Flow, any 1-10V pump, via switch channel, etc.
In the ProfiLux, you can have up to 6 individual pump groups. Within each group, you can pick and choose which pumps (up to 16), you want to assign to that group. Each pump group can consist of one or more pumps.
Later on in the article, we will explain the flow control options available to you.
Getting pumps to work within a pump group
In order for your pump(s) to react to the wave control settings within a pump group, you must first choose an empty pump group, then assign the pump(s) which shall react to the control settings you will create.
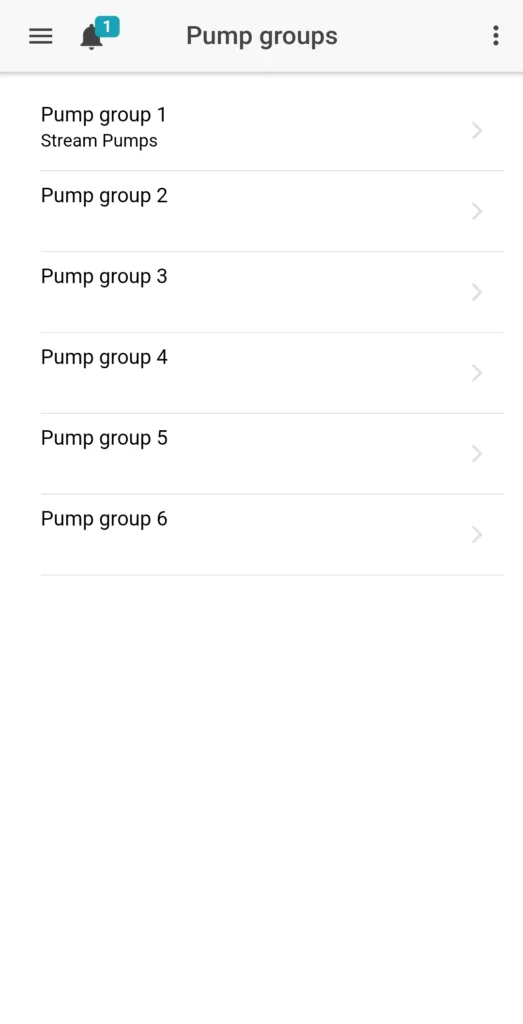
- Choose an available pump group
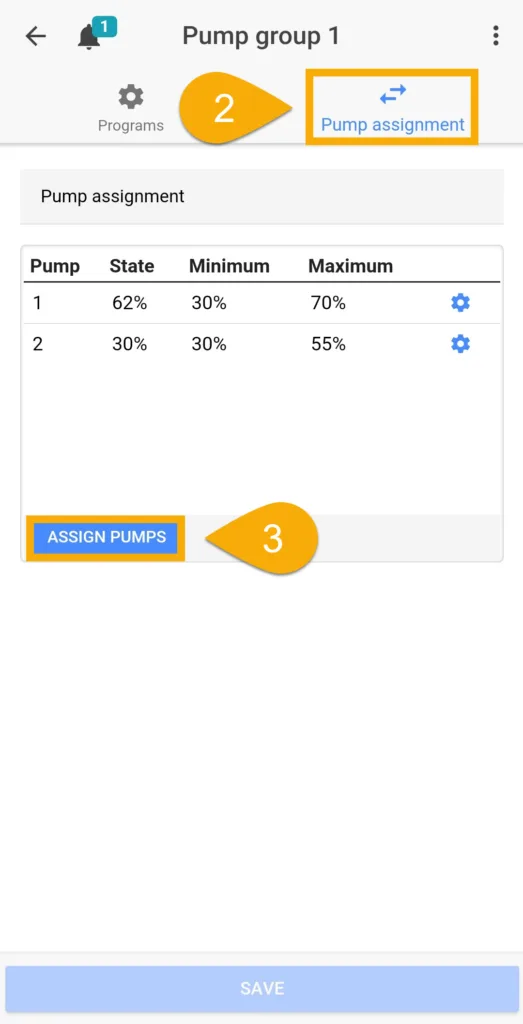
- Press the Pump Assignment tab
- Choose the pumps you want to assign to this group
- Save settings
You will now have the option to set the individual behavior of each assigned pump; min/max flow rate, flow rate a night and thunderstorm, etc.
Individual pump settings EXPLAINED
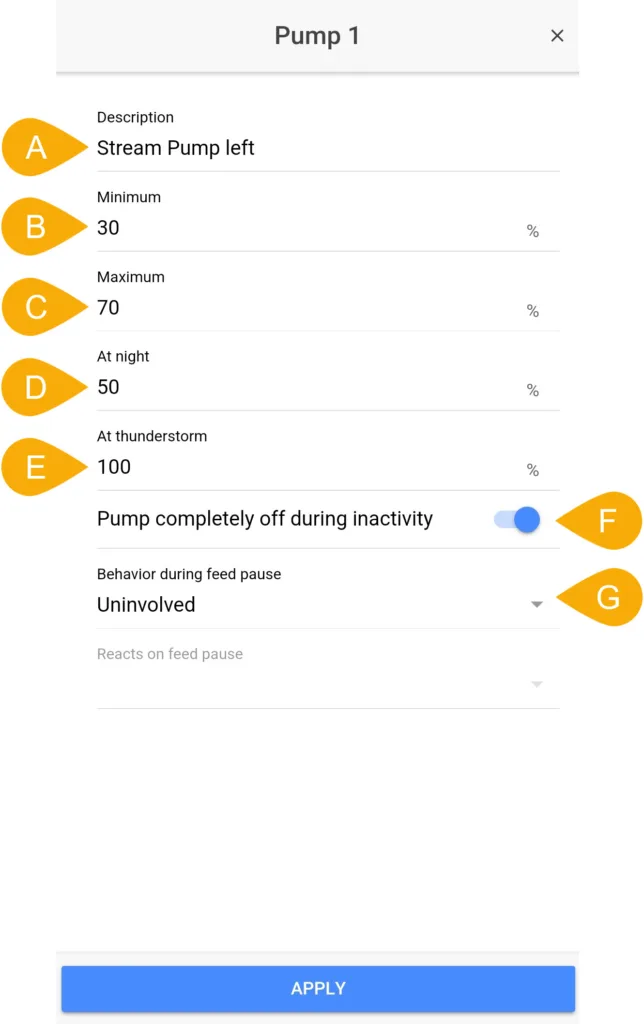
With the pump(s) assigned and settings saved, you can now individually configure the behavior of each pump. Below is an explanation of each option.
- A: Give your pump a name here
- B: Min flow rate of this pump (during wave schedule or if pump inactive)
- C: Max flow rate of this pump (during wave schedule)
- D: Flow rate at night (if using nocturnal mode)
- E: Behavior during thunderstorm mode (if being used)
- F: Turns pump OFF if inactive
- G: Behavior during Feed Pause; run at minimum or OFF completely
Pump Group overview page
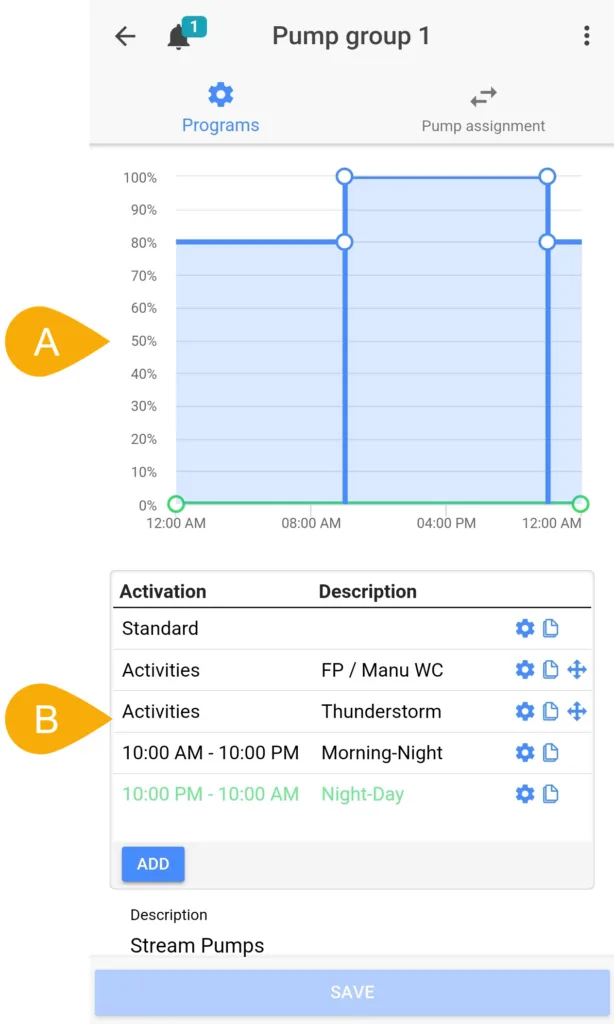
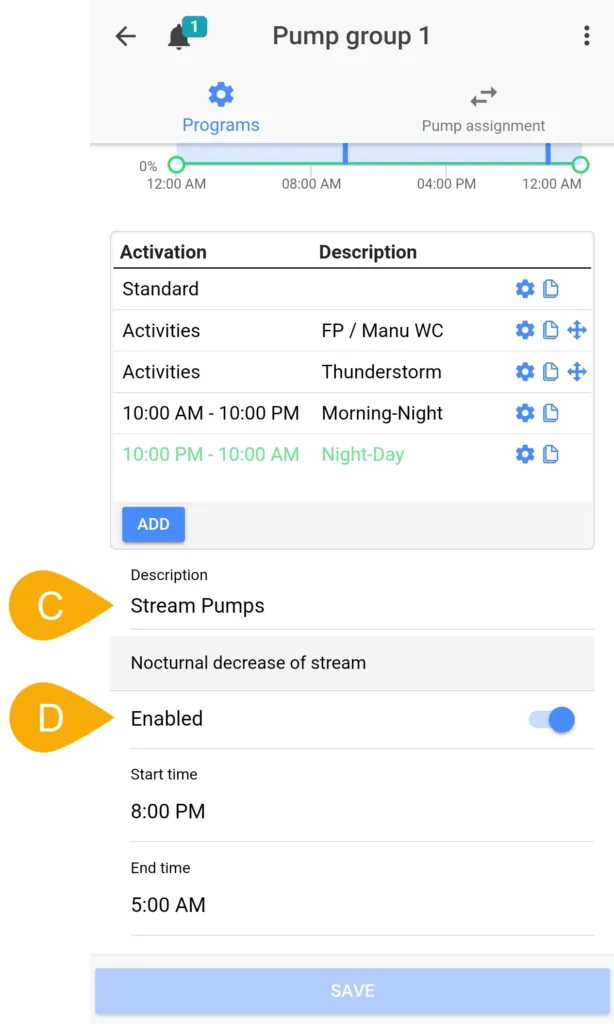
To the right, you can see an example of what a configured pump group looks like. Below is an explanation of each section.
- A: This chart displays the schedule of your group programs. The percentages in the Y-axis correspond to the “wave intensity” of each program. For instance, if a pump’s max flow percentage is set to 100% and the wave intensity in a program is set to 50%, that wave intensity will make the pump run at half (50%) of the maximum flow percentage.
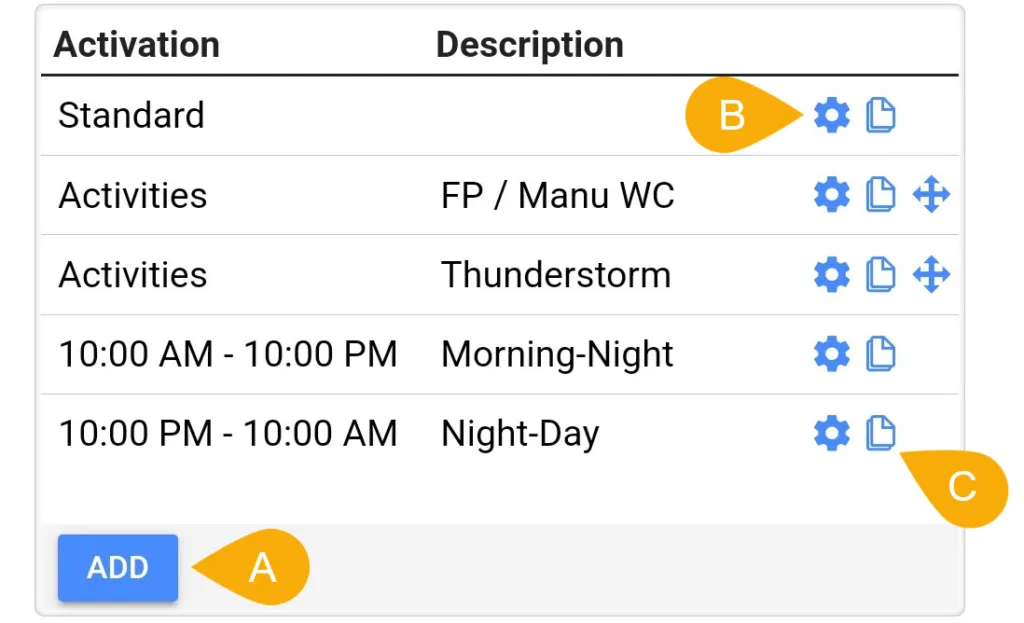
- B: Group programs are displayed here.
Creating a pump program
Before we explain how to create a pump program, we must first go over the basics.
What is a pump program?
Pump programs are used for creating special conditions which pumps in a group will react to. A program can do many things for you and your pump(s). For instance, a program can cause the pump(s) in a group to turn OFF during a feed pause or maintenance mode. A program can also consist of specific time ranges for when the pump(s) will run at one wave mode, then later change to a completely different wave mode. Collectively, you can create multiple programs for a single group.
— Pump activation/tide modes EXPLAINED
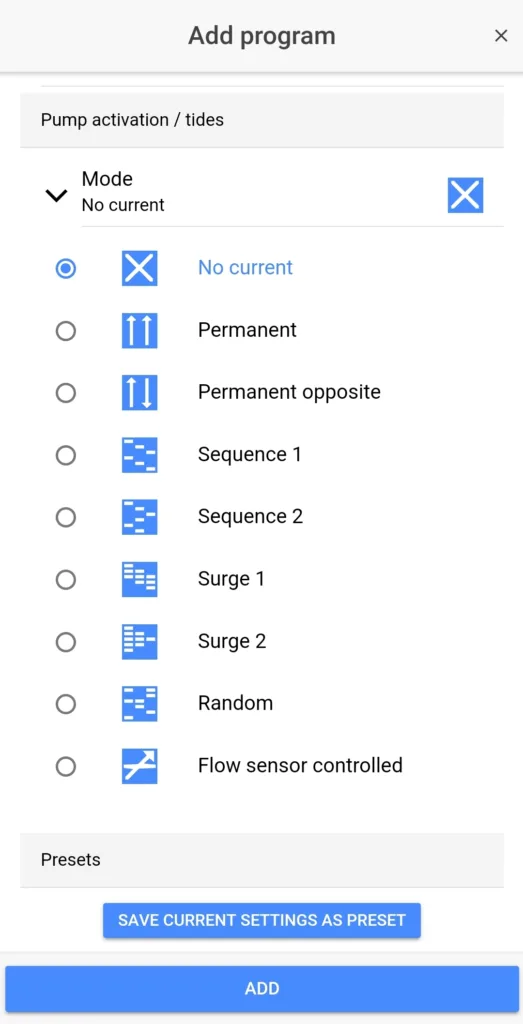
When creating a tide mode, you have 9 modes to choose from. The mode you select depends on what kind of flow pattern you’re looking to create and the number of pumps you are controlling in this group. For your convenience, we’ve included icons beside each option so you have an idea of how a certain mode will control the pump(s).
Below, you will find explanations of each mode:
No current
The pumps in this group will be permanently OFF.
Permanent
All pumps in this group will run in sync with each other; identical behavior
Permanent opposite
All pumps in this group will react opposite of each other; if pump 1 runs at maximum speed, pump 2 will run at minimum speed
Sequence 1
This mode will make one pump turn ON at a time in an alternating pattern. With this mode, you can set how long one pump will run for before it turns ON the next pump.
After the last pump is activated, the cycle starts again with the first pump. If your group consists of 2 pumps, then the ebb-tide-simulation is generated. If you use this mode with only 1 pump, that pump is switched ON and OFF in alternating pattern.
For a group of 3 pumps, the following switch-ON pattern is obtained:
“Pump active” means that the pump is running continuously between the set min / max speed and therefore generates waves.
“Pump inactive” does not necessarily mean that the pump is OFF. Instead, it means the pump will run at the minimum power you set.
NOTE:
Pump Group settings determine when and for how long the assigned pumps are active in this group.
Individual pump settings, however, determine the behavior of the pump(s) during activity and inactivity.
Sequence 2
This mode is similar to Sequence 1. The difference here is that pumps are NOT switched one after the other. Instead, they are activated in alternating order.
For a group of 3 pumps, the following switch-ON pattern is obtained:
Surge 1
This mode will make the pumps in this group switch ON one after the other until all pumps are active. Once that point is reached, the pumps are switched OFF in the same order until all pumps are OFF. The settings of this mode allow you to choose the time until the switching state changes again.
For a group of 3 pumps, the following switch-ON pattern is obtained:
Surge 2
Similar to Surge 1. This mode allows all pumps to be switched OFF in the reverse order as they were previously switching ON.
Random
This mode uses a random generator where all, some or none of the pumps of this group are activated in a continuous random variation. The time until the switching state changes again can be set.
— Tide duration settings (Seq., Surge and Random)
- Sequence 1 or 2
- Surge 1 or 2
- Random
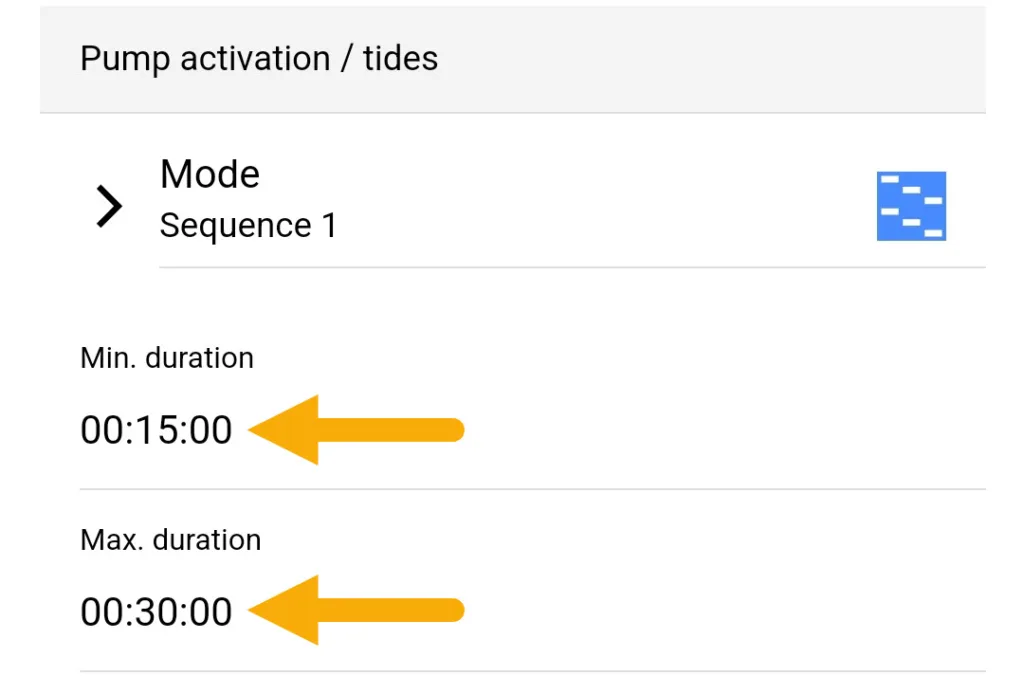
If you plan to use any of the above tide modes, you will have the option to set the time after which the switch ON state of the pumps will change again. Here, you can specify the minimum and maximum tide duration.
The time after a new switch-ON state is determined by a random-number generator. The number range is based on the min and max tide duration. If you wish to have the same switch-ON time, set the min and max time to the name number.
NOTE:
The minimum and maximum tide duration can be set to anywhere between 1 second to 8 hours.
If you are going to plug-in a pump to a Powerbar outlet and have it react to a pump group setting, make sure the switching time is NOT TOO SMALL.
Too frequent ON / OFF switching periods can damage the Powerbar socket or the pump.
— Wave form settings EXPLAINED
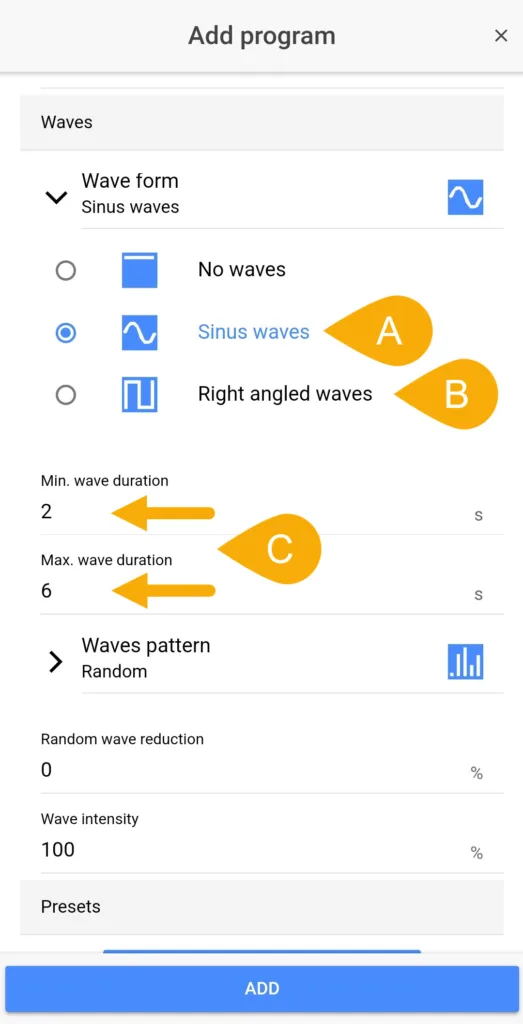
The Waves section is where you can set the wave form and wave pattern of all assigned pumps in this group.
- A: The sinus wave option will cause your pump(s) to gradually increase and decrease their flow output between the set minimum and maximum of each pump.
- B: Right angled waves will cause abrupt changes between the set minimum and maximum flow output.
- C: Min and Max wave duration can be set to anywhere between 0.4 seconds and 60 seconds. The built-in random number generator determines the duration of each wave within the limits you set
NOTE:
If you want all waves to have the same duration, enter the same values for the min and max wave duration. The technical possibilities of all controlled pumps must be taken into consideration when setting wave durations.
— Wave pattern settings EXPLAINED
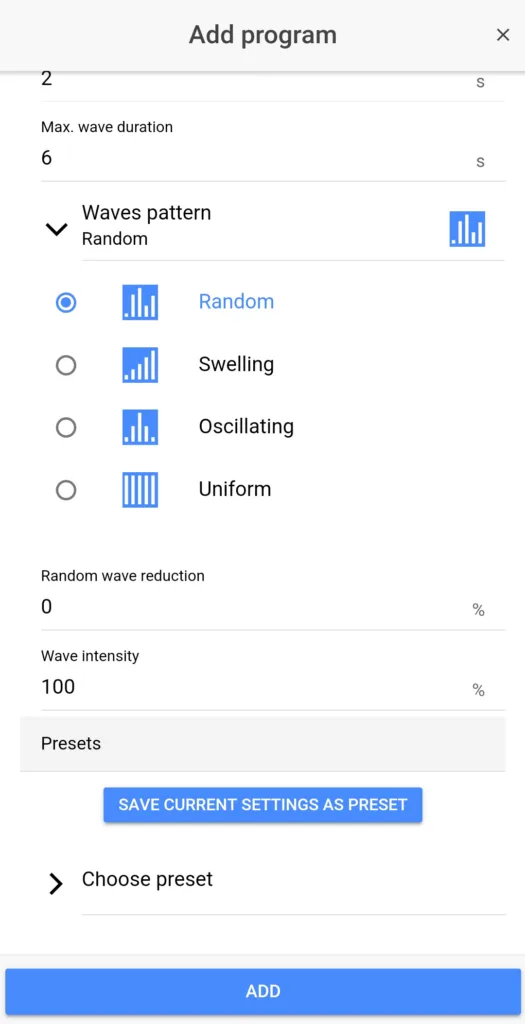
With wave patterns, you have control over the sequence of each wave.
Random
Each wave sequence is random.
Swelling
The swelling pattern causes the peak of each wave to increase each time. For instance, first wave will peak at 30%, 2nd wave at 40%, 3rd wave at 50%. When the last wave is completed, the cycle starts over (30,40,50,30,40, etc.).
Oscillating
Similar to swelling, except when the last wave is completed, the peak of the wave begins to gradually decline; 30,40,50,40,30,etc.)
Uniform
All pumps in this group will behave identically
— Random wave reduction EXPLAINED
The wave intensity setting controls the max flow percentage of the group all together.
Random wave reduction can be set from 0% to 100%. The bigger the value, the more different single waves become:
- At 0%, the peak of each wave reaches the maximum (waves are always equal)
- At 100%, the peak of each wave fluctuates randomly between the min and max
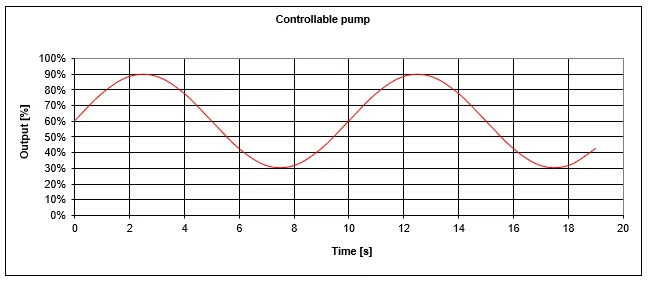
The chart below illustrates what kind of flow pattern can be seen on a controllable pump with the following settings:
Min @ 30%, Max @90%, Wave duration 10s, Sinus wave form
— Wave intensity EXPLAINED
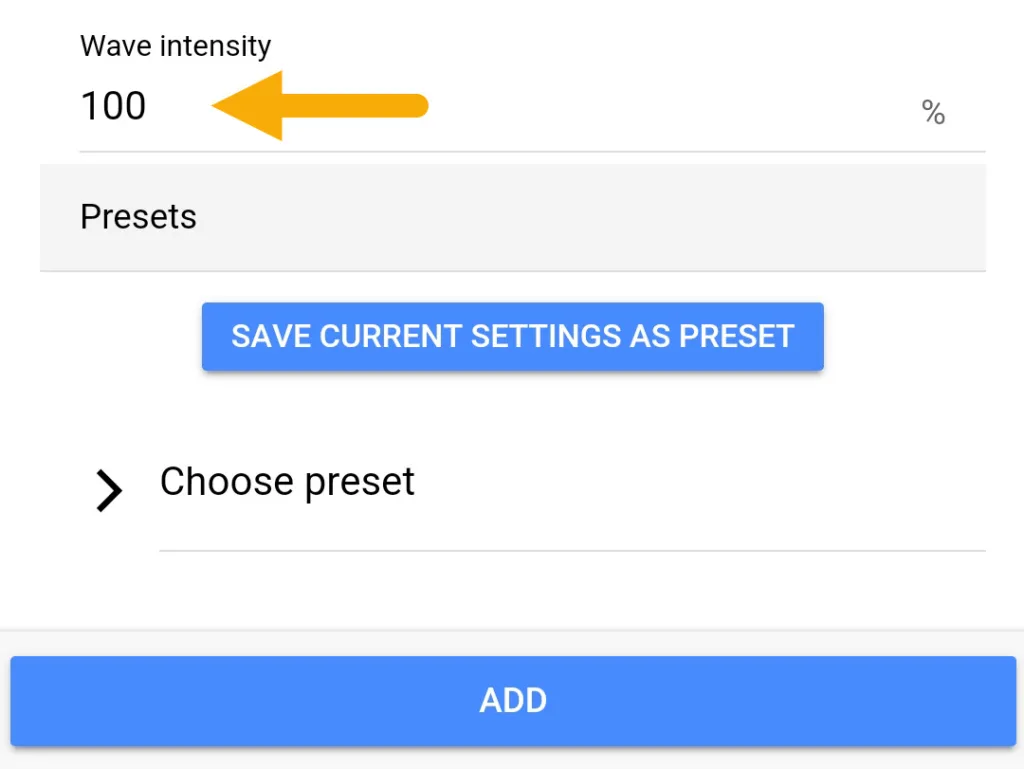
The wave intensity setting controls the max flow percentage of the group all together.
For example, if you have 2 pumps with the following individual settings…
- Pump 1: Min @ 30% and Max @ 80%
- Pump 2: Min @ 20% and Max @ 60%
And wave intensity is set to 50%…
This program will allow the pumps to operate at 50% of the max flow output; 40% and 30%, respectively
Save time with Preset Programs
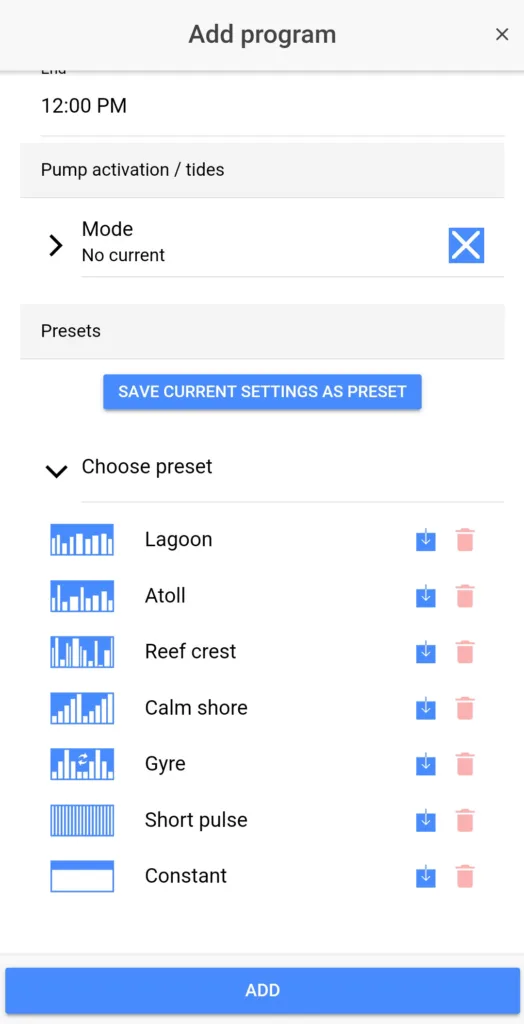
As you can see, the ProfiLux Pump Groups page is a highly customizable tool for creating simple or complex wave and flow patterns. To save on time and effort, we’ve included 7 preset programs to suit a wide range of applications.
Feel free to use these presets as a template or as they come!
If you create a program you like, you can easily save it as a preset by pressing the respective button.
