
About this article
This article (part 3 of 3) will show you how to properly setup and configure the KH Director for automatic KH testing. In order for the KHD to provide accurate test results, these steps must be followed exactly as shown.
In order to get the best understanding of how the KH Director is setup and how it works, we highly recommend you read the KH Director manual.
Click here to download the manual.
Before you proceed with the steps below, you should first complete part 1 and part 2 of the KHD setup. If you have not done so yet, click the link below:
KH Director Initial Setup (Part 1)
KH Director Initial Setup (Part 2)
PART 3: Completing initial setup
In this section we will show you how to:
- Enable the KH Director to begin testing
- Setup basic KHD settings
- Calibrate and install the KHD probe
- Prepare for and perform first KH test
— Enable KH Director
- Open the GHL Connect app, press the Menu icon, select Control, then select KH Director
- Enable the KH Director then press SAVE


— Setup general settings for KHD
- Enable Record measurement values (as shown)

NOTE: This will store your KHD test results so you can later view them on a chart (myGHL required)
2. Press the Control tab
3. Type-in your desired Alkalinity value
4. Press the General tab, then go to the Pumps for measurement section and select the dosing pumps that will be responsible for each task
Example: In part 2 of the initial setup, we chose pump 1 for the water sample, pump 2 for the reagent and pump 3 for the waste water


5. In the Time schedule section, specify how many times per day you want to do a KH test.

Example: If you test 4x per day, each test will be 6 hours apart.
6. Specify at what time you want the first test of the day to take place
Example: If you test 4x per day and the first test begins at 12:00 AM, the next tests will be 6AM, 12PM, 6PM. (00:00, 6:00, 12:00, 18:00, respectively)

— Setup water sample settings
1. In the Sample volume field, type-in how many ml you want the KHD to use for each test
NOTE: The KHD can be set to test with a sample size of 50 – 100ml
2. In the Sample tube volume field, press the Calculator icon

The calculator tool is used for telling the KHD how many ml the water sample tube holds. By measuring the total length of your water sample tube, the calculator will determine the volume held within the tube.
Alternatively, you can find the total tube volume by manually filling both ends of the tube with water and emptying the contents into a measuring instrument.
3. If you are using the sample tube that was included with your KHD, you can leave this field as-is. If you choose to use your own tube for the water sample, type-in the inner diameter of that tube.
NOTE: 4mm is the ID of the silicone tube that is included with the KHD.
4. Select your unit of measurement and type-in the total length of your water sample tube

The total tube length consists of 3 pieces of tube. These are:
- Length of tube from sump to pump head
- Length of tube from tube inside pump head (Approx 4.7″ or 11.9cm)
- Length of tube from KHD to pump head
5. If you have a water sample filter installed, select this option (as shown)
![]()
6. Press APPLY
— Setup KH alarm settings
In this section we will show you how to setup the alarm settings for the KH Director. With this setup, the KHD will trigger an alarm in case a test result goes outside of an acceptable range.
1. Enable Monitoring active
2. If you would like to disable all KHD control when a KH alarm is triggered, enable this option
3. Specify the lower and upper limits of the alarm conditions
NOTE: If any test result goes outside of the set boundaries, an alarm will be activated by the KHD.

— Connect and calibrate KHD probe
Now it’s time to connect the included KHD probe so you can calibrate it. Once that is done, we will show you how to install it into the KH Director.
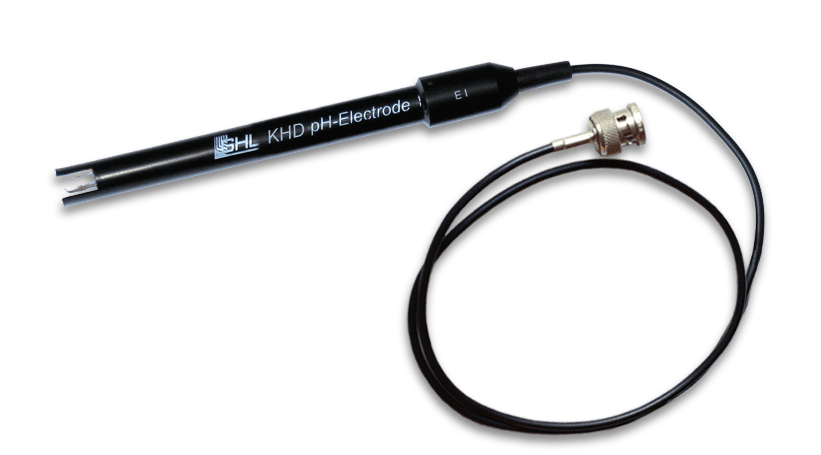
Connect KHD probe
- Take the probe that was packaged with the KHD and connect it to the back of the KHD’s BNC port
Insert the probe connector over the port and turn the connector to lock it in-place.

Prepare for KHD probe calibration
For this process you will need:
| (Item) | (Purpose) |
| Calibration fluids pH 4 and pH 7 | Necessary for calibrating the KHD probe to the proper pH range |
| 2x Small sample cups | For holding small amounts of each calibration fluid. You can prepare these samples by pouring pH4 in one cup and pH7 in another cup. |
Begin KHD probe calibration
- Press Calibrate Electrode

- Place the KHD probe in a sample of pH4 fluid, then press NEXT
- Take the probe out of the fluid, then rinse and wipe down the probe.
NOTE: This will prevent any cross contamination between the fluids and water used for rinsing
4. Place the probe in pH7 fluid, then press NEXT
5. Press DONE and calibration will be complete
6. Take probe out of the fluid, rinse, then dry


— Install probe into KHD
- Unscrew probe compression fitting
- Slide the locking nut and rubber ring over the probe
- Insert probe into KHD and secure it by tightening the locking nut

When installing the probe, make sure the locking nut is tight enough so you don’t have any leaks from the probe port. If need be, use an appropriate tool to carefully tighten the screw connection.
DO NOT apply excessive force when tightening otherwise you risk damaging the probe port and fitting!
To get the highest accuracy out of your KHD, we recommend you calibrate the probe every 2 – 4 weeks.
Anytime you need to service the probe, either to calibrate or replace, make sure you stop automatic KHD testing by temporarily setting the measurements per day to (0).
A probe that has not been in-use for more than a few weeks should ALWAYS be re-calibrated before being put to use.
For more information on KHD tips, click here.
If your KHD does not perform any tests for more than 3 days, we recommend removing the probe and storing it in liquid (storage solution) until you are ready to use it again. The KHD will always store a small amount of water inside the measurement cell to prevent the probe from drying out. With each test, this fluid is flushed out and replaced with new water.
— Preparing KHD for first test
Before you run your first KH test with the KHD, make sure you do the following:
- Make sure the water sample tube DOES NOT have any water in it
- Make sure the water sample tube is already placed in the area where you want to pull the water sample from
- The waste water and vent tube SHOULD ALSO BE EMPTY and positioned ABOVE the waste water bin
1. Press the Vent internal reagent tube button
![]()
The reagent head will now turn ON and prime the reagent tube inside the KHD. When this part is complete, move onto the next step.
2. Press the Flush measurement cell button
![]()
While the flush measurement cell task is running, check for any leaks around the probe compression fitting. If YOU DO see a leak or drip, press the Cancel current action button!
Check your probe compression fitting and re-tighten it. You can also apply a small amount of Vaseline around the rubber ring to create a better seal. Once that is done, retry the flush measurement cell step.
Once the measurement cell is flushed, your KH Director will be ready for its first test!
You can trigger a manual test at any time by pressing the Start measurement now button.

Add KHD and chart tile to Dashboard
Now that your KHD is setup and ready for automated testing, the final step will be to add the KHD tile and chart tile to your Dashboard.
Click here for instructions on customizing your GHL Dashboard.