
About GHL Doser Wi-Fi connectivity
This article will show you how to connect a Standalone GHL Doser 2.1 to your Wi-Fi network. After connecting, we will also show you how to wirelessly access the doser when you are within the range of your network (locally) and through the cloud (myGHL).
You will need…
In order to proceed, you will need the following:
| Item | Purpose |
| GHL Doser 2.1 Standalone | Device which will be used to connect to your Wi-Fi network |
| Windows computer | For connecting to the doser via USB |
| USB cable | For connecting the doser to your PC |
| Wi-Fi name / password | Allows doser to connect to your Wi-Fi network |
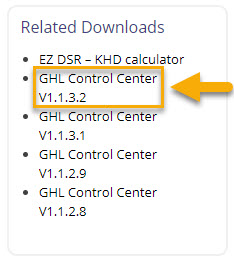
Preliminary step: Download GHL Control Center
Before you proceed with the steps below, you must first download the newest version of GHL Control Center. This program will allow you to access your GHL device settings via a Windows computer.
To download GCC, visit our downloads page and install the program to your PC.
Connect to doser via USB
- Open GHL Control Center (GCC) and connect to your doser via USB
If you are not sure how to connect over USB, follow the steps shown here. Once you are connected, you may proceed with the steps below.
Navigate to Wi-Fi / LAN settings page
- Click on System
- In the WiFi / LAN section, click on Settings
All your doser’s WiFi / LAN settings will be displayed here.

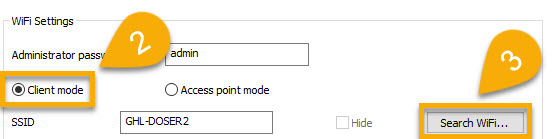
Configure Wi-Fi settings
- Set the mode to Wi-Fi

- In the WiFi settings section, select Client mode
- Click on Search Wi-FI and select your Wi-Fi network
STEP 3 (Alternate method)
If your doser did not detect any nearby Wi-Fi networks, fill-in the following fields:
SSID: Type-in the exact name of your Wi-Fi network here. This is a case-sensitive field. For example, if your network name is Household, type-in Household…typing-in household is NOT THE SAME AS Household!
Encryption: Set this to WPA2PSK; this option works for most Wi-Fi routers
Encryption type: Set this to AES; this option works for most Wi-Fi routers

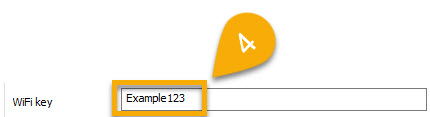
4. Type-in the exact password to your Wi-Fi network.
This is a case-sensitive field. Password123 is NOT THE SAME AS password123 or Password 123
Setup Doser with Auto IP or Static IP
Now that you’ve entered your network name and password, it’s time to specify how the doser will connect to your network. Read the text in the info box below and choose the method you want to use.
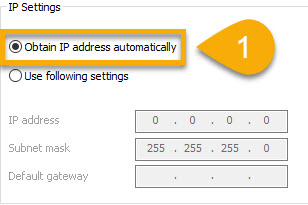
Standalone GHL Dosers can join your Wi-Fi network using either the Auto IP or Static IP method. Even though both options will get you connected, the method you choose will depend on your specific needs. Here is a brief description of each option…
Automatic IP (Obtain IP automatically): This method allows your Wi-Fi router to automatically assign an available IP address to your GHL Doser. With the Auto IP method, your router is free to change and assign a NEW IP address to the Doser at any time. This option is recommended for those who will be connecting to their doser via myGHL cloud ONLY.
Static IP (Use following settings): Instead of having your router assign an IP address (Auto IP), this method allows you to set a specific IP address for the GHL Doser. The IP address you assign be reserved for the doser and cannot be changed by the router. If you plan to connect to the Doser MOSTLY over a local connection (when you are within the range of your Wi-Fi network) AND also myGHL cloud, we recommend setting a Static IP.
— Auto IP setup
- Select Obtain IP address automatically
- Click Save
3. Click Disconnect
Your doser will now apply the Wi-Fi settings you entered. Please allow up to 2 minutes for the doser to attempt a connection. If your network information was entered correctly, the GHL logo light will turn BLUE.

If your network information was entered correctly, the GHL logo on the doser will…
- Turn solid blue: If myGHL cloud is disabled
- Flash blue: If myGHL cloud is enabled
Seeing the blue GHL logo light means that your doser is now connected to your network.
If the GHL logo light on the doser is flashing blue and another color, don’t worry. This “other” color is a secondary notification. If this “other” color is:
Red: There is an active alarm. Check your doser container fill levels and refill the container if necessary.
Yellow: The liquid in one or more of your dosing containers is starting to run low
For more information on the GHL logo color codes, click here.
— Auto IP setup: Add doser to myGHL cloud
With the doser connected to your Wi-Fi network, you can now add this device to your myGHL account. Doing so will allow you to access the doser from the cloud.
To add the doser to your myGHL account, follow the steps shown in this video.
After following the steps in the video, you will be able to connect to your doser by using any web browser to go to the myGHL website.
If you would like to use the GHL Connect app to access the doser over the cloud, you can do so by syncing your myGHL account to the app.
If you are not sure how to do this, click here for the instructions.
Once your account is synced, a new connection will be viewable in the app. This new connection will be your dedicated cloud connection for your GHL device.
— Auto IP setup: Find the assigned IP address (OPTIONAL)
In order to connect to the doser through your Wi-Fi network, you will first need to find out what IP address was assigned to your doser by your router.
You can do this by logging into your router settings and seeing the list of devices that are connected to your network. Within that list, you will see the Doser and its assigned IP address.
Once you have that IP address, write it down. The next step will be to create a new a dedicated connection for the doser in GHL Control Center and/or GHL Connect app. This dedicated connection will allow you to access the doser when you are within the range of your Wi-Fi network.
The setup steps for each platform are directly below the “Static IP setup” section.
— Static IP setup
- Select Use following settings
- Click on Setup wizard…

3. Type-in the IP address you want to assign to the doser, then click OK.
NOTE: The IP address you assign MUST NOT be in-use by another device on your network.
TIP: Having the Doser’s IP address end in .150 or .200 will work for most users.

If you want to bypass the wizard, you can manually type-in your network’s information…
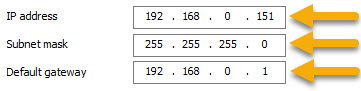
IP address: Type-in the IP address you want to assign to the doser
Subnet mask: *** See below ***
Default gateway: *** See below ***
How to find the subnet mask and default gateway
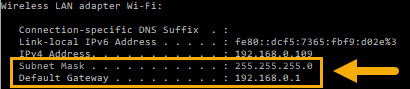
1. In the Windows search bar, type-in CMD and open Command Prompt
2. Type-in IPCONFIG and press the Enter key on your keyboard
The results will display your subnet mask and default gateway:
4. Click Save
5. Click Disconnect
Your doser will now apply the Wi-Fi settings you entered. Please allow up to 2 minutes for the doser to attempt a connection. If your network information was entered correctly, the GHL logo light will turn BLUE.
If your network information was entered correctly, the GHL logo on the doser will…
- Turn solid blue: If myGHL cloud is disabled
- Flash blue: If myGHL cloud is enabled
Seeing the blue GHL logo light means that your doser is now connected to your network.
If the GHL logo light on the doser is flashing blue and another color, don’t worry. This “other” color is a secondary notification. If this “other” color is:
Red: There is an active alarm. Check your doser container fill levels and refill the container if necessary.
Yellow: The liquid in one or more of your dosing containers is starting to run low
— Static IP setup: What’s next?
Now that your doser is connected to your network, your next step will be to create a dedicated connection for the doser in GHL Control Center and/or GHL Connect app. This dedicated connection will allow you to access the doser when you are within the range of your Wi-Fi network.
We have provided the steps for each platform below…
Wi-Fi: Connect via GHL Control Center
This section will show you how to connect wirelessly to your GHL Doser using GHL Control Center.
1. Click Administrate (top-left)
2. Click NEW
3. Select the GHL Doser

4. Set the Type of connection to Network (TCP/IP)
5. Give this connection a name; GHL Doser WiFi
6. In the Host-Name field, type-in the IP address of your GHL Doser
This will either be the IP address which was assigned to your doser by your router OR the IP address you assigned to the doser during Static IP setup.
7. Click Save, then click Close

8. Select your newly made connection by either clicking Connect or by double-clicking the respective icon.
Wi-Fi: Connect via GHL Connect app
This section will show you how to connect wirelessly to your GHL Doser using the GHL Connect app.
1. Open the GHL Connect app
2. In the My Devices page, press ADD DEVICE
![]()
3. Select your GHL Doser, then press NEXT
4. In the Host/IP field, type-in the IP address of your GHL Doser, then press NEXT
This will either be the IP address which was assigned to your doser by your router OR the IP address you assigned to the doser during Static IP setup.
5. Give this connection a name; Doser Wi-Fi — Doser Home — etc.
6. Press DONE
Your new connection will now be listed. This will be the connection you choose when you are within the range of your Wi-Fi network.


If you would like to connect and control your doser from anywhere in the world, we recommend adding your device to the cloud.
The steps for that can be found here.