
About This Article
This article will show you how to setup and program the GHL Automatic Fish Feeder for the ProfiLux controller.
With the Auto Fish Feeder, you can enjoy the ultimate in convenience with reliable fish feeding and ProfiLux automation. The setup process is very straightforward and only requires a few minutes of your time.
What You Will Need…
Before you get started with the Auto Fish Feeder setup, make sure you have the following:
ProfiLux 4 / 4e Controller

| Item | Purpose |
| ProfiLux 4 / 4e controller | For controlling Auto Feeder |
| Automaic Fish Feeder | For connecting to controller & feeding fish |
| ProfiLux -> Feeder cable | For connecting feeder to ProfiLux controller (cable with 4-pin western plug and 3.5 mm jack) |
ProfiLux Mini / Light Wi-Fi Controller

| Item | Purpose |
| ProfiLux Mini / Light Wi-Fi controller | For controlling Auto Feeder |
| ProfiLux Mini / Light Adapter | Allows you to connect auto feeder to ProfiLux |
| Automaic Fish Feeder | For connecting to controller & feeding fish |
| ProfiLux -> Feeder cable | For connecting feeder to ProfiLux controller (cable with 2x 3.5 mm jacks) |
Before you can use GHL Automatic Fish Feeder, make sure your ProfiLux meets the minimum requirements.
ProfiLux 4 / 4e: Firmware 7.40
ProfiLux Mini / Light Wi-Fi: Firmware 1.19
Unpack Auto Fish Feeder and Check Contents
Unpack the fish feeder and confirm that all contents are present. In the box, you will have a (an):
- GHL Automatic Fish Feeder
- Extra-large feeding tray
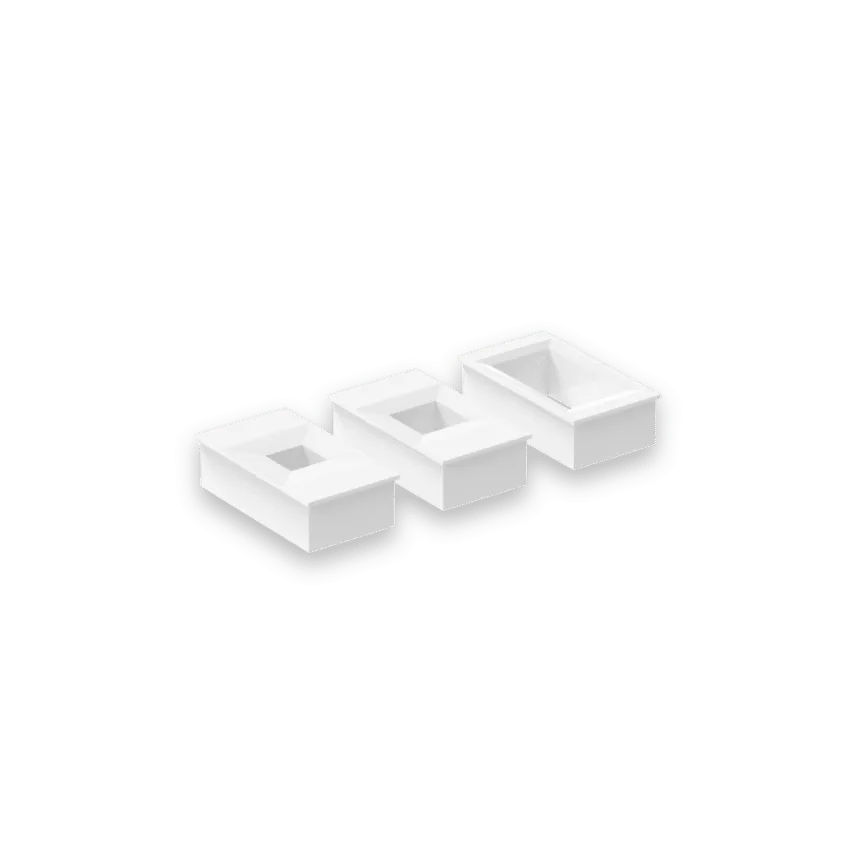
- Feeding tray inserts in 4 different sizes (one already inside feeder)
- Aquarium mounting piece w/ fastening screw
- ProfiLux -> Fish Feeder communication cable (cable with 4-pin western plug and 3.5 mm jack), 2 m (6.5 ft) long
- Fish Feeder -> Fish Feeder connecting cable (cable with 2x 3.5 mm jacks), 1.5 m (4.9 ft) long
The Fish Feeder is powered directly from the ProfiLux controller through the communication cable. No extra power cable is needed.
Install Mounting Clip to Feeder
Using the included mount, choose the desired mounting position based on the type of aquarium you have; standard, rimless or euro-braced.
Illustration (right) shows the mounting piece installed for a rimless aquarium. For euro-braced aquariums, install the mounting clip so the fastening screw comes from the bottom.
The fastening screw is used to secure feeder to the aquarium.

We recommend you not mount the feeder to the aquarium just yet. Later on, you will have to weigh the food that fits into the feeder so the ProfiLux can provide you with accurate fill levels.
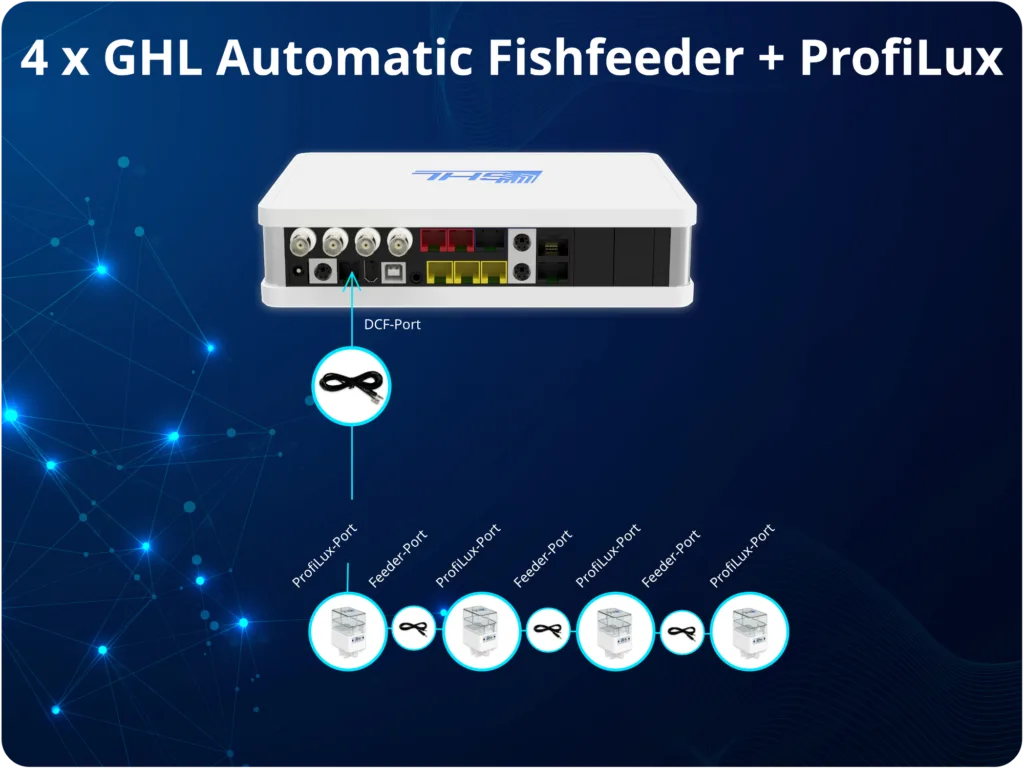
Connect Feeder to ProfiLux Controller
Using the included communication cable (ProfiLux -> Fish Feeder), connect it as shown in the illustration below.
ProfiLux 4 / 4e Controller
- The 4-pin western plug goes into the DCF port of the ProfiLux; the DCF port will later be switched to Feeder port mode in the app or GCC.
- Plug the other end of the cable with the 3.5 mm jack into the ProfiLux port of the feeder.
- If needed, connect additional (max. 3 per ProfiLux 4) feeders with the respective feeder connection cable supplied (jack to jack).
ProfiLux Mini / Light Wi-Fi Controller
- Insert the jack of the enclosed 3.5 mm jack cable into the feeder port of the adapter.
- Plug the other end of the cable into the ProfiLux port of the feeder.
- Connect the adapter to the multifunction port of the ProfiLux Mini/Light Wi-Fi using the enclosed patch cable.
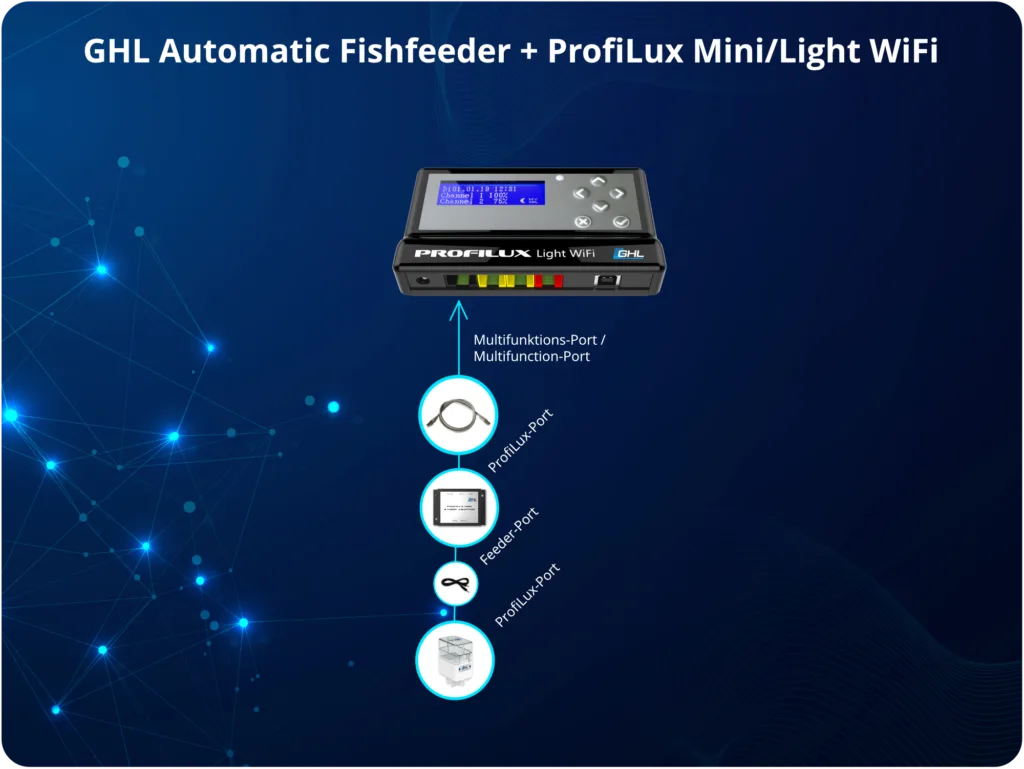
If you wish to connect more than one feeder to the ProfiLux, you may do so by using the included Feeder -> Feeder connecting cable. Take this cable and connect it to the input labeled Feeder on each feeding device.
Install Feeding Tray
Pick and choose the appropriately sized feeding tray you wish to use for your feeder, then do the following:
- Press the manual feed button at the top of the feeder.
- While feeding door is open, unplug the feeder (power OFF) to keep the door open
- Slide the current tray out, put the new tray in and power ON the feeder.
Prepare ProfiLux for Feeder
The steps below are only necessary if you have a P4 or P4e controller.
If you have a ProfiLux Mini or Light Wi-Fi controller, you can skip this part.
To prepare the ProfiLux 4 / 4e for the Auto Fish Feeder, do the following:
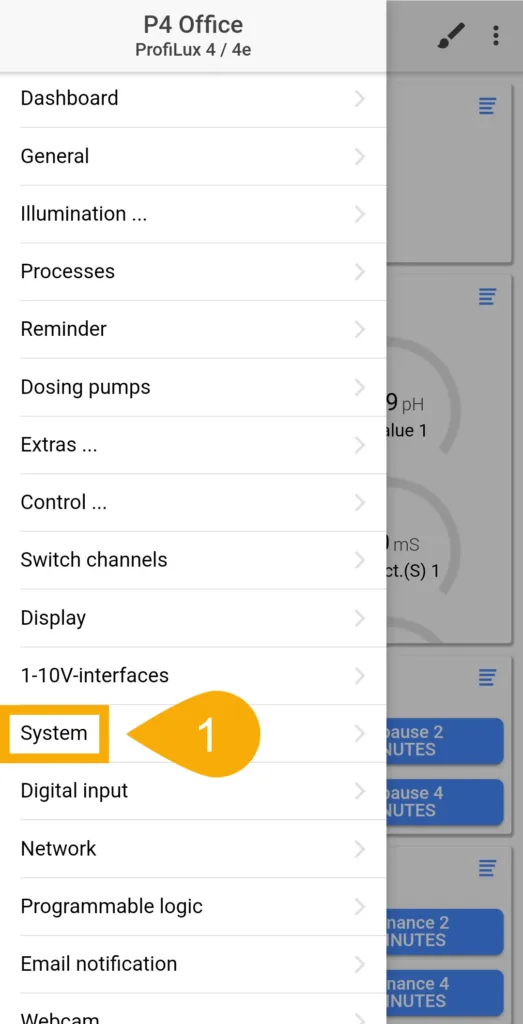
- Connect to your P4 controller, press the Menu icon, select System.
- In the Communication interfaces section, set the DCF function to Auto. feeder.
- Press SAVE.
")
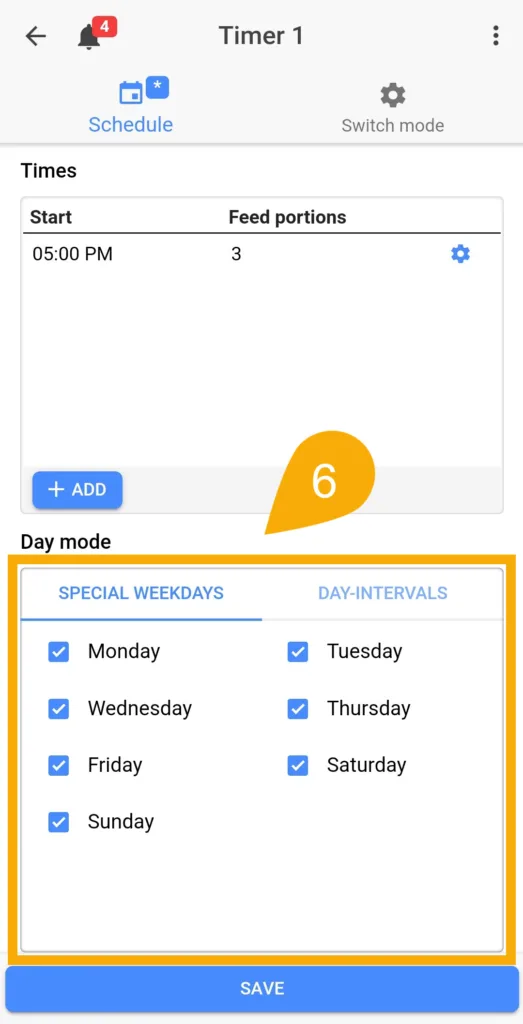
Create your Feeding Schedule
With the feeder powered ON and feeding tray installed, you can now create your own feeding schedule.
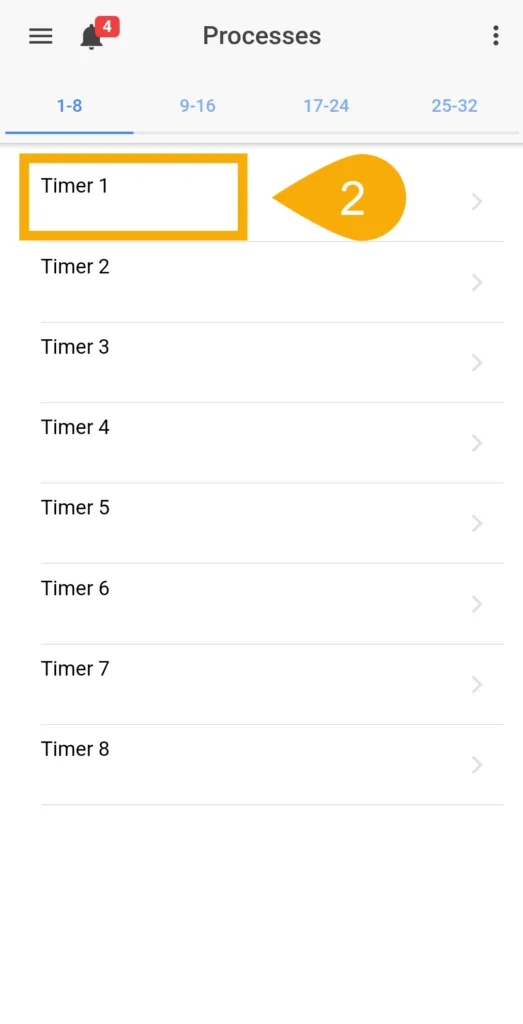
1. Press the Menu icon and select Processes.
2. Select an unused Timer.
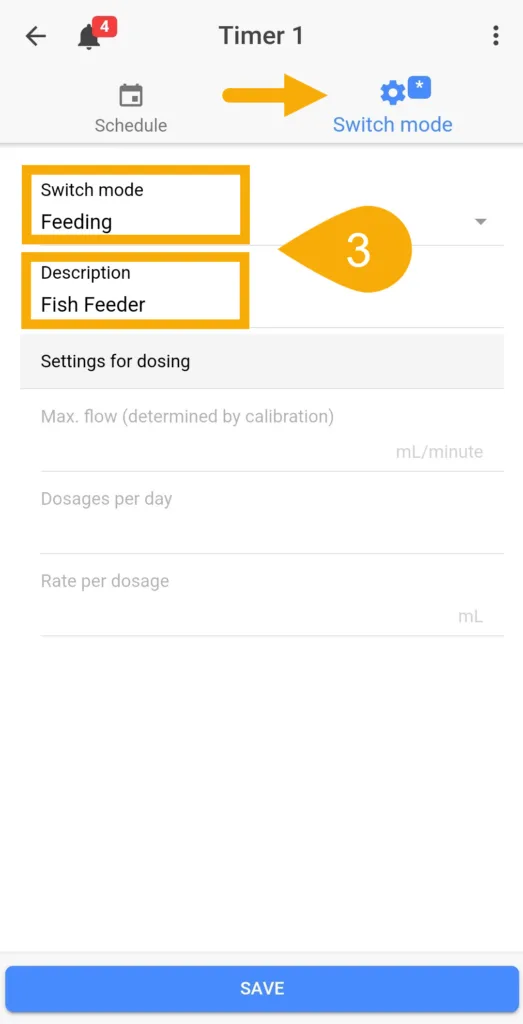
3. Press the Switch mode tab, set the mode to Feeding, then type-in a description and press SAVE

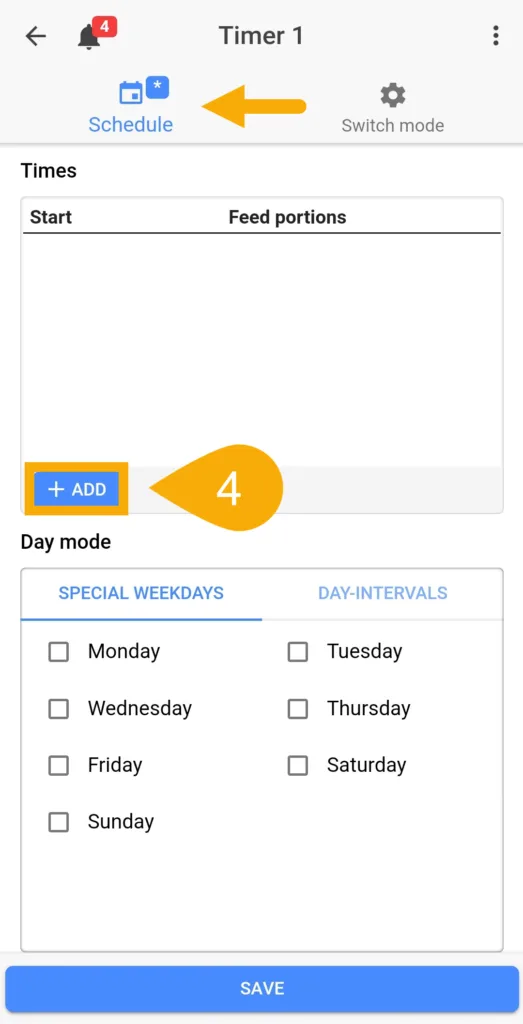
4. Press the Schedule tab and then press the ADD button.
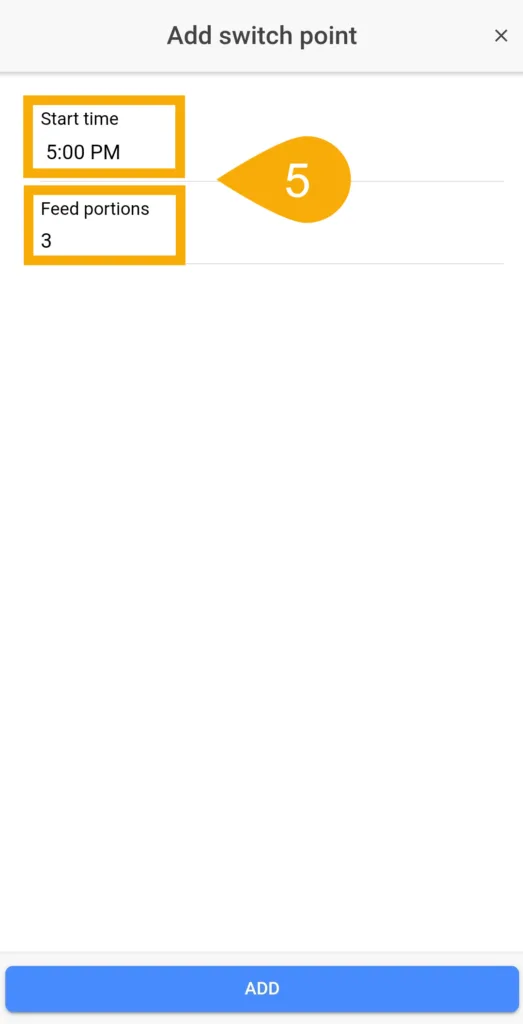
5. Specify what time you want to feed and how many feed portions the feeder should dispense, then press ADD.
If you wish to add more feed times, press the ADD button again and repeat step 5.
6. In the Day mode section, specify how often the feeder shall activate this feeding event, then press SAVE.
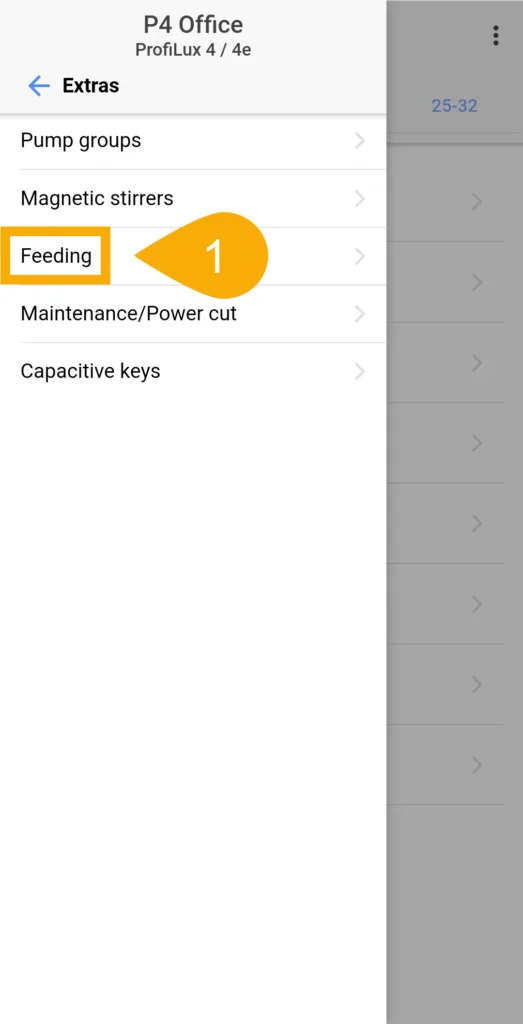
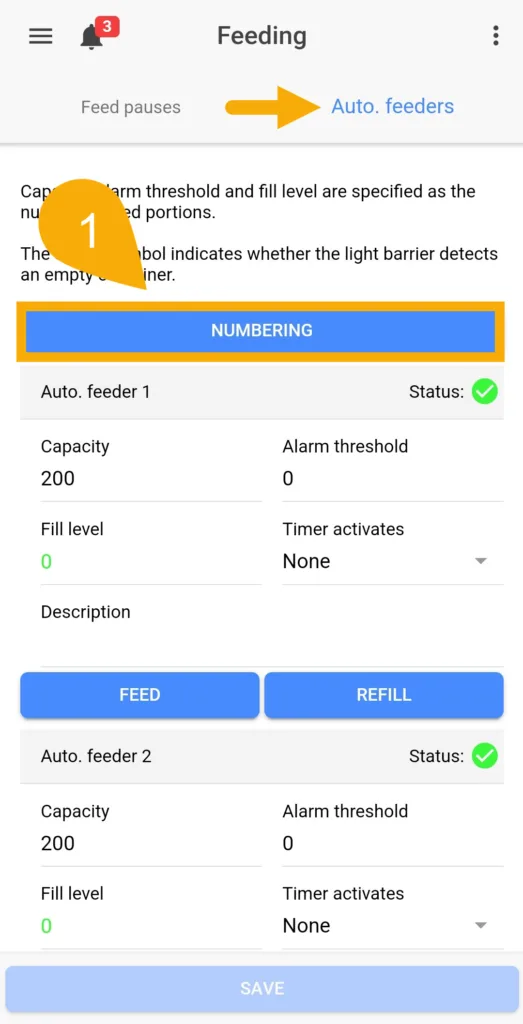
Setup Auto Feeder
Now that the feeding schedule has been made, it’s time to assign that schedule to the Auto Feeder.
- Press the Menu icon and select Extras, then Feeding.
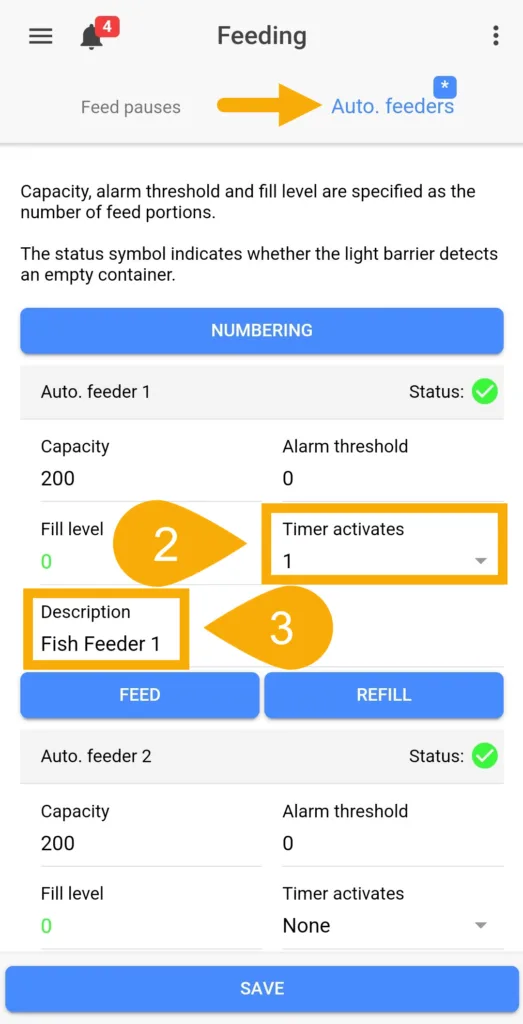
- Press the Auto. feeders tab, then choose your feeder and set it to be activated by the TIMER number you used when you created your feeding schedule.
- Type-in a description for this feeder, then press SAVE.
Example: In the above steps, we created the schedule on TIMER 1. We therefore choose to have the feeder activated by TIMER 1 as shown in the illustration (right).
ADDITIONAL TIPS
— Setting fill level for accurate food monitoring
The Auto Feeder contains an Infared (IR) light barrier that communicates with the ProfiLux 4(e) to detect low food levels. In order for the ProfiLux to accurately report fill levels and tell you when food is running low or empty, it must first know how many “Feed Portions” the whole container holds.
We’ve prepared the tips below to help you with this.
To get the most accurate result, we recommend using a jewelry scale (0.00 resolution) to weigh the food that fits into the feeding chamber.
- Place the feeder on a flat surface and fill the food chamber completely.
- Take a small empty cup and place it on the jewelry scale, then press TARE.
- Press the manual feed button and let the food drop into the cup; write down the weight of that portion.
- Pour the rest of the food from the food chamber into the same cup: write down the weight of the whole food.
- Divide the weight (grams) of the whole food by the weight of the feed portion.
- In the Auto.Feeder page, enter the capacity of the food chamber (# of food portions), press SAVE. Press the REFILL button and enter the same number. In the Alarm threshold field, type-in when you want the low-food alarm to be triggered (# of food portions).
For example, if a single portion weighs 0.06g and the whole food weighs 52g, divide 52 by 0.06 to get the total number of feeding portions inside the food chamber (866).
Since the weight of each feeding portion will differ from time to time, we highly recommend you record the weight of at least 3 manual feedings. With this info, you can get an average per portion weight and use that for your total feedings calculation.
For example, if you do 3 manual feedings and get 0.05, 0.08, 0.06g, take an average of those results to get 0.06g per portion.
— Triggering Feed Pause alongside a Feeding Schedule
The flexibility of the ProfiLux (model 4 only) and Feeder allow you to trigger a Feed Pause before the actual feeding event takes place. This option comes in handy if you’re looking to activate a feed pause (and turn OFF pumps via FP) before a feeding event (via Feeder).
To set this up, follow the steps below.
The steps below assume you’ve already setup the Feed Pause event. If you have not done so yet, follow the steps provided in the link below, then come back to this section:
- Go to the Feeding page and under the Feed pauses tab, navigate to the FP you want to tie-in with the Auto Feeder.
- Select the Auto Feeder number which shall activate this feed pause.
Example: Since we setup Auto Feeder #1, we want to assign this feeder to the Feed Pause of choice.
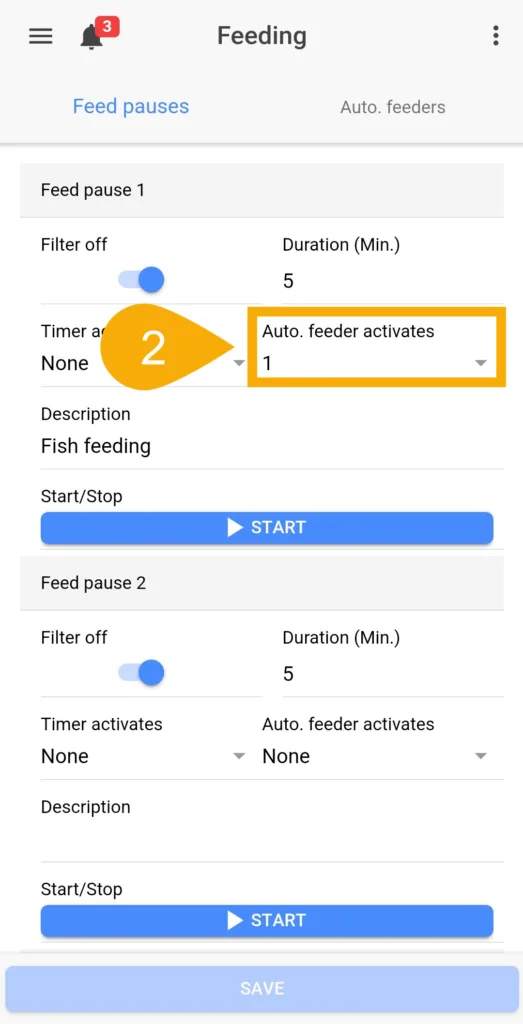
To ensure that all the food makes it to the fish, we’ve implemented an automatic 1-minute delay for the feeder. Once the FP is activated, the assigned switch channels are turned OFF and the feeding event is delayed by 1 minute. Afterwards, the feeder dispenses food and then the FP countdown begins.
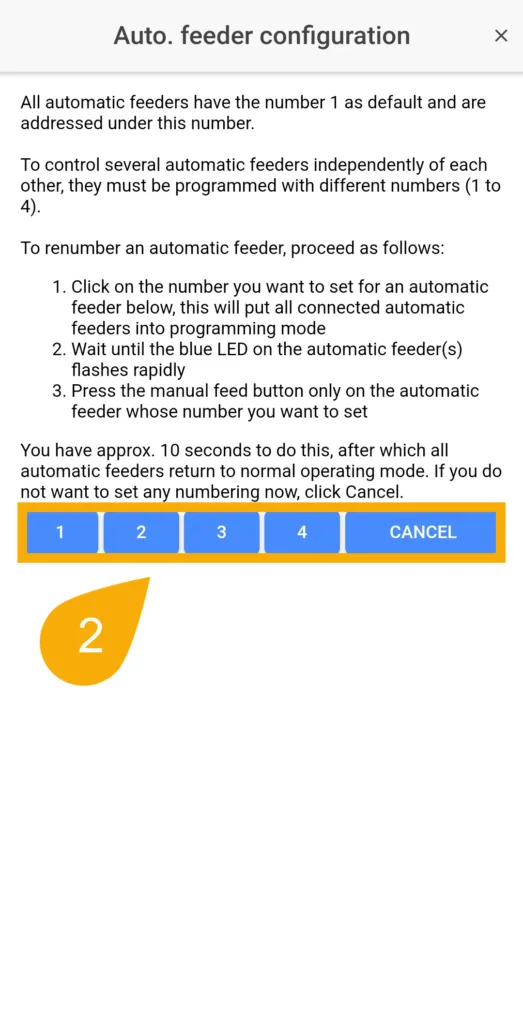
— Setting Feeder Numbering
If you have a ProfiLux 4 or 4e and wish to use more than one Auto Feeder, follow the directions below:
Before proceeding, make sure you already have your feeders daisy chained. They will need to be powered ON for the numbering assignment to work.
- Go to the Feeding page, select the Auto feeders tab, and press the NUMBERING button.
- Tap the feeder number you want to setup, wait until the blue LEDs on the feeder(s) flash rapidly, then press the manual feed button on the feeder you want to assign to this number.
For more info, tips and warranty information, please refer to the user manual.
Manual Automatic Fishfeeder – GHL