- Wire hanging kit
- GHL Flex Mount: Is installed to the back wall of your aquarium stand.
This FAQ page is currently under construction and therefore does not claim to be complete. If you can’t find what you’re looking for here, please use our manifold additional support resources.
Frequently Asked Questions
Presales
20 questions
-
If I wanted to just dose Alk, Calc, Mag. What do I need?
GHL Doser 2.1 Standalone with 3-pumps
-
What mounting options are available for the Mitras?
[TS_VCSC_Icon_Flex_Button button_text=”Read More about Mitras LX accessories” button_fontfamily=”Default:regular” icon_select=”” button_link=”url:https%3A%2F%2Fwww.aquariumcomputer.com%2Fproducts%2Fghl-illumination%2Fmitras-lx-accessories%2F|||”]
-
If I wanted to expand my GHL Doser, what can I do with the Slave pump? Do I need to buy anything else such as additional cables?
The GHL dosing system can support up to 16 total dosing pumps. If you already have a dosing unit and wish to add a Slave doser, you can further automate your dosing tasks by dosing liquid foods and other supplements such as trace elements. When adding a slave dosing unit, you will also need to purchase a PAB-cable (available in various lengths).
-
If I buy a ProfiLux 3 or 4 Controller, can I control the Mitras from it?
To do this you will need to buy the PLM-PWC expansion card. This expansion card is installed inside the ProfiLux itself. This card is what allows wireless communication between the ProfiLux and Mitras.
[TS_VCSC_Icon_Flex_Button button_text=”Read More about ProfiLux expansion cards” button_fontfamily=”Default:regular” icon_select=”” button_link=”url:https%3A%2F%2Fwww.aquariumcomputer.com%2Fproducts%2Fprofilux-accessories%2Fexpansion-cards%2F|||”] -
What are the differences between the ProfiLux 4 Mega Set and Ultimate Set?
- Mega Set includes: Probes (Temperature, pH, Redox, Conductivity), calibration fluids, Powerbar, PAB cable, USB cable, and ProfiLux 4 controller.
- Ultimate Set includes: All the above PLUS a ProfiLux Touch display
[TS_VCSC_Icon_Flex_Button button_text=”Read More about ProfiLux Controller Sets” button_fontfamily=”Default:regular” icon_select=”” button_link=”url:https%3A%2F%2Fwww.aquariumcomputer.com%2Fproducts%2Fprofilux-aquarium-controller%2Fprofilux-controller-sets%2F|||”]Last updated on: December 8, 2018
-
What I can do extra if I buy the Mitras with the ProfiLux Controller?
As long as you buy the PLM-PWC expansion card for your controller, you will be able to access your Mitras illumination settings from the ProfiLux connection. By adding a PWC expansion card, you make it easier for yourself to access the LX7 rather than connecting to the light itself. You can also synchronize special functions in ProfiLux and Mitras LX7, like thunderstroms and maintenance.
-
If I purchase a P4 Ultimate Set, what are the advantages of getting a ProfiLux Touch display?
[TS_VCSC_Icon_Flex_Button button_text=”Read More about ProfiLux Touch” button_fontfamily=”Default:regular” icon_select=”” button_link=”url:https%3A%2F%2Fwww.aquariumcomputer.com%2Fproducts%2Fprofilux-accessories%2Fprofilux-touch%2F|||”]
The ProfiLux Touch display provides an additional layer of convenience and point of access. With this accessory, you can view valuable information such as probe readouts and graphs. You can also setup 1-touch shortcut keys to trigger feed pauses, maintenance modes, and perform an Alkalinity test (KH Director required). If you wanted to manually turn on or off certain outlets, you can do that too. Ultimately, the touch display makes it easy to view and trigger commands as needed, even if your hands are wet!
-
Can I control Ecotech Vortech® pumps with a ProfiLux Controller?
Yes. To do this you would need a GHL Vortech Controller and a PAB-cable accessory. This Vortech controller will allow for wireless communication between your Vortech pumps and the ProfiLux controller. The PAB-cable is needed to connect the Vortech controller to the P4 system.
[TS_VCSC_Icon_Flex_Button button_text=”Read More about pump control” button_fontfamily=”Default:regular” icon_select=”” button_link=”url:https%3A%2F%2Fwww.aquariumcomputer.com%2Fproducts%2Fpump-controller%2F|||”] -
What are the accessories that I can add on a ProfiLux controller?
GHL offers a variety of expansion cards which can be mixed and matched to meet your needs. If you need to add additional probes or sensors, you can do so by simply purchasing a GHL expansion card. If you’re looking to control Ecotech Vortech® pumps, you can do so with our GHL Vortech Controller accessory. ProfiLux also accommodates the wish to control any 1-10v device; lighting, pumps, etc.
Add GHL powerbars, Expansion Boxes, Dosers, LED lighting and LED controllers and much more – the expansion possibilities are almost unlimited.
[TS_VCSC_Icon_Flex_Button button_text=”Read More about ProfiLux accessories” button_fontfamily=”Default:regular” icon_select=”” button_link=”url:https%3A%2F%2Fwww.aquariumcomputer.com%2Fproducts%2Fprofilux-accessories%2F|||”] -
What is the difference between single junction or double junction pH & redox/ORP probes, what does GHL use?
What type of pH and redox/ORP probes does GHL use?
The quality of the measurement results is of essential importance. For this reason GHL uses only lab-grade double junction pH & redox/ORP probes, GHL does not and never did sell the cheaper and less reliable single junction probes.
What is the difference between a single & double junction probe?
The reference cell of a single junction probe only has a material similar to a wick (hereinafter referred to simply as “wick”) which is in direct contact with the solution to be measured. This is an essential part that enables the probe to function and also a part prone to disturbances.
The reference cell of a double junction probe has a wick that comes into contact with a second chamber filled with the same material as the reference cell. This second chamber also has a wick that is in direct contact with the solution to be measured. The second chamber slows down contamination, so double-connection probes can work reliably for up to 12 months or more if well maintained.
A double junction can also help protect the probe if the sample solution reacts and could form a solid sediment with the reference solution, clogging the wick and compromising its functionality.
Contamination can occur faster with a single junction probe than with a double junction probe, so a single junction probe has a shorter life.
Last updated on: January 23, 2019
-
What is the difference between the LX 7006 and LX 7206?
- LX 7006: Freshwater model with an LED layout designed for growing healthy, colorful freshwater plants
- LX 7206: Saltwater model with an LED layout designed for growing health, colorful corals, including SPS!
[TS_VCSC_Icon_Flex_Button button_text=”Read More about the Mitras LX7000 series” button_fontfamily=”Default:regular” icon_select=”” button_link=”url:https%3A%2F%2Fwww.aquariumcomputer.com%2Fproducts%2Fghl-illumination%2Fmitras-lx-7000-series%2F|||”] -
Basics about LED Illumination – Lumen, Lux, PAR and Photosynthesis
Light is Not Just Light – The Basics of Mitras® LED Illumination by GHL
Benefit from our many years of experience – since 2002, we offer dimmable led lights for application in aquatics.
Photosynthetic Efficiency with Mitras Luminaires
With the help of light energy from CO2 and water, coral symbionts and plants build carbohydrates and discard oxygen; this process is called photosynthesis. In charge of this energy production is the plant pigment chlorophyll (a + b and carotene).
Light beams are electromagnetic waves, consisting of energy particles called photons. The energy of the so-called Photon is dependent on its wavelength (nm) and its frequency (THz). Different wavelengths of light we see as color. The visible light by humans covers only a particular segment of the electromagnetic spectrum, which moves in the range of 380-750 nm.
As you can see – For the intended use, a suitable light spectrum and light intensity are crucial for the photosynthetic activity of coral symbiont and plants. The higher the photosynthesis rate is, the stronger and healthier growth will be.
LUX (lm/m2) is the unit of illuminance, which indicates which luminous flux (lumens) falls on a particular area. The light output in lumens (lm) as a measure of the brightness is standardized to human vision sensitivity. Since people perceive blue or red light less intensely than green light, the lumen decreases with consistent high radiation values, the more blue or red the light is.
Therefore the specified lumens at our Mitras Daylight, for example, are much higher than in the Mitras Actinic, though the wattage is almost identical.
The qualification of a luminaire only based on lumens/watt (light output per electrical power) is not always suitable as it says nothing about the photosynthetic efficiency of light
It is quite so that a luminaire with high lumens but an unfavorable spectrum of photosynthesis is less beneficial than a luminaire with slightly fewer lumens but, therefore, optimum range.
More meaningful is the so-called PAR value (Photosynthetic Active Radiation), which describes the available radiation for photosynthesis.
All this offers the high-power Mitras LED illumination in perfection. Mitras Luminaires achieve above-average PAR values and thus ensures healthy growth in your aquarium.
More Facts why Mitras Luminaires are Your Best Choice
When comparing our Mitras Luminaires with others, you should note the following points:
- Our electric power also includes the consumption of the control electronics, not only the consumption of the LEDs.
- The light performance indicated by us also includes the performance of the LEDs, which contribute less to the creation of lumen but which optimize the spectrum.
- Furthermore, we indicate the actual remaining lumen after deducting the losses through the glass and temperature increase.
- Contrary to the commonly used practice to use cheap series resistors for LED-current limiting, in our luminaires, we control the current of LEDs precisely by electronics. Through this, we can also minimize current consumption and waste heat.
- We truly believe that we could utilize the maximum out of LED-technology – the best LEDs, an extremely transparent protector plate, a massive cooling, and electronic control. More is hardly possible. If you find elsewhere better performance data, then you should question this critically.
- We don’t indicate any ideal theoretic values but the performance data which can be reached in practice after the deduction of all losses.
Photosynthesis with Mitras Lightbar Daylight in freshwater aquarium
Please accept YouTube cookies to play this video. By accepting you will be accessing content from YouTube, a service provided by an external third party.
If you accept this notice, your choice will be saved and the page will refresh.
Last updated on: June 4, 2024
-
What is the light spread of a single Mitras LX7 fixture?
Up to 88 cm x 58 cm / 35″ x 23″
-
Are Mitras LX7, GHL Doser and ProfiLux 3 & 4 controllable via an app?
Yes, the all these devices can be controlled using the GHL Connect app.
[TS_VCSC_Icon_Flex_Button button_text=”Read More about the GHL Connect App” button_fontfamily=”Default:regular” button_link=”url:https%3A%2F%2Fwww.aquariumcomputer.com%2Fsoftware%2Fghl-connect-app%2F|||”]Last updated on: December 8, 2018
-
What is the difference between the Standalone and Slave doser?
[TS_VCSC_Icon_Flex_Button button_text=”Read More about GHL Doser” button_fontfamily=”Default:regular” icon_select=”” button_link=”url:https%3A%2F%2Fwww.aquariumcomputer.com%2Fproducts%2Fghl-doser%2F|||”]
- GHL Standalone doser: Comes with built-in Wi-Fi for access via GHL Connect app, myGHL cloud, and GHL Control Center. Can be used as a standalone device; no controller required to operate.
- GHL Slave doser: Requires a GHL Standalone doser, ProfiLux 3, or ProfiLux 4 to operate.
Last updated on: December 8, 2018
-
Can I connect the Mitras LX7, GHL Doser and ProfiLux to the cloud? Do I need to buy anything extra for that?
Cloud access, yes. Extra accessories needed for cloud access, no.
GHL Doser, ProfiLux 3 and 4 are equipped with Wi-Fi and/or LAN that allows you to connect it to an existing network. You can also connect all devices to the myGHL cloud for remote access to your device. All mentioned devices are cloud ready right out of the box.[TS_VCSC_Icon_Flex_Button button_text=”Read More about cloud service myGHL®” button_fontfamily=”Default:regular” icon_select=”” button_link=”url:https%3A%2F%2Fwww.aquariumcomputer.com%2Fsoftware%2Fmyghl%2F|||”] -
Can I control multiple Mitras LX7 in master/slave mode?
Yes, multiple LX7s can be controlled from a single master LX7. In this scenario, one light is set as master and other LX7s are set as slaves.
[TS_VCSC_Icon_Flex_Button button_text=”Read More about the Mitras LX 7000 series” button_fontfamily=”Default:regular” icon_select=”” button_link=”url:https%3A%2F%2Fwww.aquariumcomputer.com%2Fproducts%2Fghl-illumination%2Fmitras-lx-7000-series%2F|||”] -
What accessories do I need if I want to illuminate my aquarium with the Mitras Lightbar 2?
In addition to the light(s) you’ll need the following accessories:
Undimmed operation:
- Suitable power supply with sufficient power
Unmimmed operation of up to 4 lights:
- Suitable power supply that has at least the total power of the connected lightbars
- Mitras Lightbar Splitter
Dimmed operation via ProfiLux Controller:
- Suitable power supply that has at least the total power of the connected lightbars
- Mitras Lightbar Splitter (is also required when using only one Lightbar2)
- Interface cable for connection to the ProfiLux
[TS_VCSC_Icon_Flex_Button button_text=”Read More about Mitras Lightbar 2″ button_fontfamily=”Default:regular” icon_select=”” button_link=”url:https%3A%2F%2Fwww.aquariumcomputer.com%2Fproducts%2Fghl-illumination%2Fmitras-lightbar-2%2F|||”]Last updated on: December 12, 2018
-
Operation via App GHL Connect, Cloud myGHL or PC software GHL Control Center?
The following options are available for operating GHL devices:
- App GHL Connect and Cloud myGHL: For all devices with a network connection (WiFi/LAN), e.g.: ProfiLux 3, ProfiLux 4, GHL Doser 2/Maxi Standalone
- Web interface: For all devices with a network connection (WiFi/LAN) and integrated web server, e.g: ProfiLux 3, ProfiLux 4, Mitras LX7
- PC software GHL Control Center: For all GHL devices with USB, network and/or serial connection
- For devices with control panel (keyboard and display), settings can also be made here.
Q: What exactly is GHL Connect?
A: GHL Connect is a platform independent, web based and universal user interface for GHL devices. It is used in the app, the cloud service myGHL and the integrated web server. GHL Connect runs on Windows, Mac, Android and many other platforms.Q: Can I make all settings via the app, the cloud or the web interface (GHL Connect)?
A: GHL Connect is under permanent development, meanwhile all important or frequently used settings and functions are already supported. The few currently not supported features are in progress and will be available soon. Also future new features will be implemented in GHL Connect immediately.Q: Do I need the PC software GCC for the initial setup of devices with network connection?
A: No. In the delivery state, WiFi/LAN is already active and the device is visible for GHL Connect (app and web server) – with WiFi as access point – so settings can be made immediately via GHL Connect.Q: What do I need the PC software GCC for?
A: Mainly for updating the device firmware.Q: Is there a Mac version of GCC?
A: No. Since the launch of our first ProfiLux 1 computers about 20 years ago, thousands of development hours have already been invested in GHL Control Center (GCC). GCC is an extremely comprehensive and constantly evolving software with tens of thousands of source code lines. Porting to Mac is economically not reasonable and because of GHL Connect not neccessarily needed. We will invest our resources in the further development of GHL Connect and in new features in the device firmware.Q: Can I use GCC on my Mac?
A: Yes. Many of our Mac customers use a parallel Windows installation (e.g. Parallels, Bootcamp or Oracle Virtual Machine) to successfully use GCC.Last updated on: January 5, 2019
-
If I purchase a 2 or 3 pump GHL Doser, can I upgrade my doser at a later time?
[TS_VCSC_Icon_Flex_Button button_text=”Read More about Doser accessories” button_fontfamily=”Default:regular” button_link=”url:https%3A%2F%2Fwww.aquariumcomputer.com%2Fproducts%2Fghl-doser%2Fdoser-accessories%2F|||”]
Absolutely! The GHL Doser 2.1 was designed to grow with your needs. When you’re ready to add more dosing pumps (up to 4) to your doser, you can simply do the upgrade by purchasing the necessary parts.
Last updated on: December 12, 2018
No questions matching current filter
Frequently Asked Questions
General
6 questions
-
How do I achieve the maximal dosing accuracy with GHL Dosers?
In order to achieve the maximal dosing accuracy with our dosing devices we recommed:
- Always use the newest firmware for your device resp. the newest version of the PC software GHL Control Center. Please update to benefit from our on-going improvements. You find the newest version in our download section.
- Select the appropriate pump speed. The smaller the dosing amount and the higher the required precision is the slower the speed shall be. For large amounts which don’t need a very high accuracy higher speeds are appropriate.
- The calibration process is extremely important. Calibration has to be made in the speed in which the pump will later be operated, of course. For calibration the hoses should be as short as possible, the total length shall not exceed 60cm (2ft). The volume, which is pumped during the calibration, must be measured absolutely precisely. We recommend a letter scale or appropriate vessel with exact markings.
Check the calibration: Dose a certain amount and check whether the expected quantity was also dosed. Repeat the calibration if the result is unacceptable. The test amount should be large enough for the pump to run for at least 1 minute. - Keep all hoses as short as possible. Use the smallest possible inner diameter which just works for your application. The larger the volume inside the hose – determined by inner diameter and length – the less accurate the dosing will become.
- Avoid large height differences between dosing container, pumps and aquarium. The smaller the differences the more accurate the dosing will be. The dosing container shall be placed below the water level to avoid a back flow or syphon effect, the outlet hose (to the aquarium) must never hang in the water.
- Although the pump heads had been produced under highest quality standards with very small tolerances it can’t be guaranteed under every possible operating condition that liquids move in the hose after a certain time. Therefore it is possible that reverse valves improve the precision. But this will only work if 5.) has been followed, especially important is that the dosing container is below the water level.
- Bear in mind that liquids in the tube may volatilize, depending on temperature, air pressure fluctuations and last but not least on the fluid itself. Also, gases can diffuse through the tubing and create bubbles in the tubing. If you have problems with bubbles or liquid seems to return, you should change the tubing. In particular silicone tubes have a higher gas permeability.
Bottomline – You achieve the best accuracy with:
Slowest possible speed, very precise calibration, thin, short and gas-impermeable tubes, small height differences.
Last updated on: December 8, 2018
-
What is the Power Balancing Technology (PBT)?
The newest GHL LED-lights with integrated control are using the GHL Power Balancing Technology (PBT)
In most dimmable lamps with multiple color channels from other vendors a change in the light color is realized by reduction of the less wanted colors.
This means that the maximum available power can only be accessed when all color channels are operated at 100%. Once a color channel is reduced, the full lighting performance can’t be used.
PBT allows the optimal use of existing power resources: The power that is saved in reduced color channels can be assigned to other color channels. A complex microcontroller-controlled electronics determines temperatures, currents and other parameters, and ensures safe operation and long life of all the LED color channels.
In GHL lights LEDs are generally not operated at the maximum allowed current, through the high power reserves PBT can be used optimally.
The following simple example will illustrate this: light with 100W total output, 4 channels red, green, blue and white, each with 25W
Normal operation, no color variation, all channels at 25W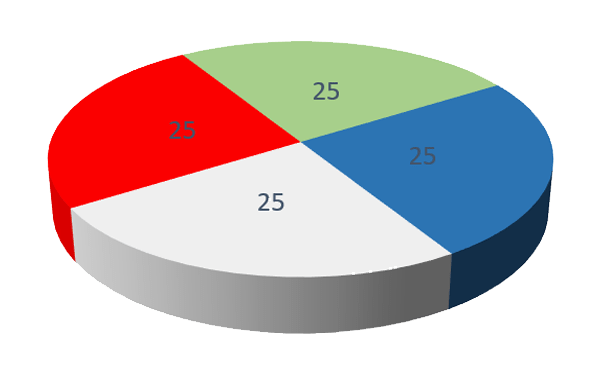
In sum 100W, the maximum light output.
Color variation without PBT: reduction of less wanted channels red and green to 10W
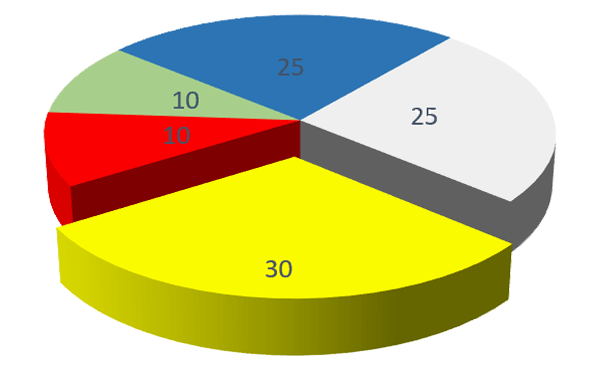
In sum 70W, 30W (shown here in yellow) of 100W unused.
Color variation with PBT: reduction of less wanted channels and increase of the other channels at the same time
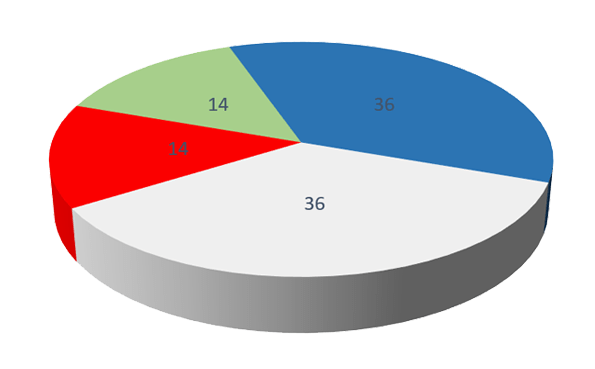
In sum 100W, the maximum possible light power can be fully used.
The maximum possible lighting performance is mainly determined by the power supply and temperature management. It therefore makes more sense to move the existing power between the individual channels and thus be able to use the full lighting performance even with color change, instead of just reducing individual channels and not being able to use the possibe total power.
GHL Power Balancing Technology can be found for instance in the Mitras Lightbar 2 and Mitras LX7.
Last updated on: December 8, 2018
-
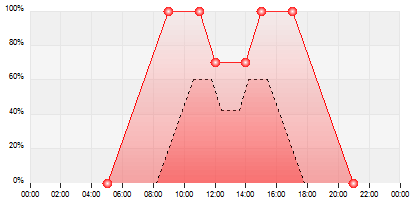
How do I use the Seasonal Lighting Simulation?
Mitras LX LED Luminaires and ProfiLux Aquarium Controllers (version 3, Mini, Light and Terra) are capable of simulating the seasonal cycle of sunshine duration and sun intensity
Example for changing intensity and day duration over the year
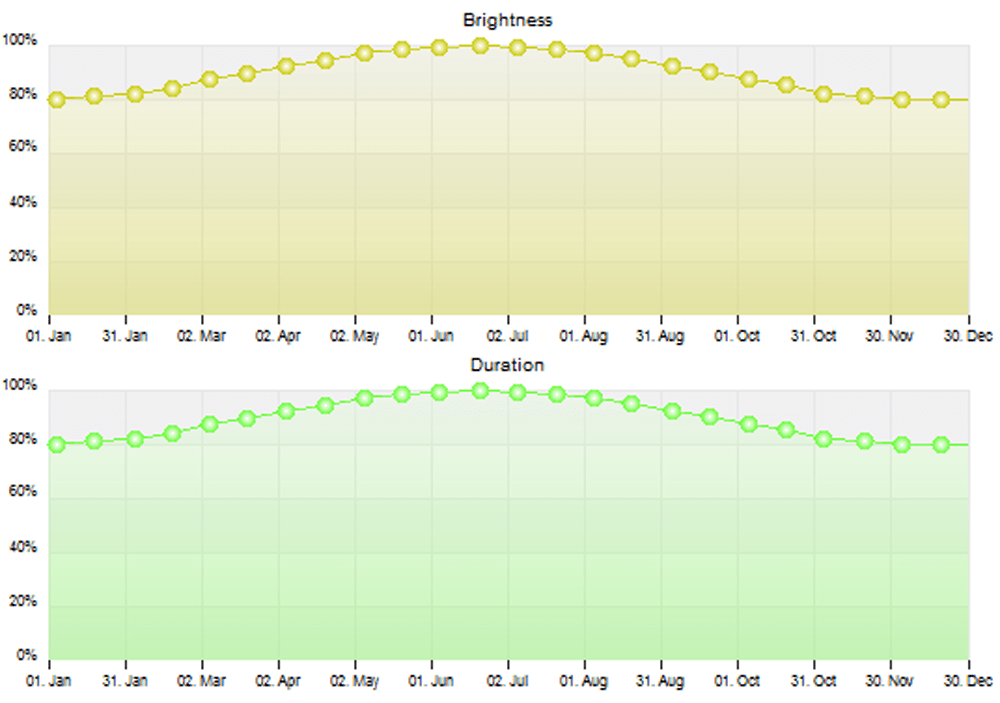
The Theory of Seasons
The duration of a day (defined as the time between sunrise and sunset), night and sun intensity change depending on the season. The amount of change that occurs throughout the day depends on the latitude; the farther it is from the equator, the greater the difference between the longest and the shortest day will be.
Examples of Day and Night Time for Different Latitudes:
Location Latitude Longest day Shortest day Brasilia (Brazil) S 16° 13 h 11 h Frankfurt (Germany) N 50° 16 h 8 h Oslo (Norway) N 60° 18.5 h 5.5 h Summer begins on the longest day of the year. Winter begins on the shortest day of the year. When day and night are the same length (equinox), it marks the beginning of spring or autumn. The seasons are opposite in both hemispheres.
The sun intensity will also change more the further away the latitude is from the equator.
Important Astronomical Time Points:
Date on Northern Hemisphere Date on Southern Hemisphere Season Equinox 20. March 22. September Spring starts Longest day 21. June 21. December Summer starts Equinox 22. September 20. March Autumn starts Shortest day 21. December 21. June Winter starts The date may vary by one day depending on the year.
Simulation of the Seasonal Course
GHL has implemented a feature which simulates the seasonal course of lighting based on the following aspects:
- Similar to nature but still practical for artificial biotopes
- Simple and convenient to operate
- Flexible and customizable to suit individual needs
The Seasonal Lighting Simulation automatically adjusts existing illumination curves by changing light intensities and times throughout the year.
Seasonal lighting can be combined with other simulations such as thunderstorms, rainy days, moon phases, clouds, and acclimation. That means that the brightness of an illumination channel is calculated from the combination of all active simulations.
Enabling the Simulation
Setting the individual illumination channels
First you set the curves for the longest and brightest day (summer start). Additionally, for each channel the checkbox “Seasonal lighting” needs to be checked so that the selected illumination channels respond to the simulation. If seasonal lighting is disabled for an illumination channel, the set lighting curve will run every day unmodified.Example:
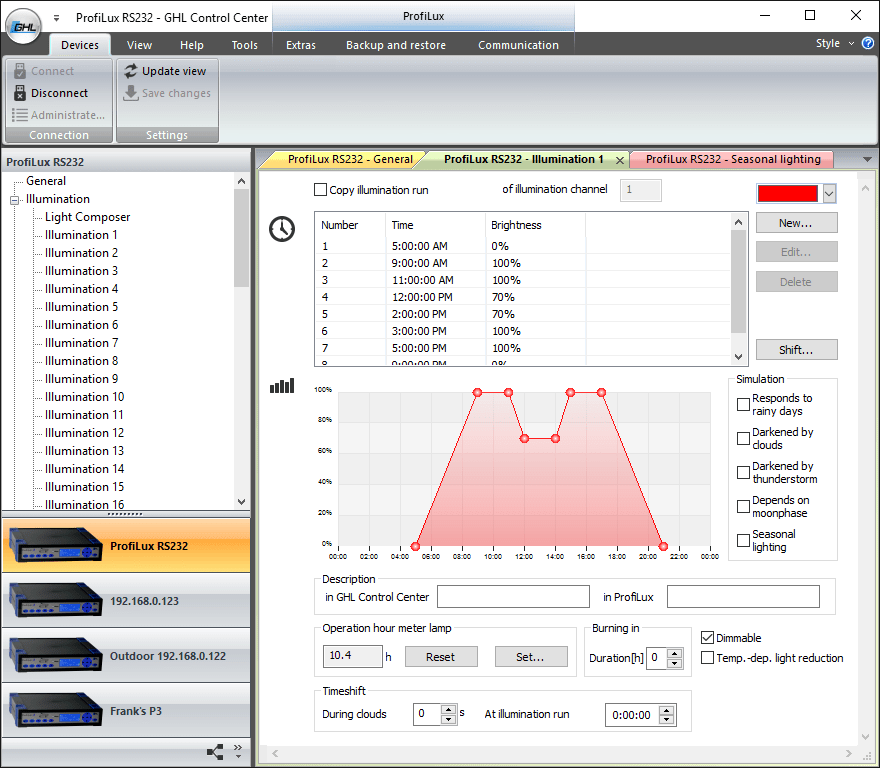
- Illumination 1 from 5:00 AM to 9:00 PM
- Maximum 100%
- Reduction at noon
- Simulation seasonal lighting activated
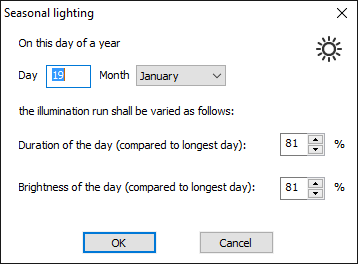
Programming the Seasonal lighting
Definition of Midday: The time is taken as the center, when the assigned illumination channel(s) runs are pushed together during the year. In the example above, the center of the curve is at 1:00 PM, so here also 1:00 PM should be set as “Mid-Day”.Definition of the duration and brightness over the year: In a table, the duration and brightness can be defined for up to 24 days a year. The duration and brightness of days that fall between the defined days are calculated automatically. This allows for a smooth transition into the simulation. The illumination curves concerned are recalculated daily, this means the illumination brightness is reduced and the duration of illumination is shortened if necessary.
Automatic Generation of Simulation Course
GHL Control Center offers a convenient way to automatically fill the table with the values for day, time and brightness.After entering:
– Day and month of the brightest day
– Brightness of the shortest day
– Duration of the shortest day
Click on “Fill table now”. The table will automatically create a course which very closely matches the natural conditions.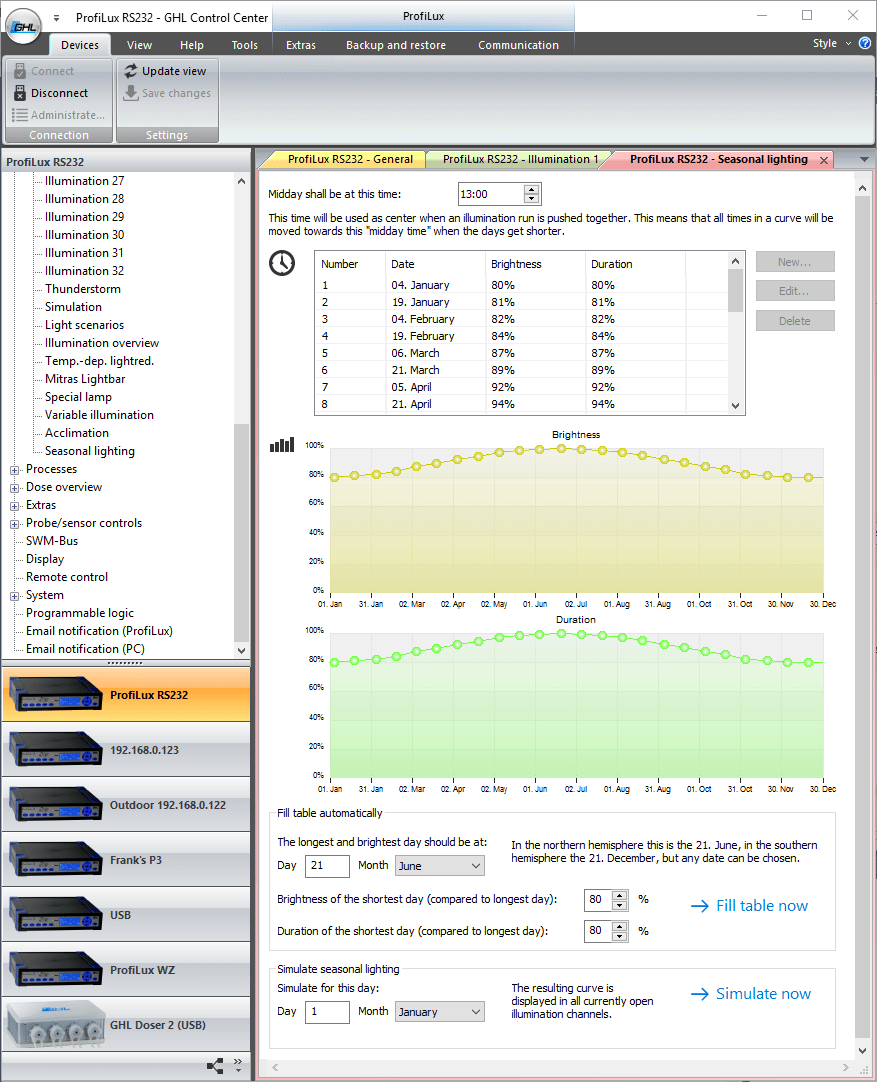
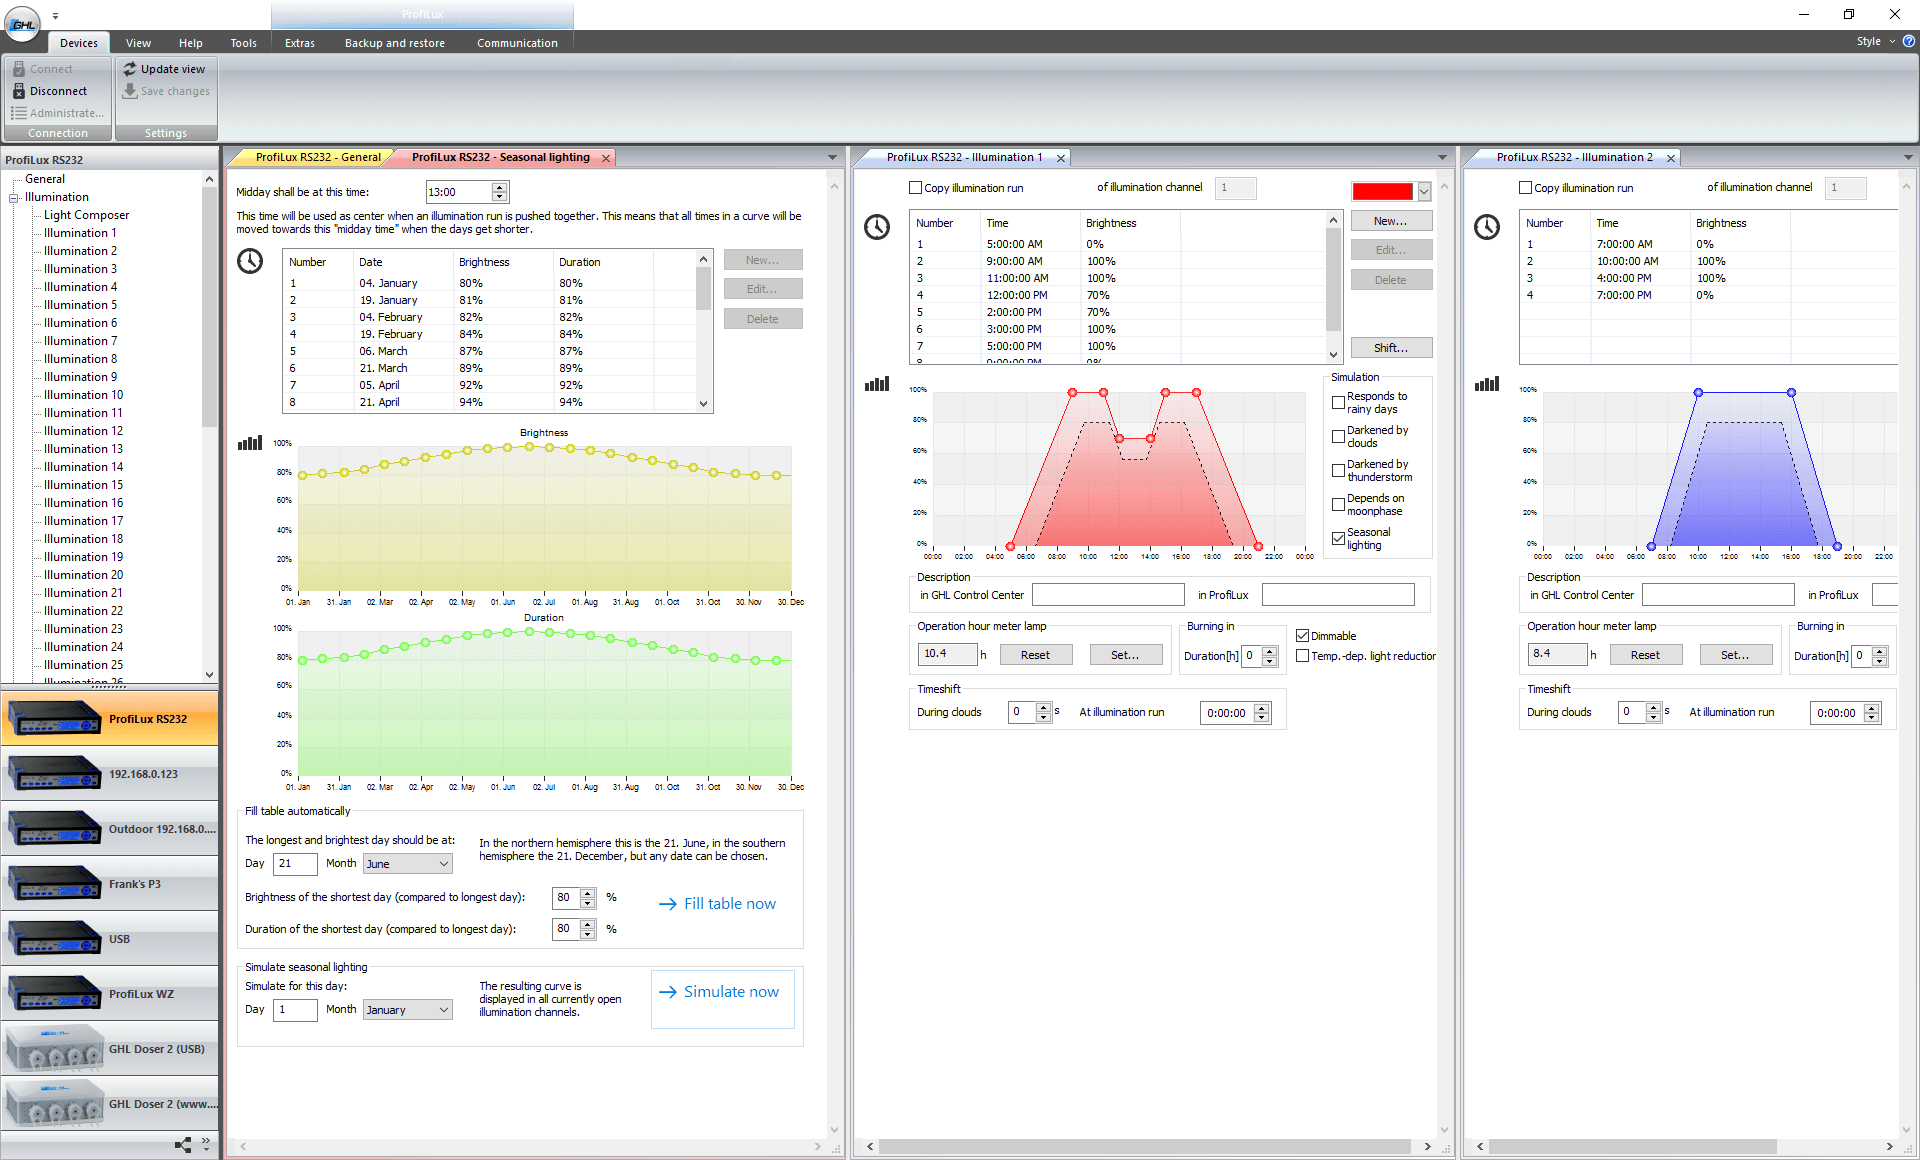
Testing Simulation Course
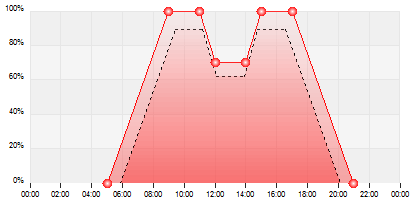
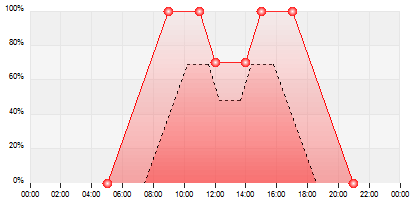
After the simulation course has been programmed, you can view the resulting illumination run for each illumination channel. Open the illumination channels whose simulation course you want to see (tip: In GCC you can also view several windows – as Seasonal Lighting and illumination runs – next to each other, move window for this on the register tab), then select the date for which you want to simulate. After clicking on “Simulate now” the simulated runs are represented by dashed lines in the illumination channels.Simultaneous display of seasonal lighting and two illumination runs, simulated course shown:
Automatic variation of one illumination course during the year:
 February 21
 April 21
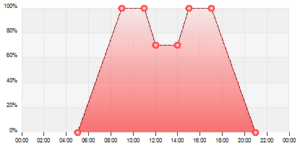 June 21
 August 21
 October 21
 December 21
Notes
Please use the “Seasonal Lighting” with caution. Remember that (at large) variations of illumination duration and intensity could harm corals or plants in the aquarium and the entire system could be destabilized.
System Requirements
The functionality described here requires the following minimum software and firmware versions:
Version ProfiLux 3 N/T (eX) 6.27 Mitras LX 6xxx 1.19 GHL Control Center 1.0.8.4 Last updated on: December 8, 2018
-
What is the meaning of the blink and color codes of the GHL Logo?
GHL Logo Status Display
Some GHL devices have an illuminated logo which displays system information using a RGB-LED.
Up to 2 information can be displayed simultaneously according to the following rules:
- the information to be displayed are selected according to their priority
- if 2 information should be displayed, these appear alternately
Displayed information
Information Combinable with other information Blinking can be switched off Violet blinking Device booting No No Red/Yellow blinking Error: Problem with serial number or security key No No Red constant Error: Memory defective No — Yellow constant Memory has been reset – please reactivate control by confirming on the device No — Red blinking Alarm Yes Yes Yellow blinking Warning Yes Yes Green blinking Activity, e.g. dosing or water change Yes Yes White constant Configuration LAN/Wi-Fi No — White blinking Connecting with myGHL Yes Yes Blue blinking Connected with myGHL Yes Yes Blue constant No information to display — — (the order is according to the priority)
The user has some options to customize the display according to his wishes, he can choose among these modes:
- Standard – up to 2 information are shown, the logo might blink for displaying a certain information.
- Standard w/o Blinking – only one information can be displayed, the logo shows one color permanently.
- Off – no information is displayed, the logo is not illuminated.
- Constant Red, Green or Blue – no information is displayed, the logo is permanently illuminated with the selected color.
In addition, the brightness of the logo illumination can be set in the range of 20% to 100% (in the “off” mode, the brightness is independent of this always 0%).
System requirements
The functionality described here requires the following minimum software and firmware versions:
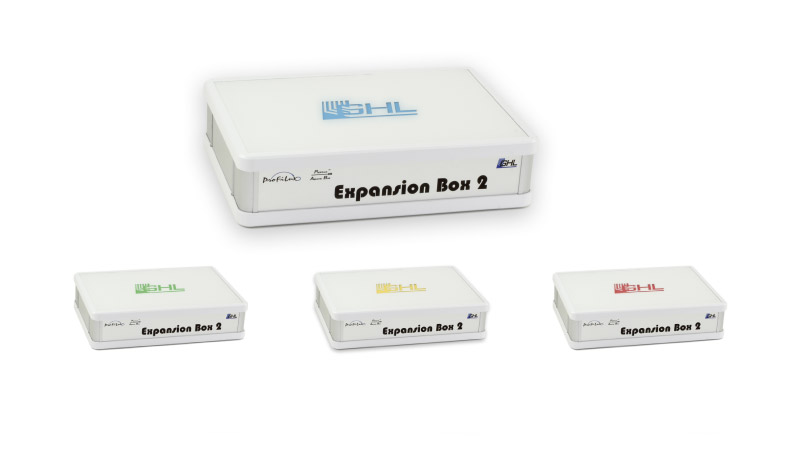
Version ProfiLux 3 N/T (eX) 6.26 GHL Doser 2 Standalone 1.19 GHL Doser 2 Slave 1.19 Expansion Box 2 2.02 GHL Control Center 1.0.8.3 -
Where do I find the newest firmware for my device?
The newest firmware of all devices is always included in the newest version of the PC software GHL Control Center (GCC).
The update is done through GCC, during the update process GCC finds the newest firmware for your device automatically.
In case you need direct access to the firmware files (e.g. for an emergency update) the firmware files are located in a directory similar to this:
C:\Program Files (x86)\GHLControlCenter_V1121\Firmware
(beginning of the path depends on the GCC version and the install location)
-
How do I update the WiFi Module?
Concerns GHL-devices with ESP WiFi module, such as Mitras LX 7 and ProfiLux 4
The WiFi module has its own file system and firmware, this is independent from the device. The file system as well as the WiFi firmware can be updated via the web interface.
Preparation:
- A stabile WiFi connection to the device (resp. its WiFi module) is required. We recommend a static IP address.
- In case myGHL is used: Prior the update myGHL should be disabled temporarily to avoid interferences during the update, reboot the device after disabling.
Update-Process:
Open the web interface
Attention: The browsers Edge and Safari are not recommended for the firmware update; problems with these browsers have been reported. Please use Firefox, Chrome or Internet Explorer.
Enter the IP address of the device in the address line of your browser. Login if you are asked to, the default login is: Username admin, PW: Starfish.

Select file
Open the menu (Sandwich-Button), Settings->File transfers.

If you want to update the firmware, click firmware.bin if the file system is to be updated spiffs.bin.

You’ll find the files in the program directory of GHL Control Center 1.0.9.7 and higher.
Example:
The firmware Version 6318 is in C:\Program Files (x86)\GHLControlCenter_V1097\WiFi\Firmware\6318.Open the file.

Start file upload
Confirm following message with OK.

The update is running now – under no circumstances interrupt it!
After a while the update is completed. Confirm following message, the WiFi module boots now, wait until the web page is refreshed.

The upload is done now. On the dashboard of the web interface you should see now the actual version number of the firmware resp. the file system.
Emergency update
Only necessary if the file system is corrupted! Otherwise do the uploads as described above!
In case the file system is corrupted (e.g. through a failed upload attempt) the web interface will not be accessible anymore, the above procedure is not possible anymore.
Nevertheless, with following actions an update can be forced:
- enter http://xxx/update in the web browser (xxx stands for the IP-address of the device)
- select file bin or spiffs.bin
- start upload process with clicking Update
- the update is running now – under no circumstances interrupt it!
- the module reboots automatically and is after approx. 1 minute operational

Last updated on: December 8, 2018


Presales
20 questions
-
If I wanted to just dose Alk, Calc, Mag. What do I need?
GHL Doser 2.1 Standalone with 3-pumps
-
What mounting options are available for the Mitras?
- Wire hanging kit
- GHL Flex Mount: Is installed to the back wall of your aquarium stand.
[TS_VCSC_Icon_Flex_Button button_text=”Read More about Mitras LX accessories” button_fontfamily=”Default:regular” icon_select=”” button_link=”url:https%3A%2F%2Fwww.aquariumcomputer.com%2Fproducts%2Fghl-illumination%2Fmitras-lx-accessories%2F|||”] -
If I wanted to expand my GHL Doser, what can I do with the Slave pump? Do I need to buy anything else such as additional cables?
The GHL dosing system can support up to 16 total dosing pumps. If you already have a dosing unit and wish to add a Slave doser, you can further automate your dosing tasks by dosing liquid foods and other supplements such as trace elements. When adding a slave dosing unit, you will also need to purchase a PAB-cable (available in various lengths).
-
If I buy a ProfiLux 3 or 4 Controller, can I control the Mitras from it?
To do this you will need to buy the PLM-PWC expansion card. This expansion card is installed inside the ProfiLux itself. This card is what allows wireless communication between the ProfiLux and Mitras.
[TS_VCSC_Icon_Flex_Button button_text=”Read More about ProfiLux expansion cards” button_fontfamily=”Default:regular” icon_select=”” button_link=”url:https%3A%2F%2Fwww.aquariumcomputer.com%2Fproducts%2Fprofilux-accessories%2Fexpansion-cards%2F|||”] -
What are the differences between the ProfiLux 4 Mega Set and Ultimate Set?
- Mega Set includes: Probes (Temperature, pH, Redox, Conductivity), calibration fluids, Powerbar, PAB cable, USB cable, and ProfiLux 4 controller.
- Ultimate Set includes: All the above PLUS a ProfiLux Touch display
[TS_VCSC_Icon_Flex_Button button_text=”Read More about ProfiLux Controller Sets” button_fontfamily=”Default:regular” icon_select=”” button_link=”url:https%3A%2F%2Fwww.aquariumcomputer.com%2Fproducts%2Fprofilux-aquarium-controller%2Fprofilux-controller-sets%2F|||”]Last updated on: December 8, 2018
-
What I can do extra if I buy the Mitras with the ProfiLux Controller?
As long as you buy the PLM-PWC expansion card for your controller, you will be able to access your Mitras illumination settings from the ProfiLux connection. By adding a PWC expansion card, you make it easier for yourself to access the LX7 rather than connecting to the light itself. You can also synchronize special functions in ProfiLux and Mitras LX7, like thunderstroms and maintenance.
-
If I purchase a P4 Ultimate Set, what are the advantages of getting a ProfiLux Touch display?
[TS_VCSC_Icon_Flex_Button button_text=”Read More about ProfiLux Touch” button_fontfamily=”Default:regular” icon_select=”” button_link=”url:https%3A%2F%2Fwww.aquariumcomputer.com%2Fproducts%2Fprofilux-accessories%2Fprofilux-touch%2F|||”]
The ProfiLux Touch display provides an additional layer of convenience and point of access. With this accessory, you can view valuable information such as probe readouts and graphs. You can also setup 1-touch shortcut keys to trigger feed pauses, maintenance modes, and perform an Alkalinity test (KH Director required). If you wanted to manually turn on or off certain outlets, you can do that too. Ultimately, the touch display makes it easy to view and trigger commands as needed, even if your hands are wet!
-
Can I control Ecotech Vortech® pumps with a ProfiLux Controller?
Yes. To do this you would need a GHL Vortech Controller and a PAB-cable accessory. This Vortech controller will allow for wireless communication between your Vortech pumps and the ProfiLux controller. The PAB-cable is needed to connect the Vortech controller to the P4 system.
[TS_VCSC_Icon_Flex_Button button_text=”Read More about pump control” button_fontfamily=”Default:regular” icon_select=”” button_link=”url:https%3A%2F%2Fwww.aquariumcomputer.com%2Fproducts%2Fpump-controller%2F|||”] -
What are the accessories that I can add on a ProfiLux controller?
GHL offers a variety of expansion cards which can be mixed and matched to meet your needs. If you need to add additional probes or sensors, you can do so by simply purchasing a GHL expansion card. If you’re looking to control Ecotech Vortech® pumps, you can do so with our GHL Vortech Controller accessory. ProfiLux also accommodates the wish to control any 1-10v device; lighting, pumps, etc.
Add GHL powerbars, Expansion Boxes, Dosers, LED lighting and LED controllers and much more – the expansion possibilities are almost unlimited.
[TS_VCSC_Icon_Flex_Button button_text=”Read More about ProfiLux accessories” button_fontfamily=”Default:regular” icon_select=”” button_link=”url:https%3A%2F%2Fwww.aquariumcomputer.com%2Fproducts%2Fprofilux-accessories%2F|||”] -
What is the difference between single junction or double junction pH & redox/ORP probes, what does GHL use?
What type of pH and redox/ORP probes does GHL use?
The quality of the measurement results is of essential importance. For this reason GHL uses only lab-grade double junction pH & redox/ORP probes, GHL does not and never did sell the cheaper and less reliable single junction probes.
What is the difference between a single & double junction probe?
The reference cell of a single junction probe only has a material similar to a wick (hereinafter referred to simply as “wick”) which is in direct contact with the solution to be measured. This is an essential part that enables the probe to function and also a part prone to disturbances.
The reference cell of a double junction probe has a wick that comes into contact with a second chamber filled with the same material as the reference cell. This second chamber also has a wick that is in direct contact with the solution to be measured. The second chamber slows down contamination, so double-connection probes can work reliably for up to 12 months or more if well maintained.
A double junction can also help protect the probe if the sample solution reacts and could form a solid sediment with the reference solution, clogging the wick and compromising its functionality.
Contamination can occur faster with a single junction probe than with a double junction probe, so a single junction probe has a shorter life.Last updated on: January 23, 2019
-
What is the difference between the LX 7006 and LX 7206?
- LX 7006: Freshwater model with an LED layout designed for growing healthy, colorful freshwater plants
- LX 7206: Saltwater model with an LED layout designed for growing health, colorful corals, including SPS!
[TS_VCSC_Icon_Flex_Button button_text=”Read More about the Mitras LX7000 series” button_fontfamily=”Default:regular” icon_select=”” button_link=”url:https%3A%2F%2Fwww.aquariumcomputer.com%2Fproducts%2Fghl-illumination%2Fmitras-lx-7000-series%2F|||”] -
Basics about LED Illumination – Lumen, Lux, PAR and Photosynthesis
Light is Not Just Light – The Basics of Mitras® LED Illumination by GHL
Benefit from our many years of experience – since 2002, we offer dimmable led lights for application in aquatics.
Photosynthetic Efficiency with Mitras Luminaires
With the help of light energy from CO2 and water, coral symbionts and plants build carbohydrates and discard oxygen; this process is called photosynthesis. In charge of this energy production is the plant pigment chlorophyll (a + b and carotene).
Light beams are electromagnetic waves, consisting of energy particles called photons. The energy of the so-called Photon is dependent on its wavelength (nm) and its frequency (THz). Different wavelengths of light we see as color. The visible light by humans covers only a particular segment of the electromagnetic spectrum, which moves in the range of 380-750 nm.
As you can see – For the intended use, a suitable light spectrum and light intensity are crucial for the photosynthetic activity of coral symbiont and plants. The higher the photosynthesis rate is, the stronger and healthier growth will be.
LUX (lm/m2) is the unit of illuminance, which indicates which luminous flux (lumens) falls on a particular area. The light output in lumens (lm) as a measure of the brightness is standardized to human vision sensitivity. Since people perceive blue or red light less intensely than green light, the lumen decreases with consistent high radiation values, the more blue or red the light is.
Therefore the specified lumens at our Mitras Daylight, for example, are much higher than in the Mitras Actinic, though the wattage is almost identical.
The qualification of a luminaire only based on lumens/watt (light output per electrical power) is not always suitable as it says nothing about the photosynthetic efficiency of light
It is quite so that a luminaire with high lumens but an unfavorable spectrum of photosynthesis is less beneficial than a luminaire with slightly fewer lumens but, therefore, optimum range.
More meaningful is the so-called PAR value (Photosynthetic Active Radiation), which describes the available radiation for photosynthesis.
All this offers the high-power Mitras LED illumination in perfection. Mitras Luminaires achieve above-average PAR values and thus ensures healthy growth in your aquarium.
More Facts why Mitras Luminaires are Your Best Choice
When comparing our Mitras Luminaires with others, you should note the following points:
- Our electric power also includes the consumption of the control electronics, not only the consumption of the LEDs.
- The light performance indicated by us also includes the performance of the LEDs, which contribute less to the creation of lumen but which optimize the spectrum.
- Furthermore, we indicate the actual remaining lumen after deducting the losses through the glass and temperature increase.
- Contrary to the commonly used practice to use cheap series resistors for LED-current limiting, in our luminaires, we control the current of LEDs precisely by electronics. Through this, we can also minimize current consumption and waste heat.
- We truly believe that we could utilize the maximum out of LED-technology – the best LEDs, an extremely transparent protector plate, a massive cooling, and electronic control. More is hardly possible. If you find elsewhere better performance data, then you should question this critically.
- We don’t indicate any ideal theoretic values but the performance data which can be reached in practice after the deduction of all losses.
Photosynthesis with Mitras Lightbar Daylight in freshwater aquarium
Please accept YouTube cookies to play this video. By accepting you will be accessing content from YouTube, a service provided by an external third party.
If you accept this notice, your choice will be saved and the page will refresh.
Last updated on: June 4, 2024
-
What is the light spread of a single Mitras LX7 fixture?
Up to 88 cm x 58 cm / 35″ x 23″
-
Are Mitras LX7, GHL Doser and ProfiLux 3 & 4 controllable via an app?
Yes, the all these devices can be controlled using the GHL Connect app.
[TS_VCSC_Icon_Flex_Button button_text=”Read More about the GHL Connect App” button_fontfamily=”Default:regular” button_link=”url:https%3A%2F%2Fwww.aquariumcomputer.com%2Fsoftware%2Fghl-connect-app%2F|||”]Last updated on: December 8, 2018
-
What is the difference between the Standalone and Slave doser?
[TS_VCSC_Icon_Flex_Button button_text=”Read More about GHL Doser” button_fontfamily=”Default:regular” icon_select=”” button_link=”url:https%3A%2F%2Fwww.aquariumcomputer.com%2Fproducts%2Fghl-doser%2F|||”]
- GHL Standalone doser: Comes with built-in Wi-Fi for access via GHL Connect app, myGHL cloud, and GHL Control Center. Can be used as a standalone device; no controller required to operate.
- GHL Slave doser: Requires a GHL Standalone doser, ProfiLux 3, or ProfiLux 4 to operate.
Last updated on: December 8, 2018
-
Can I connect the Mitras LX7, GHL Doser and ProfiLux to the cloud? Do I need to buy anything extra for that?
Cloud access, yes. Extra accessories needed for cloud access, no.
GHL Doser, ProfiLux 3 and 4 are equipped with Wi-Fi and/or LAN that allows you to connect it to an existing network. You can also connect all devices to the myGHL cloud for remote access to your device. All mentioned devices are cloud ready right out of the box.[TS_VCSC_Icon_Flex_Button button_text=”Read More about cloud service myGHL®” button_fontfamily=”Default:regular” icon_select=”” button_link=”url:https%3A%2F%2Fwww.aquariumcomputer.com%2Fsoftware%2Fmyghl%2F|||”] -
Can I control multiple Mitras LX7 in master/slave mode?
Yes, multiple LX7s can be controlled from a single master LX7. In this scenario, one light is set as master and other LX7s are set as slaves.
[TS_VCSC_Icon_Flex_Button button_text=”Read More about the Mitras LX 7000 series” button_fontfamily=”Default:regular” icon_select=”” button_link=”url:https%3A%2F%2Fwww.aquariumcomputer.com%2Fproducts%2Fghl-illumination%2Fmitras-lx-7000-series%2F|||”] -
What accessories do I need if I want to illuminate my aquarium with the Mitras Lightbar 2?
In addition to the light(s) you’ll need the following accessories:
Undimmed operation:
- Suitable power supply with sufficient power
Unmimmed operation of up to 4 lights:
- Suitable power supply that has at least the total power of the connected lightbars
- Mitras Lightbar Splitter
Dimmed operation via ProfiLux Controller:
- Suitable power supply that has at least the total power of the connected lightbars
- Mitras Lightbar Splitter (is also required when using only one Lightbar2)
- Interface cable for connection to the ProfiLux
[TS_VCSC_Icon_Flex_Button button_text=”Read More about Mitras Lightbar 2″ button_fontfamily=”Default:regular” icon_select=”” button_link=”url:https%3A%2F%2Fwww.aquariumcomputer.com%2Fproducts%2Fghl-illumination%2Fmitras-lightbar-2%2F|||”]Last updated on: December 12, 2018
-
Operation via App GHL Connect, Cloud myGHL or PC software GHL Control Center?
The following options are available for operating GHL devices:
- App GHL Connect and Cloud myGHL: For all devices with a network connection (WiFi/LAN), e.g.: ProfiLux 3, ProfiLux 4, GHL Doser 2/Maxi Standalone
- Web interface: For all devices with a network connection (WiFi/LAN) and integrated web server, e.g: ProfiLux 3, ProfiLux 4, Mitras LX7
- PC software GHL Control Center: For all GHL devices with USB, network and/or serial connection
- For devices with control panel (keyboard and display), settings can also be made here.
Q: What exactly is GHL Connect?
A: GHL Connect is a platform independent, web based and universal user interface for GHL devices. It is used in the app, the cloud service myGHL and the integrated web server. GHL Connect runs on Windows, Mac, Android and many other platforms.Q: Can I make all settings via the app, the cloud or the web interface (GHL Connect)?
A: GHL Connect is under permanent development, meanwhile all important or frequently used settings and functions are already supported. The few currently not supported features are in progress and will be available soon. Also future new features will be implemented in GHL Connect immediately.Q: Do I need the PC software GCC for the initial setup of devices with network connection?
A: No. In the delivery state, WiFi/LAN is already active and the device is visible for GHL Connect (app and web server) – with WiFi as access point – so settings can be made immediately via GHL Connect.Q: What do I need the PC software GCC for?
A: Mainly for updating the device firmware.Q: Is there a Mac version of GCC?
A: No. Since the launch of our first ProfiLux 1 computers about 20 years ago, thousands of development hours have already been invested in GHL Control Center (GCC). GCC is an extremely comprehensive and constantly evolving software with tens of thousands of source code lines. Porting to Mac is economically not reasonable and because of GHL Connect not neccessarily needed. We will invest our resources in the further development of GHL Connect and in new features in the device firmware.Q: Can I use GCC on my Mac?
A: Yes. Many of our Mac customers use a parallel Windows installation (e.g. Parallels, Bootcamp or Oracle Virtual Machine) to successfully use GCC.Last updated on: January 5, 2019
-
If I purchase a 2 or 3 pump GHL Doser, can I upgrade my doser at a later time?
[TS_VCSC_Icon_Flex_Button button_text=”Read More about Doser accessories” button_fontfamily=”Default:regular” button_link=”url:https%3A%2F%2Fwww.aquariumcomputer.com%2Fproducts%2Fghl-doser%2Fdoser-accessories%2F|||”]
Absolutely! The GHL Doser 2.1 was designed to grow with your needs. When you’re ready to add more dosing pumps (up to 4) to your doser, you can simply do the upgrade by purchasing the necessary parts.
Last updated on: December 12, 2018
No questions matching current filter
Last updated on: February 19, 2024