About this article
This article (part 3 of 3) will show you how to properly setup and configure the ION Director for automatic measurement. In order for the IOND to provide accurate test results, these steps must be followed exactly as shown.
In order to get the best understanding of how the ION Director is setup and how it works, we highly recommend you read the manual.
Click here to download the manual.
Before you proceed with the steps below, you should first complete part 1 and part 2 of the IOND setup. If you have not done so yet, click the link below:
ION Director Initial Setup (Part 1)
ION Director Initial Setup (Part 2)
PART 3: Completing initial setup
In this section we will show you how to:
- Enable the ION Director
- Assign pumps to IOND
- Setup IOND general settings
- Install the MUI sensor
- Prepare for first IOND test
— Enable ION Director
1. Open the GHL Connect app, press the Menu icon, select Control, then select ION Director

2. Enable the ION Director, then press SAVE

— Setup general settings for IOND
1. Enable Record measurement values (as shown)
![]()
NOTE: This will store your IOND test results so you can later view them on a chart (myGHL required)
2. In the Pumps for measurement section, select the dosing pumps that will be responsible for each task
Example: In part 2 of the initial setup, we chose pump 1 for the water sample, pump 2 for reference A and pump 3 for reference B

3. In the Time schedule section, choose how you’d like to run your measurement schedule.
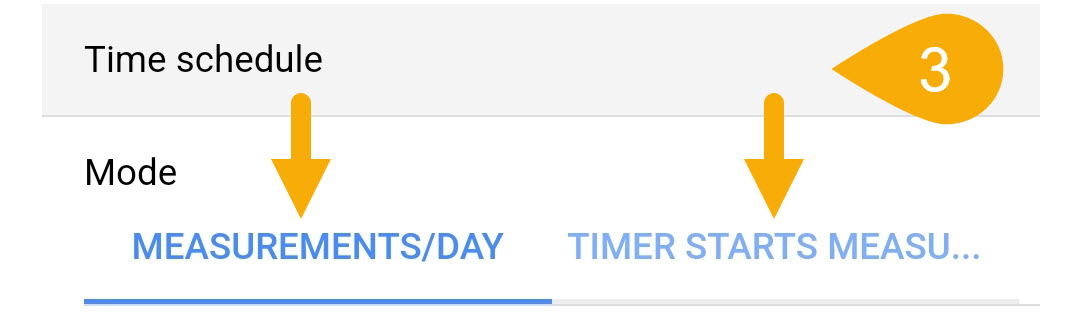
The IOND offers the flexibility to test on your schedule. Here’s an explanation of each option.
Measurements/Day: Choose this option, if you would like to test 1-24 times per day.
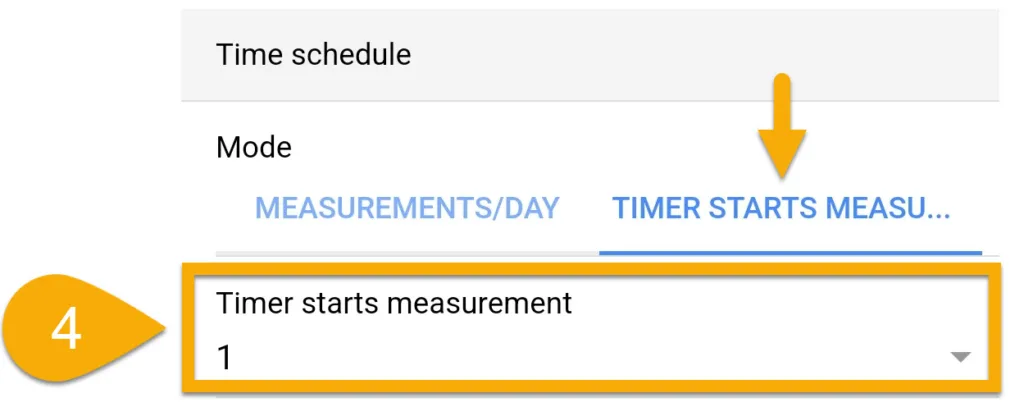
Timer Starts Measurements: Choose this option if you’d like to test less often than 1x per day.
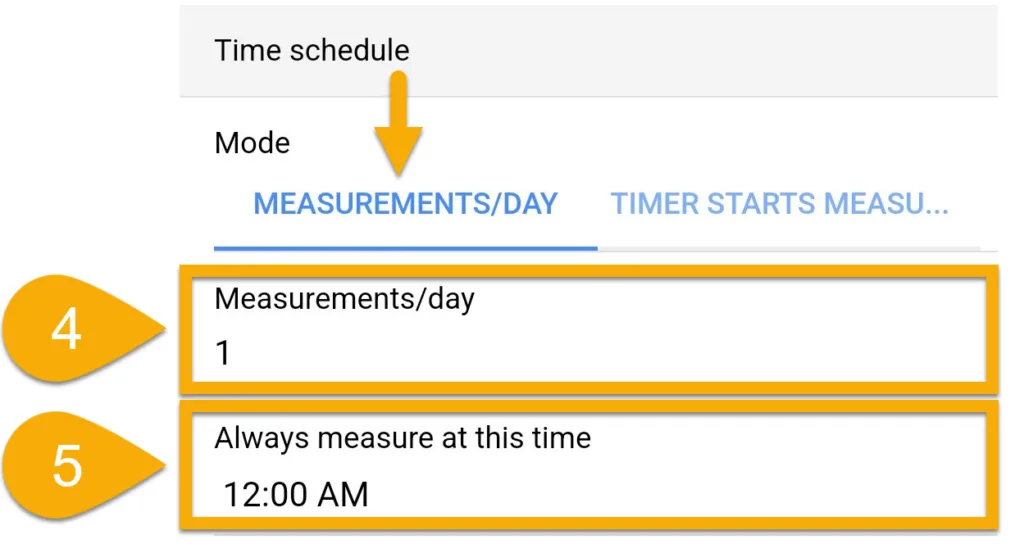
4. Specify the number of times per day you want to test
5. Specify the time for when the first test of the day shall happen.
Example: If you test 2x per day and the first test begins at 12:00 AM, the next test will be at 12:00 PM.
(00:00, 12:00, respectively)
4. Select an unused TIMER function; this TIMER will be responsible for activating IOND testing. Save settings.
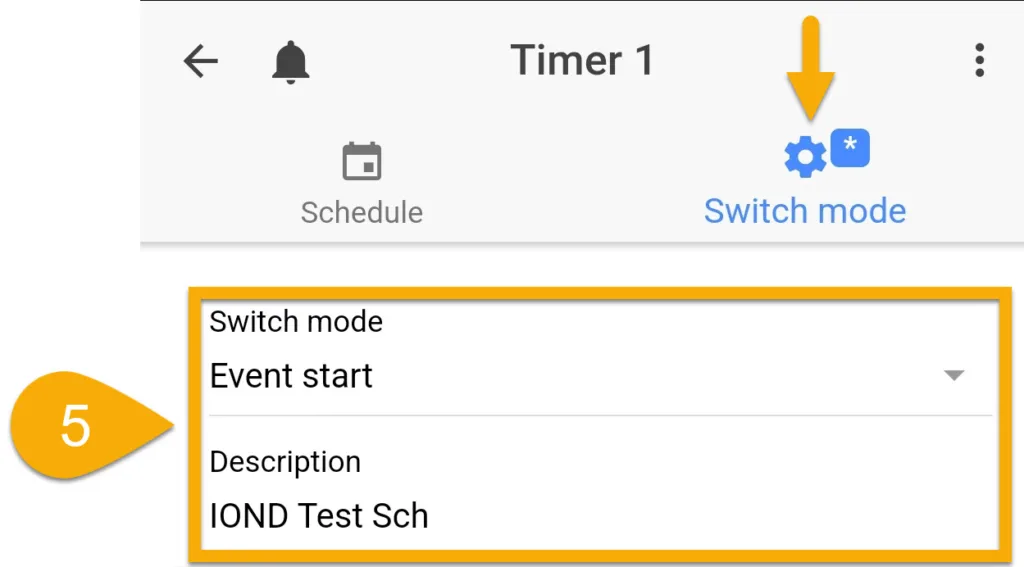
5. Go to that TIMER function, set the mode to Event Start, add a description, then tap the Schedule tab to create your testing schedule. Save settings, then go back to the IOND page to continue setup.
— Setup water sample settings
1. In the Sample tube volume field, press the Calculator icon

The calculator tool is used for telling the IOND how many ml the water sample tube holds. By measuring the total length of your water sample tube, the calculator will determine the volume held within the tube.
Alternatively, you can find the total tube volume by manually filling both ends of the tube with water and emptying the contents into a measuring instrument. If you choose to use this method, make sure you disconnect the tube from the IOND BEFORE manually filling and draining the tube.
2. Since you are using the sample tube that was included with your IOND, you can leave this field as-is.
NOTE: 4mm is the ID of the Flex-PVC tube that is included with the IOND.
3. Select your unit of measurement and type-in the total length of your water sample tube

The total tube length consists of 3 pieces of tube. These are:
- Length of tube from sump to pump head
- Length of tube from tube inside pump head (Approx 4.7″ or 12cm)
- Length of tube from KHD to pump head
When measuring the length of the tube going into the sump or aquarium, include the length of the water sample filter in your measurement.
4. Select this option to include the water sample filter in the total tube volume
![]()
5. Press APPLY
— Setup IOND parameter monitoring and alarms
1. Press the Control and alarms tab
2. In the Nominal value fields, type-in your desired value for each parameter
3. Choose if you would like to activate Alarm monitoring for each parameter
If you choose to use this feature, specify the lower and upper limits. If a parameter falls outside of your specified range, an alarm will be triggered by your primary device.
4. If you would like to disable the IOND control when the alarm for a certain parameter is triggered, choose this option.

The Double-check feature allows the IOND to perform an additional measurement IF the new results deviate by more than a certain amount when compared to the previous result. For example, if your last calcium result was 440 mg/L and the double-check feature is set to 40 mg/L, the IOND will perform an additional measurement IF the new measurement result was +/- 40 mg/L away from the last test result.
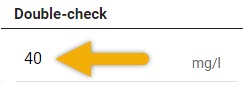
This feature comes in handy because if the IOND performs a measurement during a water change, auto top off or dosing event, the outlier results can be discarded after the re-test is completed. If you do not wish to use this feature, leave this field set to (0).
Last IOND measurement (Calcium): 440 mg/L
Double-check: 40 mg/L
When the next measurement occurs, if the result is 400 mg/L or lower, the IOND will perform an additional measurement.
If the result is 480 mg/L or higher, the IOND will perform an additional measurement.
At the end of the re-test, if the results fall in-line with the previous measurement results, the IOND will automatically discard the outlier.
— Prepare MUI sensor
Now that the IOND basic settings are setup, it’s time to prepare the IOND sensor.
For optimal sensor performance, the active sensor tip (front, slotted area) must be soaked in water before it is connected to and used by the IOND.
1. Remove the foil or protective cap (if present) from the sensor tip; this keeps the sensor tip moist during transport
2. Place the sensor in a suitable container and slowly fill it with tap water or DI water (no saltwater!) until the front sensor slot is completely submerged (marked below as Min). Do not fill above Max line.
3. Allow the sensor to soak for at least 30 minutes before proceeding to the next step

— Install MUI sensor
With the sensor now prepared, you can connect it to the IOND and prepare it for its first measurement.
1. Loosen the IOND’s sensor locking nut by giving it just a few turns.
2. Insert the MUI sensor as shown in the illustration below
Take note of the guide grooves on the right and left of the sensor shaft. These grooves ensure correct positioning of the sensor.


3. Gently push in the sensor until it meets the stop-point.


4. Tighten the locking nut firmly.
When installing the sensor, make sure the locking nut is tight enough so you don’t have any leaks from the sensor fitting. If need be, use an appropriate tool (24mm wrench) to carefully tighten the nut.
An insufficiently tightened nut may also result in air entering the IOND measuring cell which will lead to poor measurement results! Premature aging of the sensor is also possible!
DO NOT apply excessive force when tightening otherwise you risk damaging the sensor and fitting!
5. Connect the MUI sensor to the MUI sensor port on the IOND.

— Activate IOND Sensor
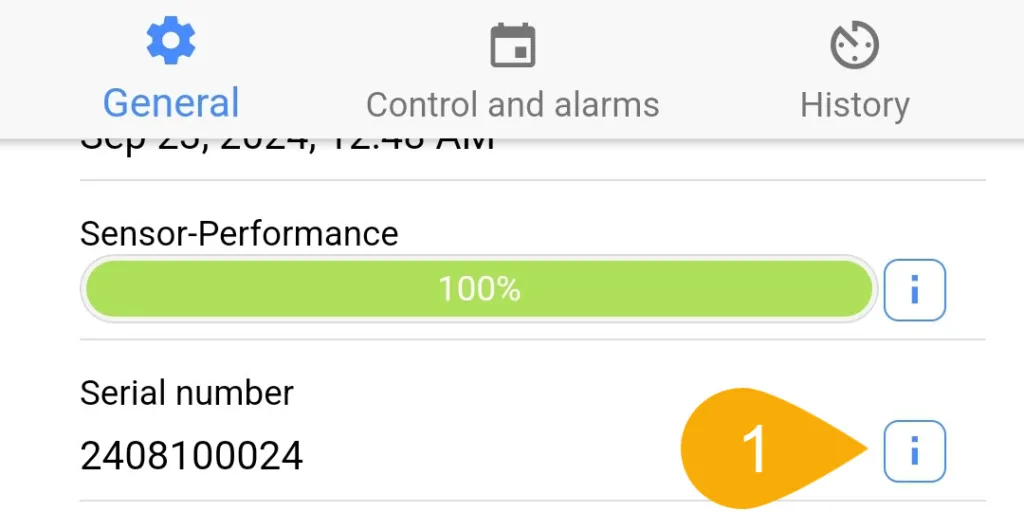
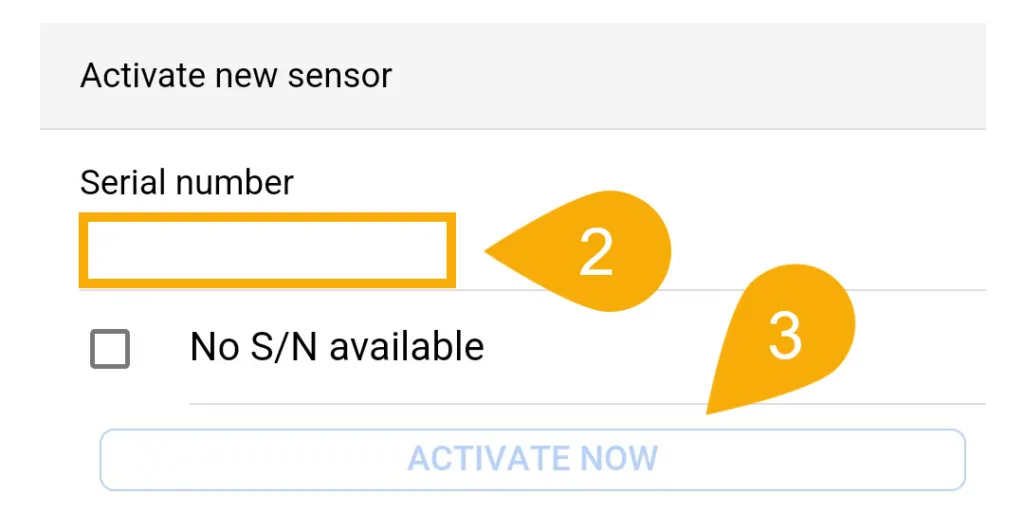
Before you proceed any further, you must activate the sensor by entering the serial number of the sensor on the tag.
1. In the Serial number section, press (i) icon
2. Type-in the serial number that is written on the sensor cable tag
3. Press ACTIVATE NOW
— Prepare for first IOND measurement
After installing the MUI sensor, you can prepare the IOND for its first measurement.
1. In the Maintenance section, press PREPARE MEASUREMENT CELL
The assigned dosing pumps will now prime the measuring cell and internal tubes.

After the measurement cell is prepared, you must give the MUI sensor 12 hours so it can stabilize with the provided liquids. Once these hours have passed, you can begin measuring at any time.
2. After 12 hours, you can trigger a manual measurement by pressing the Start measurement now button

OPTIONAL: Add IOND tile to Dashboard
Now that your IOND is setup, you can add the IOND tile to your Dashboard. Doing so will allow you to see the IOND’s last measurement results directly from the dashboard.
Click here for instructions on customizing your GHL Dashboard.

OPTIONAL: Add IOND results to Email notifications (ProfiLux 3 / 4E / 4 only)
If you would like to see your IOND’s last measurement results in your email notification, add the following token to your new or existing email body:
Calcium:$$SENV[i0]$$
Magnésium:$$SENV[i1]$$
Potassium:$$SENV[i2]$$
Sodium:$$SENV[i3]$$
Nitrate:$$SENV[i4]$$
Once you are comfortable with the measurement values provided by the IOND, you can take it a step further and use the device to automatically adjust your existing dose schedules.
Doing so will allow the IOND to continuously monitor your parameters and automatically make adjustments for you when necessary.
Click here for instructions on how to setup this feature.
As of firmware 7.41 (ProfiLux 4) and 1.53 (Doser SA), to further improve the performance of the sensor, each IOND measurement will use 44 – 45.6ml of Reference Fluid.
Troubleshooting and additional information
For additional information and troubleshooting, we recommend you take a look at the following support articles in our Knowledge Base.
ION Director Tips, Maintenance and Troubleshooting
ION Director Sensor Troubleshooting